
Installation Guide

Page 3 of 4
www.generalspecialtiesmfg.com
208-265-5244
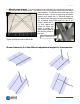
When all the panels are on the rails there may or may not be some excess rail left, depending on
the brand of PV you are using. This excess may be trimmed off, or can be left at the bottom of
the array to create more distance between it and the mounting surface to allow for snow build
up without shading the bottom panel.
Installation Instructions
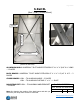
1. Bolt rails and braces together. Rails and braces come with some pre-assembly using
5/16” X ¾” bolt, washer and flange nut. You can tell the difference between them because
the two rails are longer than the two braces. Note the pictures and which direction the T-slot
is for the rail and the brace.
(View from Top Left) (View from Top Right)
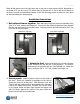
2. Attach the feet. As shown at left the foot for the rails goes
on the outside of the rail with the T-slot pointed in. The feet for
the braces go on the inside with the T-slot pointed out. Attach the
feet by using the 3/8” X 1 ¼” bolt, washer and flange nut.
3. Attach panels. Attach a panel to figure out the width of
the array. Panels are installed in landscape so the rails go
across the short axis of the panel. Slide stainless bolts into
T-slot of rail and position so they are opposite to the mounting
holes on the frame
of the panel. The bolts slip into the holes
on the panel frame and then finger tighten the flange nuts
with the flange against the inside of the panel frame and
thread onto the bolt from underneath.
Brace
Rail
Brace
Rail