
Installation Guide

Page 2 of 4
www.generalspecialtiesmfg.com
208-265-5244
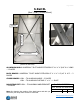
Fastening Hardware
2 – 3/8” X 1 ¼” bolt, washer and flange nut to attach Foot to Rail
2 – 3/8” X 1 ¼” bolt, washer and flange nut to attach Foot to Back Brace
2 – 5/16” X 1 ¼” bolt, washer and flange nut to attach Rails to Back Brace
2 – ¼” X 5/8” bolt and flange nut to attach Flat Bar Cross Brace to Back Brace
4 – ¼” X 5/8” bolt and flange nut to attach two Cross Braces to Back Brace
1 – ¼” X 1” bolt, washer and flange nut for three Cross Brace connection
4 – ¼” X 5/8” bolt and flange nut per panel to attach to rail
NOTE: You will need to purchase whatever fasteners are appropriate for attaching the mount
to your particular roof or other mounting surface.
Installation Notes:
In the northern hemisphere, this mount should be oriented so the panels on it face as close to
due south as possible. In the southern hemisphere, facing north.
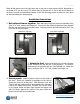
The mount is made to attach to a roof, side wall, or flat horizontal surface. If the mount is to be
attached to a roof, lag bolts may be used if at least 4” of the 3/8” lag bolts on each mounting foot
are screwed full penetration into a solid wood member. For side wall installations, the upper
mounting feet must be attached with bolts that go completely through the wall or if 3/8” lags are
used, they should be screwed into at least 3” of solid wood, e.g. into a 2" X 6" wall stud. If
mounted to the ground, it must be similarly fastened to a concrete foundation, or wood deck.
It is important that nothing casts a shadow on the solar panels at any time of day. Any shadow
falling on the panels will greatly reduce the amount of power generated by the array. For this
reason it is important to install the mount away from eaves, overhangs, and other obstructions.
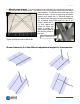
There are several adjustment positions for this mount. In any given season, the surface of the
solar panels should be as close to perpendicular to the rays of the sun as possible.
When mounting on a roof top it is desirable to install the bottom of the panels near the ridgeline.
For optimum southern exposure this ridge should run east – west. If you mount the panels on
the southern roof they may not lie down flat enough in the summer for a perpendicular orientation
to the sun. This is particularly true on steep roofs.
If you have someone to help you lift the assembled mount into place, go ahead and fasten the
panels onto the rails before installation. Note: Three “D” panels and rails = approx. 194 lbs. Use
the mounting holes on your panels which will allow you to have the best access to the wiring
junction boxes on the back. Hold this first panel 2" down from the top end of your slotted rails.
This will allow the back brace to stick past the rails when the array is laid down flatter as in
summertime orientation. Attach this first panel with the stainless bolts provided, finger tighten
only. Attach the rest of the panels one at a time below the first one. There should be
approximately ¼” between panels.