
Installation Manual


Page 2 of 8
www.generalspecialtiesmfg.com
208-265-5244
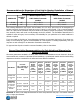
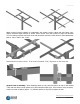
Materials
Box #1: Box #4:
- Tee with Center tube, hardware & instructions - Longitudinal (1 of 2)
Box #2: Box #5
- Crosspiece (1 of 2) - Longitudinal (2 of 2)
Box #3 Box #6
- Crosspiece (2 of 2) - Rails (4)
Hardware Packets in Box #1:
Bag #1:
- Bolts for aluminum angle brackets (bag 6) to rails.
- Square head set bolts for Tee.
Bag #2:
- Bolts and nuts for crosspieces to longitudinals (use included galvy square washers in
bag 6 with these).
Bag #3:
- U-bolts for aluminum angle brackets to longitudinals (use included aluminum angle
brackets in bag 6 with these).
Bag #4:
- U-bolts for center tube end plates on Tee assembly to crosspieces.
Bag #5:
- Instructions.
- Stainless bolts and nuts for panels to aluminum rails.
Bag #6:
- Galvy square washers for crosspieces to longitudinals (use with bag 2).
- Aluminum angle brackets for longitudinals to rails (to use with bags 1 & 3).
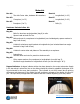
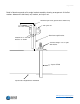
Degree Indicator: A degree indicator sticker has been placed on the center tube and a dimple
in the tee socket is where the line on the sticker should be pointed to establish the degree of tilt
from horizontal for the array that you desire. This indicator is not 100% exact (due to printing
differences and placement of the sticker) but will provide an estimate of the degree of incline for
you. We hope that you appreciate this feature and that it makes adjusting your array easier.
This shows the indicator on the center tube.
Although difficult to see in this picture the
arrow shows the location of the “dimple”.