Gimbal
DISCLAIMER AND WARNING Thank you for purchasing our Gimbal. Before you start PLEASE read this manual and become familiar with Gimbals’ components and operating modes to ensure proper operation. The information contains herein affects your safety and your legal rights and responsibility. Failure to read and follow the instructions and warnings may result in serious injury to you or damage to your device or property.
GLOSSARY The following terms are used throughout the product literature to indicate various levels of potential harm when operating this product. Warning: Procedures, which if not properly followed, may incur property damage, grave accident, or serious injury. CAUTION: Procedures, which if not properly followed, may incur property damage and serious injury. NOTICE: Procedures, which if not properly followed, may incur property damage or minor injury.
SAFETY OPERATION GUIDELINE The Gimbal should be used in temperatures from 0℃ to 40℃. Use of the battery in environments above 40℃ can lead to a fire or explosion. Use of battery below 0℃ can lead to serious damage. IMPORTANT BATTERY SAFETY INFORMATION • DO NOT use any third-party or unknown accessories or batteries. • DO NOT disassemble the battery. • DO NOT short-circuit the battery. Short circuiting may occur when the battery touches other metal objects. • DO NOT charge the battery in direct sunlight.
STORAGE 1. DO NOT leave the Stabilizer Gimbal hicle on hot days. 2. Store Gimbal in dry environment, and never store the Gimbal in any environment with temperature of over 60℃. 3. Do not leave the Gimbal unused for too long after it has been completely discharged to prevent over-discharge of battery which may result in battery damage and permanent damage. SAFETY OPERATION GUIDELINE ■ CAUTION: 1.
■ NOTICE 1. Hold the Gimbal’s Handle still in when it is powering up to ensure it starts up successfully. 2. Make sure the batteries are fully charged before each time of use. 3. Discharge the battery to 40%~65% if it will NOT be used for over 10 days. This can greatly extend the battery life." 4. Charge and Discharge the battery completely once every 3 months to keep it active.
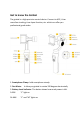
Get to know the Gimbal The gimbal is a high-precision control device. Connect to APP, it has more face tracking, time-lapse function, etc. which can offer you professional grade video. 1. Smartphone Clamp- hold smartphone steady. 2. Pan Motor- it allow you gimbal to rotate 330 degrees horizontally 3. Battery Level Indicator- The button shows how much power is left.
67%-100% “L” “M” “H” lights on 4. Joystick- Control movement UP/DOWN (tilt motor) and LEFT/RIGHT 5. Bluetooth Light- Blue Light is connected, Flashing is trying to connected. 6. Operation Mode indicator Light-Display current operation mode of the Gimbal 6.1 Light- Gimbal in Pan & Tilt Follow Mode 6.2 Light- Gimbal in Pan Follow Mode 6.3 Light- Gimbal in Lock Mode 7.
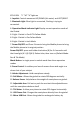
connecting the Micro-USB to any standard USB outlet or phone charger 16. Shutter Button: Press once to take a picture, 17. 1/4 Thread Screw- Allow the gimbal to mounted on the device through the /4 thread screw. USB CONNECTION IN-USE CHARGING Connect the Micro USB Port on the side of gimbal's handle to a power source SUCH AS a power pack (not include) to extend runtimes.
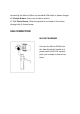
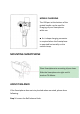
MOBILE CHARGING The USB port at the bottom of the gimbal handle can be used for charging of your Smartphone while use. ■ An L-shape charging connector is required when the Smartphone is mounted horizontally on the mobile clamp. MOUNTING SMARTPHONE Place Smartphone to mounting clip as show. Slide the Smartphone to right until it touches Tilt Motor. ADJUST BALANCE If the Smartphone does not stay leveled when mounted, please do as following: Step 1: Loosen the Roll balance Knob.
Step 2: Make small Adjustment by sliding the horizontal arm, until the mobile balance almost. Step 3: Tighten the Thumb Screw after the phone is well balanced in level to ensure normal operations. NOTE: Proper adjustment of balance ensures better power saving during operation. The gimbal may still function well when the gravity center is not properly configured; however, it may lead to more power consumption on the motors, and can greatly affect the torque output.
Power ON/OFF+ Mode Button OPERATING MODES SWITCHING GIMBAL MODES a. The gimbal enters default Pan & Tilt Following Mode each time when powered on. Step 2: Click power button to Switch into Pan Following Mode.
Following Mode: Pan Following Mode: Locking Mode: Roll axes is locked. Tilt & Roll are locked. All 3 axes are locked. The camera pan and tilt are following the movement of camera. Pan axis rotates smoothly with turn of wrist.
ROHS This product is in compliance with Directive 2011/65/EU of the European Parliament and of the Council of 8 June 2011, on the restriction of the use of certain hazardous substances in electrical equipment. FCC Caution. This device complies with part 15 of the FCC Rules. Operation is subject to the following two conditions: (1) This device may not cause harmful interference, and (2) this device must accept any interference received, including interference that may cause undesired operation.