
User Guide


Gen-Eye USB, USBW, USBP
®
Video Pipe Inspection/Location System
8
OPERATION
1. Release the reel lock and loosen the drag break on the side of
the reel.
2. Slide the camera into the line.
Be sure that the push rod is
rated for the size pipe you are
inspecting. Be careful not to
force the camera around tight
bends. If you see an ob-
struction, stop. Do not at-
tempt to clear the pipe by
using the camera head. Al-
ways use the proper tool for
the job.
3. Once the camera is in the pipe, adjust the lights to a level which
produces the best picture with the least amount of light. This will
vary depending on pipe conditions. You may also adjust the
brightness and contrast controls on the monitor. In some cases
white or lighter colored objects may cause the picture to “flare” or
“wash out”. If this happens, simply adjust the light level until a
good picture is achieved.
4. Push the camera slowly and carefully during the inspection -
taking note of the pipe condition for possible hazards that may
entangle or damage the camera on entry or retrieval.
5. When negotiating a corner, care should be taken not to butt the
nose of the camera against the sidewall with any force. It would
be better to let the camera “work” its way around the corner.
6. Should resistance become extreme, or the camera gets entan-
gled or stuck, slowly push and pull back and forth to free it.
Sometimes rotating the push rod may also help.
TO TAKE A PHOTO
1. To take a photo, press the OK button on the Recorder Keypad.
The photo will be stored in the same location as your video. A
yellow box will appear briefly on the screen to notify you that a
photo has been taken.
TO PLAYBACK VIDEO—Stored as .mp4 files
1. To playback video, press the MENU button on the recorder key-
pad and use the arrow buttons to navigate to PLAY VIDEO.
Press MENU to enter the playback menu.
2. Using the arrow buttons, select the video you wish to review.
Press OK to start playback. Press ESC to stop.
TO VIEW SNAPSHOTS
1. To view snapshots, press the MENU button on the recorder key-
pad and use the arrow buttons to navigate to VIEW SNAP-
SHOTS. Press MENU to enter the snapshots menu.
2. Using the arrow buttons, select the image you wish to review.
Press OK to view. Press ESC to exit.
FILE MANAGEMENT
Selecting FILE MANAGEMENT brings up the following selections:
Copy video from external
Copy snapshots from external
Delete files from external
RECORDER MENU SETTINGS
The settings and configuration of the recorder can be accessed by
pressing the MENU button while a live picture is displayed on screen.
This manual does not cover the scope of the different menu settings.
It is highly recommended that you do not change any setting found on
the setting menu as they are factory set for optimal recording and
playback.
TO RECORD A VIDEO
1. Make sure the USB flash drive has been inserted into the USB
slot above the keyboard. The recorder will accept USB flash
drives up to 128 GB. Using larger capacity flash drives may pro-
duce unstable results.
2. To record a video, press the REC button on the Keypad. A red
box will appear on the top left corner of the monitor screen to
indicate the unit is recording.
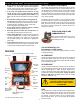
RECORDING THE INSPECTION
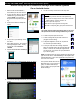
USB Recorder Keypad
ESC Escape a Menu or Stop Recording
MENU Call Up A Menu, Confirm Menu Entry
▲
Up
OK Press To Take A Snapshot
▼
Down
REC Record—Press once to start recording.
If pressed while recording it will pause.
Press again to resume recording.
3. To pause the recording, press REC. Press the REC button again
to resume the recording.
4. To end the recording, press the ESC button. Note: If you remove
the USB flash drive from the port before you stop recording, your
recording will not be saved.