
User Guide


Gen-Eye USB, USBW, USBP
®
Video Pipe Inspection/Location System
5
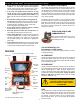
VOICE OVER MICROPHONE
This unit includes an internal microphone so you can add commentary
to your videos. Press the MIC button to activate the Microphone. A
light will illuminate when the Mic is "live". Press the MIC button again
to MUTE the microphone. If you hear audio feedback (a screeching
sound) when trying to use the microphone, it is because the volume
control on the monitor is turned up too high.
VIDEO/AUDIO OUT JACKS
Video and audio can be recorded on an external device. Use the jacks
located on the control panel to connect to the external device.
CAMERA TEST PORT
Use this connector to troubleshoot video and light problems in the
field. (See "Camera Removal" in Maintenance Section.)
REEL CONNECTOR
Connect the interface cord from large or mini-reel to Reel Connector,
located on the control panel.
MENU BUTTON
Press the MENU button for help.
LED DIMMER CONTROL
You can adjust the camera LED light level by using the camera light
buttons located on the Keyboard. Press the UP button to increase the
camera light level, and the DOWN button to decrease light level.
REEL SIZE SWITCH
To insure the footage counter is as accurate as possible, be sure the
Reel Size switch is set to match the reel you are using - Standard or
Mini-Reel.
BATTERY CHARGER (USBP only)
Recharging time is approximately 3 hours, but varies depending upon
air temperatures and the condition of the battery. The battery does not
have to be deep cycled, but the battery may have to be replaced over
time depending on usage and conditions.
The battery can be recharged from either an AC outlet, or from an AC
inverter outlet in your car or truck.
1. Connect the appropriate cord for your charging method to the
command module, then to the power source.
2. Switch the Battery Charger to ON. When the battery is fully
charged (as indicated by all five lights illuminated on the Battery
Charge Indicator), switch the Battery Charger to OFF and discon-
nect the command module from the power source.
YOU MUST SWITCH THE BATTERY CHARGER TO OFF BEFORE
TURNING THE COMMAND MODULE OFF OR DISCONNECTING
THE COMMAND MODULE FROM THE CHARGING SOURCE.
Do not charge the battery if the air temperature is below 30° F or
above 104° F.
SAVING A PAGE
To save a page to memory, go to the page you wish to save by press-
ing [PAGE SELECT] followed by 1-9 (i.e. [PAGE SELECT]+[5]). Type
text on-screen. Press [SAVE PAGE] to save screen text to the se-
lected page.
SETTING TIME/DATE
Hold [CTRL] and press D. “YYMMDDHHMMSSam” appears on the
screen. Type in the correct time and date in this order: Year, Month,
Day, Hour, Minutes, Seconds, AM/PM (A for AM and P for PM). If you
wish to quit, simply hit the [ENTER] button and date and time entry
line will disappear.
Note: The clock is preset for 12 hour mode (i.e. 01 to 12) if you have
an NTSC system. The clock is preset for 24 hour mode (i.e. 01 to 24)
if you have a PAL system.
TO SET FOOTAGE COUNTER
To set the footage counter to zero [000.0] before an inspection, press
[SET/CLR/CNTR] followed by [ENTER]. To set the footage counter to
a preset value, press [SET/CLR/CNTR]. Then press either [+] or [-]
followed by 4 digits.
To insure the footage counter is as accurate as possible, be sure the
Reel Size switch is set to match the reel you are using - Standard or
Mini-Reel.
BATTERY STRENGTH INDICATOR (USBP ONLY)
The USBP includes a rechargeable battery for operating in a remote
location far from a power source. The battery lasts up to 4 hours.
To view the battery strength status, press and hold the ON/OFF but-
ton beneath the indicator lights. The number of illuminated indicator
lights reflects battery power level. For example, when all five indicator
lights are illuminated, the battery is fully charged. When only one indi-
cator light is illuminated, the battery is almost depleted.
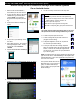
TITLER/KEYBOARD
This Gen-Eye Command Module has a built-in full keyboard titler. It
gives you nine pages of text to easily add your company name and
job location to your inspection videos.
Note: The battery charger power switch must be turned off and then
back on each time the unit is turned off or unplugged and then turned
back on or plugged back in for the charger function to resume.
This is a fail-safe built into the charger.