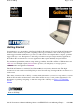
GoBook II Help Page 1 of 76 Getting Started Congratulations on your purchase of the Itronix GoBook II computer! Your new GoBook II features the most innovative advances in portable computing technology. It combines state-of-the-art ergonomics with a rugged, durable architecture to provide you with a notebook computer that is compact, powerful, rugged and easy to use.
GoBook II Help Page 2 of 76 Checklists After opening the package, carefully inspect the contents. Contact your dealer if any items are missing or appear damaged. The shipping carton should contain the following: STANDARD The Itronix GoBook II computer Battery ADP-90AB or ADP-75FB AC adapter with power cord 12.1 inch XGA display Stylus Shoulder Strap GoBook II Quick Start Guide OPTIONS The following items are normally optional, but some vendors may include them in the standard package.
GoBook II Help Page 3 of 76 in excess of local regulations. For non-proprietary accessories such as PC Cards or printers, ensure that the accessory functions properly in your computer before making the purchase. Your system vendor may be able to recommend reliable brands and models. Features High Capacity Hard Disk Drive The computer has a high capacity hard disk drive, enabling you to install your favorite programs and store large multimedia files.
GoBook II Help Page 4 of 76 GoBook II™ Help Precautions You can use your computer under a wide range of environmental conditions. However, to ensure long use and continued high performance, consider the following factors when setting up your computer: Follow all warnings and instructions noted in this documentation and in the Windows Help and Support, found on the Start Menu.
GoBook II Help Page 5 of 76 72_0103_003 10 December 2002 © 2002 Itronix Corporation. All rights reserved. GoBook II™ Help The First Time. . . Using your computer for the first time involves: Installing the battery Connecting the AC adapter to the computer Turning the Computer On and Off Adjusting the Volume Installing the Battery Make sure the computer is sheltered when you install the Lithium Ion battery; the computer is not weather sealed until the battery is properly installed.
GoBook II Help Page 6 of 76 3. Connect the AC adapter power cord to an AC outlet. 4. Lift the display to open the LCD. 5. Open the LCD panel to a comfortable viewing angle. 6. Press the Power Button to turn ON the power. Turning the Computer On and Off You can operate the computer while the battery is charging, while on external power , or on battery power only. To turn on the computer Press the Power Button button once, and then give the system time to respond. To turn off the computer 1.
GoBook II Help Page 7 of 76 FN + F10 toggles the volume mute on or off You can also adjust the volume with the Windows volume control applet, which is located on the taskbar and looks like this . NOTE Adjusting the volume using the function keys produces only a slight change with each press. It may take several presses to increase or decrease the volume to a level that you desire. 72_0103_001 10 December 2002 © 2002 Itronix Corporation. All rights reserved.
GoBook II Help Page 8 of 76 NOTE If you cannot select objects accurately with the stylus you may need to re-calibrate the touch screen. This can be accomplished by revisiting the procedure above. Adjusting the Screen You can adjust the display brightness for better viewing. Use the following keys to make adjustments: To Do This... Press Lighten the display FN+F7 Darken the display FN+F6 Setting the Date and Time To set the date and time 1.
GoBook II Help Page 9 of 76 72_0103_003 10 December 2002 © 2002 Itronix Corporation. All rights reserved. GoBook II™ Help Startup Problems? If your computer does not operate, try these solutions. Connect the AC adapter to charge the battery if it is not charged. NOTE The Power LED on the AC adapter should be lit as well as the External Power Indicator on the GoBook II if the AC adapter is connected and functioning properly. Additionally, one of the power icons should appear in the task tray.
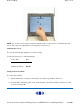
GoBook II Help Page 10 of 76 Individual Parts The following diagrams and descriptions provide an overview of your GoBook II computer. Hover the mouse over each number on the picture to see a description. Front View 1. Touch Screen Display 2. Display Latches 3. Antenna 3a. Antenna (internal mini-WLAN) 4. Activity Indicators 5. Power Button 6. Touchpad 7. Scrolling Button 8. Touchpad Buttons 9. Power / Wireless Modem Indicators 10. Speakers file://C:\Documents%20and%20Settings\harwoodm.ITRXNT1\Local%20Sett
GoBook II Help Page 11 of 76 Back View Cooling Fan Power Jack 15-Pin VGA Port 60-Pin Multi-IO Port 9-Pin Serial Port 6. PS2 Port 7. RJ-11 Modem Jack 8. RJ-45 Network Jack 9. USB Port 10. D-Rings file://C:\Documents%20and%20Settings\harwoodm.ITRXNT1\Local%20Settings\Temp\~...
GoBook II Help Page 12 of 76 Left Side View 1. PC Card Slot 2. Microphone Jack 3. Audio Jack 4. Stylus Right Side View 1.Antenna 2. Media Bay - CDROM, DVD, Floppy Disk, CDRW, or Media Bay Battery 3. Radio Bay 4. Cooling Fan 5. Security Slot file://C:\Documents%20and%20Settings\harwoodm.ITRXNT1\Local%20Settings\Temp\~...
GoBook II Help Page 13 of 76 Display with Stylus LED Activity Indicators The activity indicators, located above the keyboard, light up when a particular function of the computer is active. Each indicator is marked with a corresponding symbol and is visible when the lid is open or closed. LED numbers are from left to right. Icon & LED # Function LED Mini PCI LED #1 Description Lit Power is on to the MiniPCI Wireless LAN file://C:\Documents%20and%20Settings\harwoodm.ITRXNT1\Local%20Settings\Temp\~...
GoBook II Help Not Used Page 14 of 76 Lit LED #2 Lit LED #3 Disk Status (HW) Not lit Media Drive Lit Bay LED #4 LED #5 Number Lock Lit Caps Lock Lit LED #6 Scroll Lock Lit LED #7 Not used at this time The hard disk drive is being accessed The hard disk drive is not being accessed The computer is accessing the CDROM, the DVDROM, or the Floppy drive. The keyboard is in Num Lock mode.
GoBook II Help Icon Function LED Page 15 of 76 Description Green External Power LED off Green Power Flashing Green Green Flashing Green Battery LED off Green Wireless Flashing Green Modem LED off External power is connected to the unit. External power is not connected to the unit.
GoBook II Help Page 16 of 76 72_0103_003 10 December 2002 © 2002 Itronix Corporation. All rights reserved. GoBook II™ Help Keyboard Basics The keyboard on the GoBook II computer looks much like the keyboard of a typewriter and operates in almost the same way. While typewriter keys put characters on paper, the keys on the laptop enter characters in the computer and perform certain functions, depending on the application or program.
GoBook II Help CAPS LOCK Key CTRL ENTER ESC PRTSC SHIFT FN SPACEBAR TAB Page 17 of 76 to the left of the cursor is erased. If other functions are designed for this key, the key will be printed with the appropriate legend. Pressing the CAPS LOCK key one time locks keys A through Z in the UPPER CASE position. Pressing the CAPS LOCK key again returns the letters to lower case. While in the upper case mode, pressing the SHIFT key results in lowercase characters when entered.
GoBook II Help Page 18 of 76 Hold the FN key while pressing the numbered function key. Function key FN+F1 FN+F2 FN+F3 FN+F6 FN+F7 FN+F8 FN+F9 FN+F10 Description Toggles display on / off Toggles between LCD / CRT displays Suspend to RAM / HDD Decreases LCD brightness Increases LCD brightness Decrease volume Increase volume Mutes the audio Numeric Keypad The numeric keypad is embedded in the keyboard area. The embedded keypad emulates the numeric keypad typically found on a full-size keyboard.
GoBook II Help Page 19 of 76 4. The left and right buttons located directly below the touchpad are the same in function as those on a two-buttoned mouse. Clicking these buttons makes selections, drags objects, or performs a variety of other functions depending on the software. To select an object, first move the pointer over the object you want to select, and then press the left button one time. The functions of these buttons are software specific.
GoBook II Help Page 20 of 76 than holding down a mouse button. The scrolling button is located between the touchpad buttons. Push the top of the button to scroll up in a document or Web page; press the bottom of the button to scroll down. Connecting an External Keyboard or Mouse You can use your GoBook II computer with an optional external keyboard, numeric keypad, or IBM PS/2 compatible mouse.
GoBook II Help Page 21 of 76 2. Connect the monitor’s power cable to a power outlet and turn on the monitor. 3. If the new monitor has not automatically been detected and is not displaying what appears on your GoBook II’s LCD screen, open the Control Panel. 4. Double-tap Display. The Display Properties window opens. 5. Tap the Settings tab. Then select the Advanced button. 6. Tap the S3DuoVue tab and select the CRT box the enable display on an external monitor. 7.
GoBook II Help Page 22 of 76 Inserting a CD-ROM or DVD-ROM Disk 1. Press the button on the front of the drive to open the disk tray and pull the tray open. 2. Place the disk on the tray, label side up. 3. Place the disk on the central spindle and press gently until the disk clicks into place. 4. Slide back the tray until it clicks shut. Removing a CD-ROM or DVD-ROM Disk 1. Make sure the computer is not accessing the CD-ROM/DVD-ROM drive. 2.
GoBook II Help Page 23 of 76 Always hold the disc by the edges; avoid touching the surface of the disc. Use a clean, dry, cloth to remove dust, smudges, or fingerprints. wipe from the center outward. Do not write on the surface of the disc. Extremes in temperature may damage discs. Store discs in a cool dry place. Do not use benzene, thinners, or cleaners with detergent. Only use CD0-ROM/DVD-ROM cleaning kits. Do not bend or drop the discs. Do not place objects on top of discs.
GoBook II Help Page 24 of 76 Installing a Card 1. The top side of a PC Card is usually identified with a label. Insert the card into the slot with the top up and the edge with pinhole contacts going in first. You will feel some resistance as the card slides into the back of the slot. 2. PC Cards require drivers, or a program that allows the operating system to use a specific device. Many drivers are included with Windows, but if not, you will be prompted to install the driver included with your card.
GoBook II Help Page 25 of 76 Making Connections Your computer is equipped with a full array of ports and connectors, including standard input/output (I/O) ports for quickly and easily adding peripheral devices such as printers and monitors. Refer to documentation included with individual devices for details on connecting these devices to your computer. Along with the standard ports found on most computers, your computer may also include optional modem and LAN ports for advanced communications technology.
GoBook II Help Page 26 of 76 The 9-pin serial port can be used to connect your computer to serial devices such a a fax/modem or a serial mouse. This port is identified as COM1 and is 16550A compatible. 5 PS/2 Port You can use the mini-DIN PS/2 port to connect your computer to a PS/2 device such as a PS/2 keyboard or mouse. 6 Fax/modem RJ-11 Jack The fax/modem can transmit data using the 56 Kbps V.90 or V.92 protocol, and send and receive faxes at 14.4 Kbps.
GoBook II Help Page 27 of 76 1 PC-Card Slot Use this slot to connect PCMCIA-card devices. 2 Microphone Jack Connect a microphone to this jack to record audio. 3 Audio-Out Jack Connect external speakers or a stereo headset to this jack to listen to multimedia. 72_0103_003 10 December 2002 © 2002 Itronix Corporation. All rights reserved. GoBook II™ Help Right Side Connector Hover the mouse over the number on the picture to see a description. file://C:\Documents%20and%20Settings\harwoodm.ITRXNT1\Local%20
GoBook II Help Page 28 of 76 1 Security Slot Your computer has a Security Slot that can be used with a standard laptop locking device, such as a Kennsington Lock. You can connect the GoBook II to a large object with the lock to prevent theft of your GoBook. See the documentation that comes with your lock for more information. 72_0103_003 10 December 2002 © 2002 Itronix Corporation. All rights reserved. Wireless Communications The GoBook II includes two antennas for wireless communication.
GoBook II Help Page 29 of 76 In order to comply with FCC RF exposure requirements when the Cisco MPI-350 WLAN Card is transmitting, a minimum separation distance of 1.5 cm must be maintained between the back of the LCD display and the user/bystander's body. In order to comply with FCC RF exposure requirements when the Sierra Wireless AirCard 555/550 Modem Card is transmitting, a minimum separation distance of 1.
GoBook II Help Page 30 of 76 Page Blank for Future use. 72_0103_003 10 December 2002 © 2002 Itronix Corporation. All rights reserved. GoBook II™ Help GPRS For specific information about your GPRS radio please refer to the manufacturer's documentation.
GoBook II Help Page 31 of 76 1. The Cisco MPI350 MiniPCI slot with two antennas in the display. The Cisco MiniPCI Card User’s Manual may already be installed on your GoBook II computer. Refer to it for more information. 2. A PC Card Cisco 350 WLAN in the CARMA slot of the computer. The Cisco PC Card User’s Manual may already be installed on your GoBook II computer. Refer to it for more information. 72_0103_003 10 December 2002 © 2002 Itronix Corporation. All rights reserved.
GoBook II Help Page 32 of 76 Over time, as the battery is repeatedly drained and recharged, battery performance will decrease. Occasionally, the battery needs to be recalibrated for maximum performance. This is the purpose of the Battery Calibration application, to restore the battery to maximum performance levels. To run the Battery Calibration program tap Start, Programs, and Mobile Computer Tools. After starting calibration, the Battery Calibration application requires no further input from the user.
GoBook II Help Page 33 of 76 1. Click Start, Settings, Control Panel, Power Management (Power Options); then tap the Power Meter tab. 2. Moving the cursor to the battery icon on the taskbar, without selecting anything, is the simplest way to check on battery power status. The status will show as a pop-up when you mouse-over the icon. NOTE If you do not see the battery icon, enable it in Start, Settings, Control Panel, Power Management (Power Options).
GoBook II Help Page 34 of 76 Battery Charging When you use the AC adapter to connect your GoBook II to a power outlet, the internal battery will begin to recharge automatically. While the battery is charging, the Battery Power Indicator will be flashing green. When the battery is fully charged, it will turn off. If your computer is turned off, or suspended to RAM, a fully discharged battery will take about 4 hours to recharge.
GoBook II Help Page 35 of 76 There are four ways to initiate suspend mode.
GoBook II Help Page 36 of 76 orientated. Insert the battery into the battery compartment. Check that the latches lock back into position. 6. Charge the new battery by plugging the computer into AC power. Heat Considerations The computer’s processor has been specially designed to consume little power and generates very little heat. However, working in a hot environment, or working for long periods may raise the temperature. Your computer takes the following steps to lower temperature: 1.
GoBook II Help Page 37 of 76 GoBook II™ Help Using the Setup Utility The Setup Utility allows you to configure your computer’s basic settings. When you turn your computer on, the system reads this information to initialize the hardware so that it can operate correctly. You can use the Setup Utility to change your computer’s start-up configuration. For example, you can change your system's security routine.
GoBook II Help Page 38 of 76 The Setup Utility main menu has seven main submenu options: Standard CMOS Setup Advanced CMOS Setup Power Management Setup Peripheral Setup Stealth Mode Setup Auto-Detect Hard Disks Change User Password Change Supervisor Password Save Settings and Exit, and Exit Without Saving are used to exit the Setup Utility.
GoBook II Help PgUp PgDn Enter F2 or F3 F10 Page 39 of 76 Use the PgUp, PgDn keys to modify a field. Use PgUp to increase a value, such as a date or number, and PgDn to decrease it. For other types of choices, such as "enabled," or "disabled," use either key to move between choices. Makes a selection. Changes the color of the graphic display. Saves changes, then exits 72_0103_003 10 December 2002 © 2002 Itronix Corporation. All rights reserved.
GoBook II Help Page 40 of 76 Time Floppy Drive A Not Installed 24 hour format. The date can be set from January 1, 1980 to December 31, 2099. The values set in these two fields take effect immediately. Indicates if a floppy disk drive is installed. Default is 1.44 MB (3 1/2"). If this field is set to "Not Installed" the system will not detect a floppy inserted in the media bay. 1.44 MB (3 1/2") Type Pri. Master Sec.
GoBook II Help Page 41 of 76 Mode 32Bit mode. CAUTION Before attempting to configure a hard disk drive, make sure you have the configuration information supplied by the manufacturer of your hard drive. Incorrect settings can result in your system not recognizing the installed hard disk. 72_0103_003 10 December 2002 © 2002 Itronix Corporation. All rights reserved. GoBook II™ Help Advanced CMOS Setup Field Bootup Sequence Setting C; A; CDROM S.M.A.R.T.
GoBook II Help Bootup NumLock Display Expansion Mode Password Check Page 42 of 76 Off On Enabled Disabled Setup Always predicts device performance. The disk drive software monitors the internal performance of the motors, media, heads, and electronics of the drive. Only S.M.A.R.T. Hard Disks are supported. The default is Enabled. Use this field to initially disable the Num-Lock feature of the internal keyboard when the GoBook II starts The default is Off.
GoBook II Help Field Intel ® SpeedStep Technology Page 43 of 76 Setting Recommended Battery Performance Reverse Battery Low Warning Beep Radio Wake-Up Disabled Disabled Enabled Enabled Disabled Function Enables the system to reduce the CPU speed when the battery is in use to conserve power. This is the default setting. The computer will utilize Intel ® SpeedStep Technology when the battery is in use. This technology lowers the CPU clock speed to save power.
GoBook II Help Page 44 of 76 Peripheral Setup Settings on this page allow you to change port configurations. Field Internal MDC Modem Onboard Serial Port A & B Setting Auto Disabled Function Default is disabled. Auto COM 1 is assigned to the serial port located at the rear of your GoBook II. Set this field to Auto to enable the system to automatically assign an I/O address and interrupt to the port. Disables COM 1.
GoBook II Help Parallel Port IRQ Parallel Port DMA Parallel Port Mode Page 45 of 76 5 7 0 1 3 Normal Bi-dir EPP 1.9 EPP 1.7 ECP Only available with addresses 378, 278 and 3BC Only available in ECP mode Normal Bi-directional Enhanced Parallel Port Enhanced Parallel Port Extended Capabilities Port 72_0103_003 10 December 2002 © 2002 Itronix Corporation. All rights reserved.
GoBook II Help Page 46 of 76 NOTE The off setting means that option is in Stealth Mode. Field LEDs Fan System Beeps Audio Setting On Off On Off On Off On Off Display Brightness On Off Function LEDs function normally LEDs are disabled The fan functions normally The Fan is disabled. Heat management is then controlled solely through throttling. Beeps are heard during POST The system beeper is disabled during the boot up or resume process. Audio is preserved across suspend/resume and boot.
GoBook II Help Page 47 of 76 NOTE If you Auto-Detect your Hard Disk Drive while your media bay drive is empty, you will need to reset the Secondary Master to Auto On before you can use the CD-ROM (or other media devices). 72_0103_003 10 December 2002 © 2002 Itronix Corporation. All rights reserved. GoBook II™ Help Change Password Change Supervisor Password A supervisor password must be set before a lower-level password can be set. After selecting Change Supervisor Password, press Enter.
GoBook II Help Page 48 of 76 Auto Configuration with Optimal Settings The Auto Configuration menu resets the computer to default values. The Auto Detect Hard Disks likewise helps users to configure their systems quickly. When you see the prompt, "Load high performance settings (y/n)" choose y to reset the computer to default values. 72_0103_003 10 December 2002 © 2002 Itronix Corporation. All rights reserved.
GoBook II Help Page 49 of 76 cause your computer to malfunction, or to emit or receive electromagnetic radiation in excess of local regulations. For non-proprietary accessories such as PC Cards or printers, ensure that the accessory functions properly in your computer before making the purchase. Your system vendor may be able to recommend reliable brands and models.
GoBook II Help Page 50 of 76 Expect to pay at least $50 for a good quality surge suppressor. The surge suppressor should be a UL 1449, 497, and 1283 listed for surge suppression, modem surge protection, and RFI/EMI noise filtering respectively. The surge suppressor should have diagnostic LEDs that verify good AC ground, proper wiring, and proper surge operation. On/off switches that light are not recommended since they can produce electrical noise.
GoBook II Help >50°C (<122°F) Page 51 of 76 Battery will not charge To connect the vehicle adapter 1. Insert the vehicle adapter’s power cord into the power port on the back of the computer. 2. Insert the cigarette lighter adapter into the vehicle’s cigarette lighter socket, turning it slightly to make a good connection. The power light illuminates to indicate that current is reaching the vehicle adapter. When you connect the vehicle adapter, it automatically begins charging the computer’s battery.
GoBook II Help Page 52 of 76 PRECAUTIONS There are no user-replaceable parts within the vehicle cradle, so do not open the cradle case. The vehicle cradle is internally protected; it resets automatically if there is a power fault. Do not use the vehicle cradle to charge the computer battery overnight. Turn off the vehicle cradle at the end of each work day to prevent draining the voltage in your vehicle’s battery below starting levels.
GoBook II Help Page 53 of 76 vehicle cradle. Batteries will not charge successfully outside this temperature range. If you charge your battery daily, rely on the gas gauge reading to determine battery capacity. The gas gauge displayed by the Power Meter may show that the battery is full, but charging continues. This happens because the charging process is trying to put a little more capacity into the battery. External power can be removed at this time since the battery is virtually full.
GoBook II Help Page 54 of 76 Cleaning or Replacing Cradle Contact Pins The contact pins on the vehicle cradle are exposed to contamination and stress when the computer is installed and removed from the cradle during normal daily operation. If the pins become dirty, they can be removed and cleaned as necessary using electrical contact cleaner. Or they can be replaced. The power and ground pins are pins 3 and 8 respectively.
GoBook II Help Page 55 of 76 NOTE If you are using the computer in a cold temperature environment and the battery level is too low for the heater to operate, you will see the error message "Battery too low to warm the hard drive. Shutting down..." and the computer will shut down. Apply external power and reboot. LCD Heater The GoBook II also has an optional CCFL heater to improve display brightness in a cold environment.
GoBook II Help Page 56 of 76 Storing Batteries Store the battery within the recommended temperature range: 10°C to 30°C (50°F to 86°F). Unused or stored batteries can lose power over time. When you install a battery that has not been used for awhile, connect external power to the computer and charge the battery. After storage, battery calibration may increase its capacity. 72_0103_003 10 December 2002 © 2002 Itronix Corporation. All rights reserved.
GoBook II Help Page 57 of 76 2. Remove the battery. 3. Using a soft, dry cloth (do not use paper products because they can scratch the surface, add a small amount of cleaning solution to the cloth and clean the computer case. 4. Wipe off any excess liquid with a soft cloth. 5. Reinstall the battery. Display Periodically inspect the display to make sure the brightness function is operating properly and that all pixels are operational.
GoBook II Help Page 58 of 76 If you plan to store the computer, follow these storage guidelines. To store the computer 1. Files and data should be saved before storing the computer. Contact your organization’s help desk about the procedure for backing up files or data. 2. Exit all applications and use the appropriate procedure to exit from your operating system. 3. Turn off the computer by going to the Start menu and selecting Shutdown. 4. Remove the battery from the unit and store it in a dry place. 5.
GoBook II Help Page 59 of 76 You can reduce the risk of damage to the hard drive and increase the reliability of the hard drive and data integrity by following the recommendations below. Installing and Removing the Hard Drive To remove the hard drive: 1. Shut down the unit and remove external power. 2. Open the battery door and remove the battery using the extraction tape. The hard drive is in a cassette that can be seen in the battery well just under the RTC hatch. 3.
GoBook II Help Page 60 of 76 4. Slide the hard drive cassette into its storage location. 5. Replace the battery and then replace the battery door. Internal Hard Drives Do not intentionally drop the computer. The unit is designed to withstand the day to day rigors of the mobile environment and provide years of reliable service. The useful life of the product can be enhanced by not intentionally abusing it.
GoBook II Help Page 61 of 76 72_0103_003 10 December 2002 © 2002 Itronix Corporation. All rights reserved. GoBook II™ Help Touch Screen Care CAUTION Always use an approved stylus or your finger. Never use sharp, hard, or abrasive implements on the touch screen such as ball point pens, pencils, or keys. They could damage the screen. To clean the touch screen panel, apply a household glass cleaner to a soft, clean, dry cloth and wipe the screen.
GoBook II Help Page 62 of 76 Windows Applications GoBook II™ Help POST Messages When the GoBook II computer restarts, it tests its hardware components. This test is called the Power On Self Test (POST) . If the system finds an error during this test, it displays an error message. Some POST errors can occur before anything can be displayed on the screen. In this case, the computer issues a series of beeps, then stops working.
GoBook II Help Page 63 of 76 KB / Interface Error Reboot the computer by pressing CTRL+ALT+DEL. If the message persists, and the keyboard is not usable, report this error to your supervisor or your organization's help desk. Keyboard Error Unlock Keyboard Restart the computer by pressing the Power Button for at least eight seconds. If the problem persists, contact your supervisor or your organization's help desk. No boot device available Reboot the computer by pressing CTRL+ALT+DEL.
GoBook II Help Page 64 of 76 72_0103_003 10 December 2002 © 2002 Itronix Corporation. All rights reserved. GoBook II™ Help MS-DOS Messages The MS-DOS operating system may display a warning or error message if it encounters a problem with a command in the CONFIG.SYS or AUTOEXEC.BAT file, or a command that you entered at the DOS prompt. Following are a few of the most common MS-DOS messages. Bad command or file name A command was entered that is spelled incorrectly or does not exist on the computer.
GoBook II Help Page 65 of 76 72_0103_003 10 December 2002 © 2002 Itronix Corporation. All rights reserved. GoBook II™ Help Windows Messages Windows messages are typically self-explanatory. (See Troubleshooting, for more information). Application Messages Both MS-DOS and Windows applications may display messages if a warning or error condition occurs. Refer to the online Help or other documentation for the application that generated the message. 72_0103_003 10 December 2002 © 2002 Itronix Corporation.
GoBook II Help Page 66 of 76 Help and Support from the Start Menu. Third-party Windows manuals are available from your local bookstore. GoBook II™ Help Applications My application locks up, acts strangely, or produces a General Protection Fault (GPF) error If you’ve tried to resolve the problem and your application still doesn’t respond, you may need to restart your computer as described below. To reboot your computer, select Start, Shut Down, Restart.
GoBook II Help Page 67 of 76 The battery does not charge To prevent possible damage to the battery, the system will not allow a charge if the battery temperature is extremely hot or cold (such as in a closed, unattended vehicle). If possible, charge the battery in a location with a moderate temperature of around 20°C (68°F). If possible, turn off the computer while the battery is charging. If the battery is new or has been stored for a week or more, follow this procedure: 1.
GoBook II Help Page 68 of 76 If you charge your battery daily, rely on the gas gauge reading to determine battery capacity. The charging process may continue even if the gas gauge reads full. External power can be removed because the battery is virtually full. My battery seems to have less and less capacity If your battery is new, or if your are using it for the first time, you will need to calibrate it prior to using it.
GoBook II Help Page 69 of 76 I can’t see the cursor while using the DOS editor Press FN+INSERT to change from insert mode to overwrite mode to enable a block cursor. When it defaults to insert mode, the DOS editor uses an underline cursor which is less visible than the block cursor for overwrite mode. The display appears to have random pixels darkened after scrolling Contact your supervisor or your organization’s help desk for information about correcting this problem.
GoBook II Help Page 70 of 76 I get the message "Battery too low to warm the hard drive. Shutting down..." There is not enough battery power to operate the Hard Disk Drive (HDD) heater and the temperature is too cold to safely turn on the HDD. Apply external power and/or move the unit to a location that is at least 5°C. 72_0103_003 10 December 2002 © 2002 Itronix Corporation. All rights reserved.
GoBook II Help Page 71 of 76 Incorrect characters appear on the screen when I press certain keys You may be in NUM LOCK mode. Press NUM LOCK to toggle NUM LOCK mode off. 72_0103_003 10 December 2002 © 2002 Itronix Corporation. All rights reserved. GoBook II™ Help Landline Modems The modem doesn’t work When you first try to use HyperTerminal or similar application , the system responds with a message asking if you want to install the modem.
GoBook II Help Page 72 of 76 When you first try to use HyperTerminal or similar application, the system responds with a message asking if you want to install the modem. Answer “Yes” to this question and follow the instructions on the screen to install it. The modem dials and the answering modem generates tone, but our modem does not begin the training sequence to establish a connection Although the problem may appear to originate from the computer, the source of the problem is the answering modem.
GoBook II Help Page 73 of 76 If you are using the AC adapter , check the electrical outlet you are using to make sure it is working properly. If the GoBook II computer does not turn on, restart the computer by holding down the Power Button for at least 10 seconds and then release it. The computer won’t turn off Press and hold the Power Button for at least eight seconds.
GoBook II Help Page 74 of 76 pack, and allow the unit to remain idle for ten minutes. After ten minutes, connect external power and retry. The LED’s, backlight, and/or keyboard backlight don’t illuminate. You may have enabled Stealth mode in the Setup Utility. Go to CMOS Setup and disable Stealth mode. The computer doesn't make any sounds, even during boot-up. You may have enabled Stealth mode in the Setup Utility. Go to CMOS Setup and disable Stealth mode. The fan stopped running.
GoBook II Help Page 75 of 76 © 2002 Itronix Corporation. All rights reserved. GoBook II™ Help PC Cards I can’t remove the PC card Press the ejector button located inside the PC card door on the side of the computer. The button will pop out. Press the ejector button again to eject the PC card. Slide the card out. If the ejector button malfunctions when you press it, release the button and then press it again.
GoBook II Help Page 76 of 76 GoBook II™ Help Pen/Touch Screen When I try to use the stylus on my touch screen, nothing happens If you cannot select objects accurately with the stylus, you may need to recalibrate the touch screen. To calibrate the touch screen 1. From the Start Menu, select Programs, Mobile Computer Tools and then choose Touch Screen Calibrator. This opens the Calibration Applet. 2. Click on the Calibrate button. 3.
Legal Information Page 1 of 3 GoBook II™ Help Legal Information Identification GoBook II (IX260) Help December 2002 · Revision 003 Copyright Notice © Copyright 2002 Itronix Corporation. All rights reserved.
Legal Information Page 2 of 3 requested, this information must be provided to the telephone company. The REN is used to determine the quantity of devices which may be connected to the telephone line. Excessive RENs on the telephone line may result in the devices not ringing in response to an incoming call. In most, but not all areas, the sum of the RENs should not exceed five (5.0).
Legal Information Page 3 of 3 device to send any message via a telephone fax machine unless such message clearly contains in a margin at the top or bottom of each transmitted page or on the first page of the transmission, the date and time it is sent and an identification of the business or other entity, or other individual sending the message and the telephone number of the sending machine or such business, other entity, or individual.