GoBook II Help Page 1 of 41 Getting Started Congratulations on your purchase of the Itronix GoBook II computer! Your new GoBook II features the most innovative advances in portable computing technology. It combines state-of-the-art ergonomics with a rugged, durable architecture to provide you with a notebook computer that is compact, powerful, rugged and easy to use.
GoBook II Help l Media Bay Li-Ion battery pack (3000 mAhr) l Hard Disk Drive Heater l LCD Heater Page 2 of 41 CAUTION When purchasing any of the accessories listed above, purchase only those accessories that are approved for use with your computer. The above accessories are proprietary items. Your system vendor can obtain these approved accessories.
GoBook II Help Page 3 of 41 l Do not step on or place anything on the power cord l If you use the computer with an extension cord, ensure that the total ampere ratings of all the devices sharing the extension do not exceed the rating of the extension cord or the rating of the wall outlet l Unless instructed, never push foreign objects into the computer through any of the slots or openings.
GoBook II Help Page 4 of 41 1. From the Start menu, tap Shut Down. 2. Then, from the Shut Down Windows screen select Shut Down and tap OK. If you need to leave the system for a short time, or if you want to conserve battery power, you can suspend the computer by pressing FN+F3. See Power Management for additional information.
GoBook II Help Page 5 of 41 NOTE If you cannot select objects accurately with the stylus you may need to re-calibrate the touch screen. This can be accomplished by revisiting the procedure above. Adjusting the Screen You can adjust the display brightness for better viewing. Use the following keys to make adjustments: To Do This... Press Lighten the display FN+F7 Darken the display FN+F6 Setting the Date and Time To set the date and time 1.
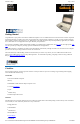
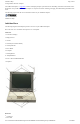
GoBook II Help Page 6 of 41 Getting Familiar with Your Computer The GoBook II computer is a ruggedized , weather-sealed laptop computer system built for the demanding environment of the mobile worker. Designed for use by mobile workforces, this computer is a superior work tool for collecting, managing, and communicating information in the field. The following pages describe the external and internal features of your GoBook II computer.
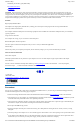
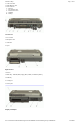
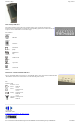
GoBook II Help Page 7 of 41 15-Pin VGA Port 60-Pin Multi-IO Port l 9-Pin Serial Port 6. PS2 Port 7. RJ-11 Modem Jack 8. RJ-45 Network Jack 9. USB Port 10. D-Rings l l Left Side View 1. PC Card Slot 2. Microphone Jack 3. Audio Jack 4. Stylus Right Side View 1.Antenna 2. Media Bay - CDROM, DVD, Floppy Disk, CDRW, or Media Bay Battery 3. Radio Bay 4. Cooling Fan 5. Security Slot Display with Stylus file://C:\Documents%20and%20Settings\harwoodm.ITRXNT1\Local%20Settings\Temp\~hh4848.
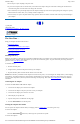
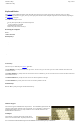
GoBook II Help Page 8 of 41 LED Activity Indicators The activity indicators, located above the keyboard, light up when a particular function of the computer is active. Each indicator is marked with a corresponding symbol and is visible when the lid is open or closed. LED numbers are from left to right.
GoBook II Help Page 9 of 41 GoBook II™ Help Keyboard Basics The keyboard on the GoBook II computer looks much like the keyboard of a typewriter and operates in almost the same way. While typewriter keys put characters on paper, the keys on the laptop enter characters in the computer and perform certain functions, depending on the application or program.
GoBook II Help Page 10 of 41 move the cursor around the screen. Using Your Touchpad Clicking 1. First, place your fingers on the keyboard in the normal typing position. The touchpad is easily accessible by moving either your left or right thumb off the space bar and on to the touchpad. 2. Gently move your thumb across the touchpad in the direction you want the cursor to move. The pad detects the change in pressure and moves the cursor in the corresponding direction.
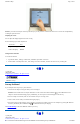
GoBook II Help Page 11 of 41 XGA vs. SVGA Display Your GoBook II computer has either an XGA (standard) or SVGA (optional) display. XGA Display: The XGA display is a transmissive color display designed to minimize glare and maximize transmitted light from the backlight so it has excellent readability in indirect light. The XGA display is the most popular display because it is easy to read indoors and in vehicles.
GoBook II Help Page 12 of 41 3. Pick up the CD-DVD by the edges and remove the CD-ROM/DVD-ROM from the tray. Push the tray into the computer until it closes fully. CAUTION When the computer is reading from a CD-ROM/DVD-ROM or Floppy disk drive, the indicator light for the drive will flash. Do not attempt to remove a disk while this light is active. Changing your 'swappable' media bay device 1. Make sure the computer is not accessing the media bay drive. 2.
GoBook II Help Page 13 of 41 Installing a Card 1. The top side of a PC Card is usually identified with a label. Insert the card into the slot with the top up and the edge with pinhole contacts going in first. You will feel some resistance as the card slides into the back of the slot. 2. PC Cards require drivers, or a program that allows the operating system to use a specific device. Many drivers are included with Windows, but if not, you will be prompted to install the driver included with your card.
GoBook II Help Page 14 of 41 You can use the mini-DIN PS/2 port to connect your computer to a PS/2 device such as a PS/2 keyboard or mouse. 6 Fax/modem RJ-11 Jack The fax/modem can transmit data using the 56 Kbps V.90 or V.92 protocol, and send and receive faxes at 14.4 Kbps. In some countries, local regulations may not permit the use of the fax/modem designed for this system. In this case, you may use a PCMCIA modem. CAUTION Plug your modem into an analog telephone jack only. Most homes use analog lines.
GoBook II Help Page 15 of 41 Hover the mouse over the number on the picture to see a description. 1 Security Slot Your computer has a Security Slot that can be used with a standard laptop locking device, such as a Kennsington Lock. You can connect the GoBook II to a large object with the lock to prevent theft of your GoBook. See the documentation that comes with your lock for more information. 72_0103_003 10 December 2002 © 2002 Itronix Corporation. All rights reserved.
GoBook II Help Page 16 of 41 GoBook II™ Help Page Blank for Future use. 72_0103_003 10 December 2002 © 2002 Itronix Corporation. All rights reserved. GoBook II™ Help Page Blank for Future use. 72_0103_003 10 December 2002 © 2002 Itronix Corporation. All rights reserved. GoBook II™ Help Intel Pro 2200BG Wireless LAN The GoBook II computer includes a high powered WLAN radios: 1. The Intel Pro 2200BG MiniPCI slot with two antennas in the display.
GoBook II Help Page 17 of 41 3. At the "Choose the setup function" screen, select "Battery Calibration" and hit enter. NOTE Make sure the AC adapter and battery are present. 4. Choose Primary or secondary battery and hit enter. Battery Calibration will take from 10 to 16 hours, depending on how much power the battery may already contain. Windows Battery Calibration Over time, as the battery is repeatedly drained and recharged, battery performance will decrease.
GoBook II Help Page 18 of 41 NOTE Do not restart the computer until you have connected to an AC adapter, or replaced the discharged battery with a charged battery. 72_0103_003 10 December 2002 © 2002 Itronix Corporation. All rights reserved. GoBook II™ Help Battery Charging When you use the AC adapter to connect your GoBook II to a power outlet, the internal battery will begin to recharge automatically. While the battery is charging, the Battery Power Indicator will be flashing green.
GoBook II Help l Page 19 of 41 Decreasing monitor brightness can also save power. Decrease brightness by pushing FN + F6. Increase it by pushing FN + F7. When to Replace the Battery Over time, the battery’s capacity gradually decreases. We recommend that you replace your battery when you notice that it begins to store significantly less charge. WARNING There is danger of explosion if the battery is incorrectly replaced. Replace only with the same or equivalent type recommended by the manufacturer.
GoBook II Help Page 20 of 41 72_0103_003 10 December 2002 © 2002 Itronix Corporation. All rights reserved. GoBook II™ Help The Main Menu The Setup Utility main menu has seven main submenu options: l Standard CMOS Setup l Advanced CMOS Setup l Power Management Setup l Peripheral Setup l Stealth Mode Setup l Auto-Detect Hard Disks l Change User Password l Change Supervisor Password Save Settings and Exit, and Exit Without Saving are used to exit the Setup Utility.
GoBook II Help Enter F2 or F3 F10 Page 21 of 41 use either key to move between choices. Makes a selection. Changes the color of the graphic display. Saves changes, then exits 72_0103_003 10 December 2002 © 2002 Itronix Corporation. All rights reserved. GoBook II™ Help Standard CMOS Setup The Standard CMOS Setup page of the Setup Utility has a list of fields that describe the basic configuration of your computer.
GoBook II Help Blk Mode PIO Mode 32Bit Mode Page 22 of 41 Multi-sector transfers enabled PIO (Programmed Input/Output) mode refers to data transfer method used by IDE drives. These modes use the CPU's registers for data transfer in contrast with DMA (Direct Memory Access), which transfers directly between main memory and the peripheral device. The default value Auto lets the system automatically read setup information it needs for setup from the hard disk drive.
GoBook II Help Page 23 of 41 This section of the Setup Utility manages power settings. To save power, you may select the time the computer may idle before going into standby, or a low power state, then into suspend mode. See Power Management for an introduction to suspend modes.
GoBook II Help Page 24 of 41 3F8/COM1 Onboard Parallel Port Parallel Port IRQ Parallel Port DMA Parallel Port Mode 2F8/COM2 3E8/COM3 2E8/COM4 Auto Disabled 378 278 3BC 5 7 0 1 3 Normal Bi-dir EPP 1.9 EPP 1.7 ECP other devices. Default address and COM port setting. Optional address setting. Optional address setting. Optional address setting. Set this field to Auto, so that the system automatically assigns an I/O address and interrupt. You can also choose a specific I/O address. Disables the LPT port.
GoBook II Help Page 25 of 41 The keyboard backlight does the following whether stealth mode is enabled or disabled: l Does not illuminate when the system is off or suspended l Does not illuminate on resume or boot l Turns off when FN+F1 is pressed to turn off the display. 72_0103_003 10 December 2002 © 2002 Itronix Corporation. All rights reserved.
GoBook II Help Page 26 of 41 72_0103_003 10 December 2002 © 2002 Itronix Corporation. All rights reserved. GoBook II™ Help Exit and Saving Save Settings and Exit Select this option to save changes to the field values and restart the computer using the new values. Pressing F10 from any of the menu screens also allows you to save settings and exit. Exit Without Saving Select this option to discard any changes you have made to the field values and restart the computer using the old values.
GoBook II Help Page 27 of 41 l The surge suppressor should have diagnostic LEDs that verify good AC ground, proper wiring, and proper surge operation. On/off switches that light are not recommended since they can produce electrical noise. l The Joule ratings should be a minimum of 480 Joules for the AC surge circuit. l The Joule ratings should be a minimum of 240 Joules for the modem. l The modem surge circuit should present low capacitance to the modem line or it will slow the transmission rate.
GoBook II Help Page 28 of 41 PRECAUTIONS ¡ ¡ There are no user-replaceable parts within the vehicle cradle, so do not open the cradle case. The vehicle cradle is internally protected; it resets automatically if there is a power fault. Do not use the vehicle cradle to charge the computer battery overnight. Turn off the vehicle cradle at the end of each work day to prevent draining the voltage in your vehicle’s battery below starting levels.
GoBook II Help Page 29 of 41 Cleaning or Replacing Cradle Contact Pins The contact pins on the vehicle cradle are exposed to contamination and stress when the computer is installed and removed from the cradle during normal daily operation. If the pins become dirty, they can be removed and cleaned as necessary using electrical contact cleaner. Or they can be replaced. The power and ground pins are pins 3 and 8 respectively.
GoBook II Help Page 30 of 41 GoBook II™ Help Battery Maintenance and Storage Maintaining Batteries Follow these guidelines to maintain performance of Lithium-Ion (Li-on) batteries. ¡ Avoid exposing batteries to extremely hot or cold temperatures for long periods. To prevent possible damage to the battery, the GoBook II does not allow the battery to charge if the internal temperature of the battery gets too low (< 5°C or < 41°F) or too high (> 50°C or > 122°F).
GoBook II Help Page 31 of 41 unreliable connection to the external power source. Clean the connector using a cotton swab dipped in isopropyl alcohol. RJ-11/ RJ-45 / USB Connectors Make sure these connectors are operating properly. During normal use, the connector pins can get dirty or become broken, bent, or pushed out of place. Clean the connector with a cotton swab dipped in isopropyl alcohol. Keyboard Check all keys to make sure they are working properly.
GoBook II Help Page 32 of 41 2. Open the battery door and remove the battery using the extraction tape. The hard drive is in a cassette that can be seen in the battery well just under the RTC hatch. 3. On the left side of the hard drive cassette you will see a small black release lever. Pull the lever towards you (away from the direction of the RTC hatch) and slide the cassette out into the battery storage area. 4. Lift the hard drive cassette from the battery storage area. To install the hard drive: 1.
GoBook II Help Page 33 of 41 To run SCANDISK in WIN2K and WINXP right click on the drive letter, go to properties, and select the tools tab, Error-checking and click check now. In other Windows operating systems you can run SCANDISK by going to Start, Programs, Accessories, System Tools. Then select SCANDISK. 72_0103_003 10 December 2002 © 2002 Itronix Corporation. All rights reserved. GoBook II™ Help Touch Screen Care CAUTION l Always use an approved stylus or your finger.
GoBook II Help Page 34 of 41 Fixed disk failure Report this error to your supervisor or your organization's help desk. GA20 Error Hardware failure. Report this error to your supervisor or your organization's help desk. Hard disk boot sector invalid Hard disk failed Restart the computer by pressing the power button for at least eight seconds. If the problem persists, contact your supervisor or your organization's help desk.
GoBook II Help Page 35 of 41 The MS-DOS operating system may display a warning or error message if it encounters a problem with a command in the CONFIG.SYS or AUTOEXEC.BAT file, or a command that you entered at the DOS prompt. Following are a few of the most common MS-DOS messages. Bad command or file name A command was entered that is spelled incorrectly or does not exist on the computer. Invalid media type reading drive X (where X is any drive letter) Abort, Retry, Fail? The media may not be formatted.
GoBook II Help Page 36 of 41 GoBook II™ Help Applications My application locks up, acts strangely, or produces a General Protection Fault (GPF) error ¡ If you’ve tried to resolve the problem and your application still doesn’t respond, you may need to restart your computer as described below. To reboot your computer, select Start, Shut Down, Restart. If that does not work, try pressing CTRL +ALT+DEL twice. If the computer does not restart, the keyboard may be locked up.
GoBook II Help Page 37 of 41 The gas gauge isn’t full after charging the battery ¡ This may indicate that the charging process terminated prematurely. The gas gauge reads “full,” but the charging indicator light is still blinking ¡ If you charge your battery daily, rely on the gas gauge reading to determine battery capacity. The charging process may continue even if the gas gauge reads full. External power can be removed because the battery is virtually full.
GoBook II Help Page 38 of 41 I can’t save files because the disk is full ¡ Report this situation to your supervisor or your organization’s help desk. Diskette Read Error ¡ Any card in the PC card socket except for a properly formatted memory card will cause this error since it is trying to read the PC card. ¡ Any media in the installed media bay, except for properly formatted media, will cause this error since it is trying to read the media. I get the message "Battery too low to warm the hard drive.
GoBook II Help Page 39 of 41 the modem. Answer “Yes” to this question and follow the instructions on the screen to install it. ¡ Make sure the communication settings are correct in your application. Refer to the online Help for your application. The modem doesn’t dial a number Check these things: ¡ If you are using an external modem, make sure the cables are attached correctly. ¡ Make sure your communications parameters are correct in your application. Refer to the online Help for your application.
GoBook II Help Page 40 of 41 ¡ Check to make sure the COM ports are off. For example, exit any application that uses COM ports. ¡ Make sure external power is not connected. Depending on power settings, some systems will not suspend automatically when they are connected to external power. ¡ Make sure the standby time is set properly in the Power Management program.
GoBook II Help Page 41 of 41 PC Cards I can’t remove the PC card ¡ Press the ejector button located inside the PC card door on the side of the computer. The button will pop out. Press the ejector button again to eject the PC card. Slide the card out. ¡ If the ejector button malfunctions when you press it, release the button and then press it again.