GoBook II Help Page 1 of 68 Getting Started Congratulations on your purchase of the Itronix GoBook II computer! Your new GoBook II features the most innovative advances in portable computing technology. It combines state-of-the-art ergonomics with a rugged, durable architecture to provide you with a notebook computer that is compact, powerful, rugged and easy to use.
GoBook II Help Page 2 of 68 STANDARD z The Itronix GoBook II computer z Battery z ADP-90AB or ADP-75FB AC adapter with power cord z 12.1 inch XGA display z Stylus z Shoulder Strap z GoBook II Quick Start Guide OPTIONS The following items are normally optional, but some vendors may include them in the standard package. Some items may not be available in some countries, or some vendors may choose not to carry all the items.
GoBook II Help Page 3 of 68 Full Array of Ports and Connectors Your computer includes standard ports for connecting to peripherals such as USB devices and monitors. USB ports allow you to add many types of peripherals. Large SVGA or XGA LCD Your computer has a large, easy to view SVGA or XGA LCD panel. Built-in Microphone and Stereo Speakers The stereo speakers and internal microphone enable you to run a variety of multimedia applications.
GoBook II Help Page 4 of 68 optimum performance z There is danger of explosion if the battery is incorrectly replaced. Replace only with the same or equivalent type recommended by the manufacturer. Dispose of used batteries according to the manufacturer's instructions. z Do not open the RAM door by yourself. z Unplug the computer from the power outlet before cleaning. Use a damp cloth for cleaning.
GoBook II Help z Page 5 of 68 Adjusting the Volume Installing the Battery Make sure the computer is sheltered when you install the Lithium Ion battery; the computer is not weather sealed until the battery is properly installed. The battery should be fully charged before you operate the unit on battery power. To get the most from your battery, follow the guidelines in the Power Management section. To install the battery 1. Remove the battery door. 2.
GoBook II Help Page 6 of 68 If you need to leave the system for a short time, or if you want to conserve battery power, you can suspend the computer by pressing FN+F3. See Power Management for additional information. Suspend to RAM In a suspend to RAM, the contents of your computer's memory are held intact, while almost all the components in your computer either turn off completely, or reduce power consumption to a minimum.
GoBook II Help Page 7 of 68 CAUTION z Always use an approved stylus or your finger. z Never use sharp, hard, or abrasive implements on the touch screen such as ball point pens, pencils, or keys. They could damage the screen. z To clean the touch screen panel, apply a household glass cleaner to a soft, clean, dry cloth and wipe the screen.
GoBook II Help Darken the display Page 8 of 68 FN+F6 Setting the Date and Time To set the date and time 1. Tap the Start button, Settings, Control Panel, and double-tap the Date / Time icon. 2. From the Date / Time Properties menu, make changes to the Time and Date, and then close this screen by selecting OK. 72_0103_003 10 December 2002 © 2002 Itronix Corporation. All rights reserved. GoBook II™ Help Startup Problems? If your computer does not operate, try these solutions.
GoBook II Help Page 9 of 68 Getting Familiar with Your Computer The GoBook II computer is a ruggedized , weather-sealed laptop computer system built for the demanding environment of the mobile worker. Designed for use by mobile workforces, this computer is a superior work tool for collecting, managing, and communicating information in the field. The following pages describe the external and internal features of your GoBook II computer.
GoBook II Help Page 10 of 68 Back View Cooling Fan z Power Jack z 15-Pin VGA Port z 60-Pin Multi-IO Port z 9-Pin Serial Port 6. PS2 Port 7. RJ-11 Modem Jack 8. RJ-45 Network Jack 9. USB Port 10. D-Rings z file://C:\Documents%20and%20Settings\harwoodm.ITRXNT1\Local%20Settings\Temp\~...
GoBook II Help Page 11 of 68 Left Side View 1. PC Card Slot 2. Microphone Jack 3. Audio Jack 4. Stylus Right Side View 1.Antenna 2. Media Bay - CDROM, DVD, Floppy Disk, CDRW, or Media Bay Battery 3. Radio Bay 4. Cooling Fan 5. Security Slot file://C:\Documents%20and%20Settings\harwoodm.ITRXNT1\Local%20Settings\Temp\~...
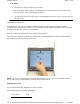
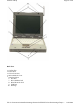
GoBook II Help Page 12 of 68 Display with Stylus LED Activity Indicators The activity indicators, located above the keyboard, light up when a particular function of the computer is active. Each indicator is marked with a corresponding symbol and is visible when the lid is open or closed. LED numbers are from left to right. Icon & LED # Function Mini PCI LED #1 Not Used LED #2 LED #3 Disk Status (HW) file://C:\Documents%20and%20Settings\harwoodm.ITRXNT1\Local%20Settings\Temp\~...
GoBook II Help Page 13 of 68 Media Drive Bay LED #4 Number Lock LED #5 Caps Lock LED #6 Scroll Lock LED #7 LED Power / Wireless Modem Indicators The case front LED's indicate external power, unit ON/OFF, battery status, and wireless modem ON/OFF. The indicators remain active and viewable even when the LCD panel is closed.
GoBook II Help Page 14 of 68 Keyboard Basics The keyboard on the GoBook II computer looks much like the keyboard of a typewriter and operates in almost the same way. While typewriter keys put characters on paper, the keys on the laptop enter characters in the computer and perform certain functions, depending on the application or program.
GoBook II Help Page 15 of 68 Hold the FN key while pressing the numbered function key. Numeric Keypad The numeric keypad is embedded in the keyboard area. The embedded keypad emulates the numeric keypad typically found on a full-size keyboard. It is arranged like a calculator for applications that require you to key many numbers or for use with the Calculator in the standard Windows Accessories. Touchpad The touchpad is a pointing device that provides all the features of a two-button mouse.
GoBook II Help z Page 16 of 68 Double-clicking is a common technique for selecting objects or launching programs from icons. Once you have moved the pointer over the object you wish to select, rapidly press the left button two times. This action is commonly referred to as "double-clicking" an object. Dragging z z Move the pointer to the desired location then press down the left button. While still holding down the left button, move the pointer to the desired location. Release the button.
GoBook II Help Page 17 of 68 72_0103_003 10 December 2002 © 2002 Itronix Corporation. All rights reserved. GoBook II™ Help Display Basics XGA vs. SVGA Display Your GoBook II computer has either an XGA (standard) or SVGA (optional) display. XGA Display: The XGA display is a transmissive color display designed to minimize glare and maximize transmitted light from the backlight so it has excellent readability in indirect light.
GoBook II Help Page 18 of 68 10 December 2002 © 2002 Itronix Corporation. All rights reserved. GoBook II™ Help Disk Drives Your computer comes with several components for reading and writing (recording) information. The Hard Disk Drive The hard disk provides high-capacity storage and fast access. Windows and most programs are stored here. Your GoBook II identifies the hard disk drive as drive C. For information about removing or installing the hard drive see Hard Drive Care and Handling.
GoBook II Help Page 19 of 68 1. Make sure the computer is not accessing the media bay drive. 2. Slide the door latches to release the media bay door. 3. Left click the "unplug or eject" media bay icon on the right side of the taskbar. 4. Select the media bay device and left click to stop the device. 5. Wait for the "safe to remove hardware" message. 6. Grasp the media bay device by the removal tab and pull straight out until it is clear from the slot. 7. Click OK 8.
GoBook II Help Page 20 of 68 GoBook II™ Help The PC Card Slot The PC card slot can be used as an interface between your computer and a variety of communications devices, such as network adapters, SCSI adapters, and fax/modems. They can also be used to provide additional data storage capacity. Your computer’s PC Card slot supports Type I, II or III PC Cards, 32bit CardBus cards, and Zoomed Video cards. Installing a Card 1. The top side of a PC Card is usually identified with a label.
GoBook II Help Page 21 of 68 72_0103_003 10 December 2002 © 2002 Itronix Corporation. All rights reserved. Making Connections Your computer is equipped with a full array of ports and connectors, including standard input/output (I/O) ports for quickly and easily adding peripheral devices such as printers and monitors. Refer to documentation included with individual devices for details on connecting these devices to your computer.
GoBook II Help Page 22 of 68 serial mouse. This port is identified as COM1 and is 16550A compatible. 5 PS/2 Port You can use the mini-DIN PS/2 port to connect your computer to a PS/2 device such as a PS/2 keyboard or mouse. 6 Fax/modem RJ-11 Jack The fax/modem can transmit data using the 56 Kbps V.90 or V.92 protocol, and send and receive faxes at 14.4 Kbps. In some countries, local regulations may not permit the use of the fax/modem designed for this system. In this case, you may use a PCMCIA modem.
GoBook II Help Page 23 of 68 1 PC-Card Slot Use this slot to connect PCMCIA-card devices. 2 Microphone Jack Connect a microphone to this jack to record audio. 3 Audio-Out Jack Connect external speakers or a stereo headset to this jack to listen to multimedia. 72_0103_003 10 December 2002 © 2002 Itronix Corporation. All rights reserved. GoBook II™ Help Right Side Connector Hover the mouse over the number on the picture to see a description. file://C:\Documents%20and%20Settings\harwoodm.ITRXNT1\Local%20
GoBook II Help Page 24 of 68 1 Security Slot Your computer has a Security Slot that can be used with a standard laptop locking device, such as a Kennsington Lock. You can connect the GoBook II to a large object with the lock to prevent theft of your GoBook. See the documentation that comes with your lock for more information. 72_0103_003 10 December 2002 © 2002 Itronix Corporation. All rights reserved. Wireless Communications The GoBook II may include three antennas for wireless communication.
GoBook II Help Page 25 of 68 and refer to the manufacturer documentation to setup and use your radio(s). Safety Information Enclosed with each IX260 Laptop PC is the Radio specific safety information. Do not proceed with out reviewing the Information provided on that document. Do not proceed beyond a WARNING or CAUTION until the indicated conditions are fully understood and met.
GoBook II Help Page 26 of 68 Bluetooth systems create a personal-area network (PAN), or piconet, that may fill a room or may encompass no more distance than that between the cell phone on a belt-clip and the headset on your head. When Bluetooth-capable devices come within range of one another, an electronic conversation takes place to determine whether they have data to share or whether one needs to control the other.
GoBook II Help Page 27 of 68 GPRS For specific information about your GPRS radio please refer to the manufacturer's documentation. You may have one or more of the following documents already installed on your GoBook II computer: z z z AT&T - PC Card Manuals (Install Manual / Quick Reference Guide) Rogers AT&T - PC Card Manuals (Installation Guide) Generic - PC Card Manuals (Install Guide / Glossary) --------------08 June 2004 © 2004 Itronix Corporation. All rights reserved.
GoBook II Help Page 28 of 68 Battery Calibration BIOS Level Battery Calibration The first time you use a battery, you should calibrate it. The calibration process empties and charges the battery. This allows the Windows battery gauge to accurately monitor battery status. To calibrate a battery, follow these steps: 1. Plug in the AC adapter. 2. Restart the computer. When the startup screen appears, just prior to the Windows logo screen, press the Del key to enter the BIOS Setup Utility. 3.
GoBook II Help Page 29 of 68 72_0103_003 10 December 2002 © 2002 Itronix Corporation. All rights reserved. GoBook II™ Help Using the Battery Monitoring Battery Power There are two ways to monitor how much power the battery has left: 1. Click Start, Settings, Control Panel, Power Management (Power Options); then tap the Power Meter tab. 2. Moving the cursor to the battery icon on the taskbar, without selecting anything, is the simplest way to check on battery power status.
GoBook II Help Page 30 of 68 72_0103_003 10 December 2002 © 2002 Itronix Corporation. All rights reserved. GoBook II™ Help Battery Charging When you use the AC adapter to connect your GoBook II to a power outlet, the internal battery will begin to recharge automatically. While the battery is charging, the Battery Power Indicator will be flashing green. When the battery is fully charged, it will turn off.
GoBook II Help Page 31 of 68 Suspend to Disk (Hibernate) is similar to turning off the computer, except that the current state of the computer is copied to the hard disk as a special file. When the computer returns from suspend mode, the desktop appears with the same files and programs open as when the computer was suspended.
GoBook II Help Page 32 of 68 position and remove the door. Remove the battery. 5. Make sure the replacement battery is properly orientated. Insert the battery into the battery compartment. Check that the latches lock back into position. 6. Charge the new battery by plugging the computer into AC power. Heat Considerations The computer’s processor has been specially designed to consume little power and generates very little heat.
GoBook II Help Page 33 of 68 Using the Setup Utility The Setup Utility allows you to configure your computer’s basic settings. When you turn your computer on, the system reads this information to initialize the hardware so that it can operate correctly. You can use the Setup Utility to change your computer’s start-up configuration. For example, you can change your system's security routine.
GoBook II Help Page 34 of 68 z Peripheral Setup z Stealth Mode Setup z Auto-Detect Hard Disks z Change User Password z Change Supervisor Password Save Settings and Exit, and Exit Without Saving are used to exit the Setup Utility. Navigating and Entering Information in the BIOS Use the following keys to move between fields and to enter information Key DEL ESC Up, down arrow keys / Tab PgUp PgDn Enter F2 or F3 F10 Function Starts the Setup utility after turning on the computer.
GoBook II Help Page 35 of 68 72_0103_003 10 December 2002 © 2002 Itronix Corporation. All rights reserved. GoBook II™ Help Standard CMOS Setup The Standard CMOS Setup page of the Setup Utility has a list of fields that describe the basic configuration of your computer. CMOS is simply a type of Non-Volatile Memory used to store the basic configuration of the computer.
GoBook II Help Page 36 of 68 Not Installed System Memory; Extended Memory These fields display the amount of conventional memory and extended memory detected by the system during boot up. They are display only fields. CAUTION Incorrect settings can cause your system to malfunction. To correct mistakes, press Esc until you have exited the Setup Utility. Primary / Secondary Master and Slave Settings Size Cylinders WPCOM Sec Heads LBA Mode Blk Mode PIO Mode 32Bit Mode Displays the hard disk capacity.
GoBook II Help Page 37 of 68 Field Bootup Sequence Setting C; A; CDROM S.M.A.R.T. for Hard A; C; CDROM CDROM; A; C; Disabled Enabled Bootup NumLock Display Expansion Mode Password Check Off On Enabled Disabled Setup Always Function Use this field to set the devices from which the system should boot in order of priority. The default value is C; A; CDROM,. This means the computer will attempt to boot from the hard disk drive (HDD), then the floppy disk drive (FDD), then the CD-ROM.
GoBook II Help Page 38 of 68 GoBook II™ Help Power Management Setup This section of the Setup Utility manages power settings. To save power, you may select the time the computer may idle before going into standby, or a low power state, then into suspend mode. See Power Management for an introduction to suspend modes.
GoBook II Help Page 39 of 68 GoBook II™ Help Peripheral Setup Settings on this page allow you to change port configurations. Field Internal MDC Modem Onboard Serial Port A & B Setting Auto Disabled Function Default is disabled. Auto COM 1 is assigned to the serial port located at the rear of your GoBook II. Set this field to Auto to enable the system to automatically assign an I/O address and interrupt to the port. Disables COM 1.
GoBook II Help Parallel Port IRQ Parallel Port DMA Parallel Port Mode Page 40 of 68 5 7 0 1 3 Normal Bi-dir EPP 1.9 EPP 1.7 ECP Only available with addresses 378, 278 and 3BC Only available in ECP mode Normal Bi-directional Enhanced Parallel Port Enhanced Parallel Port Extended Capabilities Port 72_0103_003 10 December 2002 © 2002 Itronix Corporation. All rights reserved.
GoBook II Help Page 41 of 68 Fan Off On Off System Beeps Audio On Off On Off Display Brightness On Off LEDs are disabled The fan functions normally The Fan is disabled. Heat management is then controlled solely through throttling. Beeps are heard during POST The system beeper is disabled during the boot up or resume process. Audio is preserved across suspend/resume and boot. The default volume level is set to mid range. Volume is set to 0 across suspend/resume and boot.
GoBook II Help Page 42 of 68 10 December 2002 © 2002 Itronix Corporation. All rights reserved. GoBook II™ Help Change Password Change Supervisor Password A supervisor password must be set before a lower-level password can be set. After selecting Change Supervisor Password, press Enter. You will be prompted for the new password, and then again to verify it. Type in six or fewer keystrokes. If you make an error, press Esc to start over.
GoBook II Help Page 43 of 68 GoBook II™ Help Exit and Saving Save Settings and Exit Select this option to save changes to the field values and restart the computer using the new values. Pressing F10 from any of the menu screens also allows you to save settings and exit. Exit Without Saving Select this option to discard any changes you have made to the field values and restart the computer using the old values. 72_0103_003 10 December 2002 © 2002 Itronix Corporation. All rights reserved.
GoBook II Help Page 44 of 68 II, and it helps identify a few sources for products with acceptable performance. Selecting the Right Surge Protection Consider the level of quality you need when selecting a surge suppressor. This depends on factors such as surge environment, the type of equipment to be protected, and the quality of the electrical wiring and service. Surge Environment Surge environment refers to the damage potential from electrical surges in a particular geographical area.
GoBook II Help Page 45 of 68 72_0103_003 10 December 2002 © 2002 Itronix Corporation. All rights reserved. GoBook II™ Help Vehicle Adapter The Vehicle Adapter is an optional device that supplies power from the vehicle battery to operate the computer and charge the battery installed in the unit. It typically connects to the vehicle battery using the cigarette lighter socket. To prevent possible damage to the battery, the system will not allow the battery to charge at extreme temperatures.
GoBook II Help Page 46 of 68 Vehicle Cradle The vehicle cradle is a vehicle-based docking station designed to safely secure the computer in the vehicle. A standard key lock located on the front of the cradle locks the computer onto the cradle for security purposes.
GoBook II Help z z z Page 47 of 68 A temperature of 5°C to 50°C (41°F to 22°F) is required when charging batteries with the vehicle cradle. Batteries will not charge successfully outside this temperature range. If you charge your battery daily, rely on the gas gauge reading to determine battery capacity. The gas gauge displayed by the Power Meter may show that the battery is full, but charging continues. This happens because the charging process is trying to put a little more capacity into the battery.
GoBook II Help Page 48 of 68 To clean or replace the cradle contact pins 1. Hold down the protective plastic cover. 2. Grasp a pin and pull straight up, being careful not to bend it. 3. Clean the pin with electrical contact cleaner and reinstall it into the cradle contact assembly. If a pin is bent or cannot be cleaned, contact your support desk to obtain a replacement pin. NOTE Pin 8 is not user replaceable. Contact your support desk for information about replacing this RF connector.
GoBook II Help Page 49 of 68 72_0103_003 10 December 2002 © 2002 Itronix Corporation. All rights reserved. Maintenance and Storage The GoBook II is ruggedized and weather resistant. Handle it with the normal care required by any sophisticated electronic equipment, and the computer will provide reliable service even under harsh field conditions. Follow the guidelines in this section to care for your unit.
GoBook II Help Page 50 of 68 GoBook II™ Help Computer Maintenance and Storage Maintaining Your Computer Follow these guidelines to help maintain the condition and performance of your computer. { Turn off the computer when you are not using it. { Charge the batteries daily or whenever their capacity is low. { Operate the computer within the recommended temperature ranges of -23°C to +60°C (32° F to +140°F).
GoBook II Help Page 51 of 68 Clean the connector using a cotton swab dipped in isopropyl alcohol. RJ-11/ RJ-45 / USB Connectors Make sure these connectors are operating properly. During normal use, the connector pins can get dirty or become broken, bent, or pushed out of place. Clean the connector with a cotton swab dipped in isopropyl alcohol. Keyboard Check all keys to make sure they are working properly.
GoBook II Help Page 52 of 68 10 December 2002 © 2002 Itronix Corporation. All rights reserved. GoBook II™ Help Hard Drive Care and Handling There is one hard drive option for the GoBook II: a removable shock-mounted 2.5-inch hard drive. All hard drives contain media for data storage in the form of a rotating disk, read/write head(s), a motor, and electronics for interfacing and control. Drives can be susceptible to damage from severe shock and other stressful environmental impacts.
GoBook II Help Page 53 of 68 4. Lift the hard drive cassette from the battery storage area. To install the hard drive: 1. Make sure the unit is shut down and external power is removed. 2. The battery door should be off the unit and the battery removed. 3. Make sure the small black release lever is rotated towards you (in its released position). 4. Slide the hard drive cassette into its storage location. 5. Replace the battery and then replace the battery door.
GoBook II Help Page 54 of 68 { There are no user repairable parts in the PC Card hard drive. Do not attempt to disassemble any part of the hard drive. The warranty will be voided if drive seals are broken or screws have been removed. { Periodically backup or archive important files and data. If you encounter or suspect hard drive problems, you can run SCANDISK, which provides a description of file usage and syntax on selected drives.
GoBook II Help Page 55 of 68 72_0103_003 10 December 2002 © 2002 Itronix Corporation. All rights reserved. Error Messages The following are possible error and warning messages you may encounter while operating the GoBook II computer. The messages described in this section are listed below.
GoBook II Help Page 56 of 68 Hard disk boot sector invalid Hard disk failed Restart the computer by pressing the power button for at least eight seconds. If the problem persists, contact your supervisor or your organization's help desk. Insert boot-disk and press any key Restart the computer by pressing the Power Button for at least eight seconds. If the problem persists, contact your supervisor or your organization's help desk. KB / Interface Error Reboot the computer by pressing CTRL+ALT+DEL.
GoBook II Help Page 57 of 68 temperature is too cold to safely turn on the HDD. Apply external power and/or move the unit to a location that is at least 5°C. Warming internal hard drive. Please wait... The temperature is less than 5°C and the HDD heater is operating. The unit will continue booting when the HDD temperature is warm enough for safe operation. 72_0103_003 10 December 2002 © 2002 Itronix Corporation. All rights reserved.
GoBook II Help Page 58 of 68 Make sure that the media is inserted fully into the card socket, then press r to retry. 72_0103_003 10 December 2002 © 2002 Itronix Corporation. All rights reserved. GoBook II™ Help Windows Messages Windows messages are typically self-explanatory. (See Troubleshooting, for more information). Application Messages Both MS-DOS and Windows applications may display messages if a warning or error condition occurs.
GoBook II Help z Page 59 of 68 Third-party Windows manuals are available from your local bookstore. GoBook II™ Help Applications My application locks up, acts strangely, or produces a General Protection Fault (GPF) error { If you’ve tried to resolve the problem and your application still doesn’t respond, you may need to restart your computer as described below. To reboot your computer, select Start, Shut Down, Restart. If that does not work, try pressing CTRL+ALT+DEL twice.
GoBook II Help Page 60 of 68 { If possible, turn off the computer while the battery is charging. { If the battery is new or has been stored for a week or more, follow this procedure: 1. Make sure the computer is turned off. 2. Open the battery door and remove the battery. 3. Connect the AC adapter to the computer and an AC wall outlet, and then turn on the computer by pressing the Power Button. 4. Let the computer complete the boot process. Then reinstall the battery and replace the battery door.. 5.
GoBook II Help { Page 61 of 68 As your battery ages, the maximum capacity that it can hold naturally decreases, and even the best maintained batteries eventually need to be retired. Consider replacing the battery if you are not getting the usage you need from it. 72_0103_003 10 December 2002 © 2002 Itronix Corporation. All rights reserved. GoBook II™ Help Display The display performance is slow { The temperature may be too cold. Move the computer to a warmer operating environment.
GoBook II Help Page 62 of 68 72_0103_003 10 December 2002 © 2002 Itronix Corporation. All rights reserved. GoBook II™ Help Hard Disk The hard disk will not spin up so the computer can’t boot up { This occurs if the unit is exposed to extreme low temperatures. This is not a hardware failure associated with the hard disk . Allow the computer to warm to room temperature.
GoBook II Help Page 63 of 68 I/O Ports I can’t access a serial port { Make sure another application is not using the same port . { Make sure the correct COM port is selected in your application. Refer to the online Help for your application. 72_0103_003 10 December 2002 © 2002 Itronix Corporation. All rights reserved. GoBook II™ Help Keyboard Something unexpected happens when I press a key { You may have pressed a key combination that performs a Windows function.
GoBook II Help Page 64 of 68 the instructions on the screen to install it. { Make sure the communication settings are correct in your application. Refer to the online Help for your application. The modem doesn’t dial a number Check these things: { If you are using an external modem, make sure the cables are attached correctly. { Make sure your communications parameters are correct in your application. Refer to the online Help for your application.
GoBook II Help Page 65 of 68 The computer shuts off unexpectedly { The computer has entered suspend mode . Press any key to turn it back on. { The battery capacity may be low. Connect external power to charge the battery, or replace the battery with a fully charged one. { The battery contacts may be dirty. Turn off the computer, remove the battery, and clean the contacts. The speaker volume is too high or too low { Increase the volume by pressing FN+F9; decrease the volume by pressing FN+F8.
GoBook II Help Page 66 of 68 { Run MS-DOS applications in full screen rather than a window. Press ALT+ENTER to toggle between full screen and window mode. { If you’re using desktop wallpaper, set wallpaper to None. To do this, choose Display from Control Panel and make the appropriate change. { Make sure you have enough space on your hard disk . Contact your supervisor or your organization’s help desk for assistance. { Set up a permanent swap file.
GoBook II Help Page 67 of 68 { The mouse pointer may be off the screen. Move the mouse until it reappears on the screen. { From the Start Menu, select Settings, Control Panel, and then choose Mouse. The Motion tab contains settings for the mouse speed and mouse trails. 72_0103_003 10 December 2002 © 2002 Itronix Corporation. All rights reserved. GoBook II™ Help PC Cards I can’t remove the PC card { Press the ejector button located inside the PC card door on the side of the computer.
GoBook II Help Page 68 of 68 72_0103_003 10 December 2002 © 2002 Itronix Corporation. All rights reserved. GoBook II™ Help Pen/Touch Screen When I try to use the stylus on my touch screen, nothing happens { If you cannot select objects accurately with the stylus, you may need to recalibrate the touch screen. To calibrate the touch screen 1. From the Start Menu, select Programs, Mobile Computer Tools and then choose Touch Screen Calibrator. This opens the Calibration Applet. 2.
Legal Information Page 1 of 3 License Agreement. Itronix hardware products may be reconditioned, or be manufactured from parts and components that may be new, used, rebuilt, or recycled and in some cases, the hardware product may not be new and may have been previously installed. In any event, Itronix warranty terms apply. Trademark and Patent Notice Itronix is a registered trademark of Itronix Corporation.
Legal Information Page 2 of 3 Users should ensure for their own protection that the electrical ground connections of the power utility, telephone lines, and internal metallic water pipe system, if present, are connected together. This precaution may be particularly important in rural areas. CAUTION! Users should not attempt to make such connections themselves, but should contact the appropriate electric inspection authority, or electrician, as appropriate.
Legal Information Page 3 of 3 In the event of problems, you should contact your equipment supplier in the first instance. Safety Information Enclosed with each IX260 Laptop PC is the Radio specific safety information. Do not proceed with out reviewing the Information provided on that document. Do not proceed beyond a WARNING or CAUTION until the indicated conditions are fully understood and met. 72_0119_001 mod 7/4 28 June 2004 mk:@MSITStore:C:\Documents%20and%20Settings\harwoodm.ITRXNT1\Desktop\KBC...