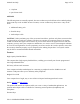
GoBook Pro Help Page 1 of 74 Getting Started Congratulations on your purchase of the Itronix GoBook Pro computer! Your new GoBook Pro features the most innovative advances in portable computing technology. It combines state-of-the-art ergonomics with a rugged, durable architecture to provide you with a notebook computer that is compact, powerful, rugged and easy to use.
GoBook Pro Help Page 2 of 74 Unpacking Your System Inside your packaging you will find: l Itronix GoBook Pro computer l Power cord l AC adapter l Battery l 2 Styluses l GoBook Pro Quick Start Guide You may have additional components or peripherals if you ordered these items separately. Check your packing slip for a complete list of items included in your package. 79_0100_001 © 2001 Itronix Corporation. All rights reserved. 1.
GoBook Pro Help Page 3 of 74 not use aerosols, solvents, or strong detergents l Slots and openings in the computer case are for ventilation purposes. Do not block or cover these openings or the system could overheat l On the bottom of the GoBook Pro, there is a label with information on the power requirements of this system. These requirements must be followed.
GoBook Pro Help l 2 Styluses l Quick Start Guide Page 4 of 74 OPTIONS The following items are normally optional, but some vendors may include them in the standard package. Some items may not be available in some countries, or some vendors may choose not to carry all the items. l Additional battery pack l Shoulder Strap l Audio adapter cable CAUTION When purchasing any of the accessories listed above, purchase only those accessories that are approved for use with your computer.
GoBook Pro Help Page 5 of 74 Function keys allow you to suspend your computer, shut the LCDs off, and give you easy control of audio and your monitor. Where to Look For Information About Your Computer This User’s Manual describes the key elements of your computer. New users can find a simple step-bystep orientation in this chapter. About Windows The Windows Online Help, found on the Start menu, offers extensive Windows assistance. Welcome to Windows offers an online orientation for new Windows users.
GoBook Pro Help Page 6 of 74 1. Align the battery connectors and place the battery in the computer. 2. Slide the battery latch to the locked position. 3. Make certain that the battery latch engages properly. NOTE When the battery is installed and the computer is connected to AC power, see Connecting the AC Adapter below, it starts charging automatically. At moderate temperatures, approximately 70° Fahrenheit (21°C), the battery will be fully charged in four to six hours.
GoBook Pro Help Page 7 of 74 the Display lid suspend/resume drop down box. Computer Off In Off Mode, the contents of your computer’s memory are held intact, while practically all the rest of the components in your computer either turn off completely, or reduce power consumption to a minimum. In Off Mode, your computer remains active, but with a minimum possible power consumption. Return the computer to full power by pressing FN On (spacebar).
GoBook Pro Help Page 8 of 74 Your GoBook Pro computer has a touch screen display. Follow the guidelines below to calibrate the touch screen for optimum use. CAUTION l Always use an approved stylus or your finger. l Never use sharp, hard, or abrasive implements on the touch screen such as ball point pens, pencils, or keys. They could damage the screen. l To clean the touch screen panel, apply a household glass cleaner to a soft, clean, dry cloth and wipe the screen.
GoBook Pro Help Page 9 of 74 screen by clicking OK. 79_0100_001 © 2001 Itronix Corporation. All rights reserved. 1. Getting Started Topics GoBook Pro Help Startup Problems? If your computer does not operate, try these solutions. l Connect the AC adapter to charge the battery if it is not charged. NOTE The Power LED on the AC adapter should be lit as well as the external power LED activity indicator on the GoBook Pro if the AC adapter is connected and functioning properly.
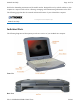
GoBook Pro Help Page 10 of 74 built for the demanding environment of the mobile worker. Designed for use by mobile workforces, this computer is a superior work tool for collecting, managing, and communicating information in the field. The following pages describe the external and internal features of your GoBook Pro computer. 2. Getting Familiar with Your Computer Topics GoBook Pro Help Individual Parts The following diagrams and descriptions provide an overview of your GoBook Pro computer.
GoBook Pro Help Page 11 of 74 Left Side View Right Side View Bottom View LED Activity Indicators The activity indicators, located between the keyboard and the touch screen, light up when a particular function of the computer is active. Each indicator is marked with a corresponding symbol and is visible when the lid is open or closed. LED numbers are from left to right file://C:\WINDOWS\TEMP\~hh6357.
GoBook Pro Help Page 12 of 74 Icon & LED Function # Power Status LED Description The computer is powered and operating The battery is low Charge Status Amber Blinking Amber Not lit Amber Disk Status (HW) Blinking Amber Not lit Amber The computer is suspended or off The computer is attached to AC power and the battery is fully charged The computer is attached to AC and the battery is charging The computer is not attached to AC power The hard disk drive is being accessed Not lit The hard disk drive
GoBook Pro Help Page 13 of 74 l 81-key US keyboard; 82-key international keyboard l Twelve function keys, F1-F12 l Embedded numeric keypad l Mouse keys and cursor control keys Restarting the Computer Press… CTRL+ALT+DEL twice Press and hold both mouse buttons for about ten seconds and then release the buttons. To do this Soft reboot the computer. CAUTION All open and unsaved data will be lost.
GoBook Pro Help Key CTRL ENTER ESC PRTSC SHIFT FN SPACEBAR TAB Page 14 of 74 Description The CTRL (control) key works with other keys to perform a variety of functions. The ENTER key signals the computer that you have completed your entry. This is your way of telling the computer to process the information that you have entered. The ESC (escape) key cancels the current line if you are working in DOS. In some DOS applications, pressing the ESC key backs you out of your last menu selection.
GoBook Pro Help Function key FN+F2 FN+F3 FN+F5 FN+F6 FN+F7 FN+F8 FN+F10 FN+SPACEBAR FN+Q Page 15 of 74 Description Decreases LCD brightness Increases LCD brightness Toggles the audio between mute and on Decrease volume Increase volume Toggles between LCD/CRT displays Suspend to Disk Turns on computer Turn off computer Numeric Keypad The numeric keypad is embedded in the keyboard area. The embedded keypad emulates the numeric keypad typically found on a full-size keyboard.
GoBook Pro Help Page 16 of 74 Dragging l Move the pointer to the desired location then press down the left button. While still holding down the left button, move the pointer to the desired location. Release the button. l Move the pointer to the desired location. Tap the pointing stick twice quickly as if you were double-clicking, however do not remove your finger after the second tap. Move the cursor to the desired location. Lift your finger to finish dragging.
GoBook Pro Help Page 17 of 74 Disk Drives The Hard Disk Drive The hard disk provides high-capacity storage and fast access. Windows and most programs are stored here. Your GoBook Pro identifies the hard disk drive as drive C. 79_0100_001 © 2001 Itronix Corporation. All rights reserved. 2.
GoBook Pro Help Page 18 of 74 Removing a PC Card 1. If a PC Card is in use, you must shut down the PC Card before removing it. 2. Click the PC Card icon on the right side of the Windows tray taskbar , then click Stop. 3. When the Windows message appears, telling you that it is safe to remove the card, click OK. 4. Press the eject button on the PC Card slot to release the eject button (it is spring loaded and remains hidden until it is pressed). 5. Press the eject button again to release the PC Card.
GoBook Pro Help Page 19 of 74 6. Click the Settings tab. 7. Click the Advanced button. 8. Click the S3DuoVue tab. The screen shown at the right appears. 9. Select the CRT box to enable display on an external monitor. 10. You can also use the FN+F8 hot keys to cycle through the CRT/LCD settings. 79_0100_001 © 2001 Itronix Corporation. All rights reserved.
GoBook Pro Help Page 20 of 74 4 Microphone/Audio Connector Connect a microphone to this port to record audio. Connect external speakers or a stereo headset to listen to multimedia. 5 External Monitor Connector Connect an external monitor to this port. 79_0100_001 © 2001 Itronix Corporation. All rights reserved. 3. Making Connections Topics GoBook Pro Help Left Side Connectors 1 PC-Card Slot Use this slot to connect PCMCIA-card devices.
GoBook Pro Help Page 21 of 74 appropriate network provider. Before using your wireless modem you must sign up for service with a wireless network provider. When you register, you will need to furnish the network provider with your modem ID and the computer’s serial number. This information is printed on a label located on the bottom of your GoBook Pro computer. 4.
GoBook Pro Help Page 22 of 74 unregistered device. Unauthorized use of your radio modem may interfere with local business or government communications, resulting in fines or other legal action. 79_0100_001 © 2001 Itronix Corporation. All rights reserved. 4. Wireless Modem Topics GoBook Pro Help Wireless Modem LED Status Air Card 300 (CDPD) The wireless modem is powered ON after reboot, or resume, as indicated by the wireless modem LED activity indicator being a steady green.
GoBook Pro Help Page 23 of 74 Cisco Wireless LAN The wireless modem is powered ON after initial boot, reboot, or resume as indicated by the wireless modem LED activity indicator being solid green. It can be turned off by right clicking the PC Card icon in the system task tray, then selecting “Stop Cisco Systems 340 Series Wireless LAN Adapter”. It can be repowered by doing a suspend/resume, or by rebooting the computer. 79_0100_001 © 2001 Itronix Corporation. All rights reserved. 4.
GoBook Pro Help Page 24 of 74 enter. The RIM Diagnostic screen should appear. This diagnostic program allows the user to send a short message either to yourself or another device on the network. For more information on how use the built-in diagnostics, visit the RIM website at www.rim.net. Cisco Wireless LAN l Driver comes pre-installed 79_0100_001 © 2001 Itronix Corporation. All rights reserved. 4.
GoBook Pro Help Page 25 of 74 RIM 902M radio, an application that uses one of these protocols must be installed on the computer and configured to communicate on COM4. Cisco Wireless LAN l Go to your preferred LAN application and run normally CAUTION While the radio is operating, the antenna must be at least 4.0 cm from all persons in order to comply with the FCC RF exposure limit. Radio (wireless modem) operators must make sure their radio unit is in compliance with these FCC regulations.
GoBook Pro Help Page 26 of 74 How your computer responds to a low battery condition can be set by going to Start, Settings, Control Panel, Power Management, Alarms. Two different power alarms can be enabled or disabled: the Low Battery Alarm, and the Critical Battery Alarm. Use the slidebar to set the power level at which the alarms are activated. Click on the Action button to choose whether the alarm sounds, displays a message, or both.
GoBook Pro Help Page 27 of 74 to recharge. If your computer is turned on and is not in suspend mode , it will take about 6 hours to recharge the battery. Refer to the following table: Charging Discharging System On 6 - 7 hours 3-4 hours System Off (suspend to RAM) 4 hours — Power Saving Modes Adjust the default power management settings in the Power Management (Power Options) dialog box in the Control Panel.
GoBook Pro Help Page 28 of 74 There are four ways to initiate suspend mode. The settings can be adjusted in the Power Management dialog box: l The computer will automatically enter suspend mode when not used for a set period of time l Selecting the Stand by button in the Shut Down Windows dialog box l Pressing the suspend/system off function key (FN + Q) l Closing the lid (display) if enabled in power settings.
GoBook Pro Help Page 29 of 74 If the temperature continues to rise: 2. Processor activity is reduced. You may notice a slight loss of performance when this happens. If the computer overheats: 3. The processor will stop functioning and the computer will shutdown. 79_0100_001 © 2001 Itronix Corporation. All rights reserved. Customizing Your BIOS Settings This chapter explains how to use the Setup Utility to modify the BIOS settings.
GoBook Pro Help Page 30 of 74 on the computer display that says “Press F2 to run Setup.” When you see this prompt, press the F2 key and the system will start the Setup Utility and display the main menu of the utility.
GoBook Pro Help Page 31 of 74 79_0100_001 © 2001 Itronix Corporation. All rights reserved. 6. Customizing Your BIOS Topics GoBook Pro Help The Main Menu You can change the system date and time on the main menu and view system and extended memory.
GoBook Pro Help Page 32 of 74 System Memory N/A Extended Memory N/A Displays amount of conventional memory detected during boot up Displays the amount of extended memory detected during boot up Primary Master The drive type is automatically detected by the BIOS. You can use this menu to view the hard disk configuration. Field Type Setting User None Auto 1-39 CD-ROM ATAPI Removable Total Sectors Maximum Capacity Sectors N/A N/A 1 to 63 file://C:\WINDOWS\TEMP\~hh6357.
GoBook Pro Help Multi-Sector Transfers LBA Mode Control Page 33 of 74 Disabled Standard 2 sectors 4 sectors 8 sectors 16 sectors Enabled Disabled 32-Bit I/O Enabled Disabled Transfer Mode Standard Fast PIO 1 Fast PIO 2 Fast PIO 3 Fast PIO 4 SMART Monitoring Enabled Disabled Ultra DMA Mode: Mode 0 Mode 1 Mode 2 Disabled Any selection except Disabled determines the number of sectors transferred per block.
GoBook Pro Help Page 34 of 74 Field Type Setting Auto None CD-ROM User Multi-Sector Transfers N/A LBA Mode Control N/A 32 Bit I/O Disabled Enabled Standard Fast PIO 1 Fast PIO 2 Fast PIO 3 Fast PIO 4 FPIO 3 / DMA 1 FPIO 4 / DMA 2 Transfer Mode SMART Monitoring Ultra DMA Mode N/A Disabled Mode 0 Mode 1 Mode 2 Function Auto=Autotyping, the drive itself supplies the correct drive information.
GoBook Pro Help Field QuickBoot Mode Summary Screen SETUP Prompt Page 35 of 74 Setting Enabled Disabled Enabled Disabled Enabled Disabled Function Enabled allows the system to skip certain tests while booting, decreasing the time needed to boot. Displays system configuration summary screen during boot up. Displays "Press for Setup" during boot up." Disabling this option does not disable , only the display of the message. 79_0100_001 © 2001 Itronix Corporation. All rights reserved. 6.
GoBook Pro Help Field Installed O/S: Reset Configuration Data: I/O Device Configuration USB Host Controller USB BIOS Legacy Support Page 36 of 74 Setting Other Win95 Win98 WinMe WinNT2K Yes No sub-menu Disabled Enabled Disabled Enabled Function Select the operating system you use most often Yes erases all configuration data in a section of memory for ESCD (Extended System Configuration Data) which stores the configuration settings for non-PnP plug-in devices.
GoBook Pro Help Page 37 of 74 l Automatically by the BIOS during POST l Automatically by a PnP Operating System such as Windows 95 after the Operating System boots. Field Serial port A: Setting Disabled Enabled Auto Function Disabled turns off the port . Enabled requires you to enter the base Input/Output address and the Interrupt number on the next line Auto makes the BIOS configure the port automatically during POST. 79_0100_001 © 2001 Itronix Corporation. All rights reserved. 6.
GoBook Pro Help Field Set User Password Page 38 of 74 Password on boot Setting Up to seven alphanumeric characters Up to seven alphanumeric characters Enabled Disabled Diskette access fixed disk boot sector Enabled Disabled Normal Write Protect System backup reminder Virus check reminder Disabled Daily Weekly Monthly Set Supervisor Password Function Pressing Enter displays the dialog box for entering the user password. In related systems, this password gives restricted access to SETUP menus.
GoBook Pro Help Page 39 of 74 NOTE In some systems, the User and supervisor passwords are related; you cannot have a User password without first creating a Supervisor password. In other systems, you can create and use them independently 79_0100_001 © 2001 Itronix Corporation. All rights reserved. 6. Customizing Your BIOS Topics GoBook Pro Help The Power Menu The options available in power management depend upon the hardware installed in your system. Those shown here are from a typical system.
GoBook Pro Help Field Power Savings Idle Mode Standby Timeout Auto Suspend Timeout Suspend Mode Hard Disk Timeout Video Timeout Page 40 of 74 Setting Disabled Customized Maximum Power Savings Maximum Performance On Off Off 1 min 2 min 4 min 6 min 8 min 12 min 16 min Off 5 min 10 min 15 min 20 min 30 min 40 min 60 min Suspend Save to Disk Disabled 10 sec 15 sec 30 sec 45 sec 1 min 2 min 4 min 6 min 8 min 10 min 15 min Disabled 10 sec 15 sec 30 sec 45 sec 1 min 2 min 4 min file://C:\WINDOWS\TEMP\~hh63
GoBook Pro Help Resume On Modem Ring Resume On Time Resume Time Page 41 of 74 6 min 8 min 10 min 15 min Off On Off On XX:XX:XX Wakes up system when an incoming call is detected on the modem. Wakes up system at predetermined time. Predetermined time to wake up the system 79_0100_001 © 2001 Itronix Corporation. All rights reserved. 6.
GoBook Pro Help Field Removable Devices Hard Drive CD-ROM Page 42 of 74 Setting N/A N/A N/A Function Shows removable devices Shows hard drive(s) Shows CD-ROM(s) 79_0100_001 © 2001 Itronix Corporation. All rights reserved. 6. Customizing Your BIOS Topics GoBook Pro Help The Exit Menu You use the exit menu to leave the BIOS Setup Utility . ESC does not exit this menu. You must select on of the items from the menu or menu bar to exit. file://C:\WINDOWS\TEMP\~hh6357.
GoBook Pro Help Field Exit Saving Changes Exit Discarding Changes Use Setup Settings Load Setup Defaults Page 43 of 74 Function After making your selections on the Setup menus, this option stores the selections displayed in the menus in CMOS, a special section of memory that stays on after your turn your system off. It then exits the SETUP program. The next time you boot your computer, the BIOS configures your system according to the Setup selections stored in CMOS.
GoBook Pro Help Page 44 of 74 7. Optional Equipment and Accessories Topics GoBook Pro Help Vehicle Adapter The Vehicle Adapter is an optional device that supplies power from the vehicle battery to operate the computer and charge the battery installed in the unit. It typically connects to the vehicle battery using the cigarette lighter socket. To prevent possible damage to the battery, the system will not allow the battery to charge at extreme temperatures.
GoBook Pro Help Page 45 of 74 Vehicle Cradle The vehicle cradle is a vehicle-based docking station designed to safely secure the computer in the vehicle. A standard key lock located on the front of the cradle locks the computer onto the cradle for security purposes.
GoBook Pro Help Page 46 of 74 charging process is trying to put a little more capacity into the battery. External power can be removed at this time since the battery is virtually full. l If your battery is new or has not been used for several weeks, rely on the indicator light to determine when the battery is fully charged. The gas gauge is unreliable in these cases; it may read 100 percent, but the actual capacity is only 10 percent.
GoBook Pro Help Page 47 of 74 Cleaning or Replacing Cradle Contact Pins The contact pins on the vehicle cradle are exposed to contamination and stress when the computer is installed and removed from the cradle during normal daily operation. If the pins become dirty, they can be cleaned with an electrical contact cleaner. The power and ground pins are pins 3 and 8 respectively.
GoBook Pro Help Page 48 of 74 service. Surge Environment Surge environment refers to the damage potential from electrical surges in a particular geographical area. A high quality suppressor should be used if there is frequent lightning activity in the area and the location service is fed by overhead utility poles. Type of Equipment to be Protected If the computer is equipped with a modem, the modem should also be surge protected.
GoBook Pro Help Page 49 of 74 79_0100_001 © 2001 Itronix Corporation. All rights reserved. 7. Optional Equipment and Accessories Topics GoBook Pro Help Parallel Adapter 79_0100_001 © 2001 Itronix Corporation. All rights reserved. Maintenance and Storage The GoBook Pro is ruggedized and weather resistant. Handle it with the normal care required by any sophisticated electronic equipment, and the computer will provide reliable service even under harsh field conditions.
GoBook Pro Help Page 50 of 74 They could damage the screen. l To clean the touch screen panel, apply a household glass cleaner to a soft, clean, dry cloth and wipe the screen. 79_0100_001 © 2001 Itronix Corporation. All rights reserved. 8. Maintenance and Storage Topics GoBook Pro Help Hard Drive Care and Handling All hard drives contain media for data storage in the form of a rotating disk, read/write head(s), a motor, and electronics for interfacing and control.
GoBook Pro Help Page 51 of 74 another. This will unload the read/write heads and spin down the disk. l Maintain the environmental seal of the computer by keeping PC Card access door closed and latched. Also avoid exposing the unit to extreme temperatures or moisture when the door is open. l Periodically backup or archive important files and data. External PC Card Hard Drives Each PC Card hard drive manufacturer provides specific guidelines for the care and handling of the product.
GoBook Pro Help Page 52 of 74 Battery Maintenance and Storage Maintaining Batteries Follow these guidelines to maintain performance of Lithium-Ion (Li-on) batteries. l Avoid exposing batteries to extremely hot or cold temperatures for long periods. To prevent possible damage to the battery, the GoBook Pro does not allow the battery to charge if the internal temperature of the battery gets too low (< 5°C or < 41°F) or too high (> 50°C or > 122° F).
GoBook Pro Help Page 53 of 74 l Charge the batteries daily or whenever their capacity is low. l Operate the computer within the recommended temperature ranges of 0°C to +60°C (32°F to +140°F). Care and Cleaning Physical Inspection Periodically inspect the computer and accessories for wear, damage, loose or missing parts. Identifying and correcting potential problems early can help reduce the need to return the unit for service.
GoBook Pro Help Page 54 of 74 If keyboard problems persist, the keyboard might need to be replaced. This can be done without returning the unit for service. Contact your local support person for more information. I/O Ports Make sure the video, serial, and audio ports are operating properly. Periodically inspect the ports for damage or contamination, and make sure the cover is attached to the computer. The I/O cover can be replaced without returning the unit for service.
GoBook Pro Help Page 55 of 74 Error Messages The following are possible error and warning messages you may encounter while operating the GoBook Pro computer. The messages described in this section are listed below. Error and warning messages are generated by several different sources including: l Power On Self Test (POST) l MS-DOS l Windows l Applications A. Error Messages Topics GoBook Pro Help POST Messages When the GoBook Pro computer restarts, it tests its hardware components.
GoBook Pro Help Page 56 of 74 Keyboard controller failed test. May require replacing keyboard controller. Keyboard locked - Unlock key switch Unlock the system to proceed. Monitor type does not match CMOS - Run SETUP Monitor type not correctly identified in Setup Shadow Ram Failed at offset: nnnn Shadow RAM failed at offset nnnn of the 64k block at which the error was detected. System RAM Failed at offset: nnnn System RAM failed at offset nnnn of in the 64k block at which the error was detected.
GoBook Pro Help Page 57 of 74 Previous POST did not complete successfully. POST loads default values and offers to run Setup. If the failure was caused by incorrect values and they are not corrected, the next boot will likely fail. On systems with control of wait states, improper Setup settings can also terminate POST and cause this error on the next boot. Run Setup and verify that the wait-state configuration is correct. This error is cleared the next time the system is booted.
GoBook Pro Help Page 58 of 74 ServerBIOS2 test error: Fail-Safe Timer takes too long. device Address Conflict Address conflict for specified device. Allocation Error for: device Run ISA or EISA Configuration Utility to resolve resource conflict for the specified device. CD ROM Drive CD ROM Drive identified. Entering SETUP ... Starting Setup program Failing Bits: nnnn The hex number nnnn is a map of the bits at the RAM address which failed the memory test. Each 1 (one) in the map indicates a failed bit .
GoBook Pro Help Page 59 of 74 nnnn kB Shadow RAM Passed Where nnnn is the amount of shadow RAM in kilobytes successfully tested. nnnn kB System RAM Passed Where nnnn is the amount of system RAM in kilobytes successfully tested. One or more I2O Block Storage Devices were excluded from the Setup Boot Menu There was not enough room in the IPL table to display all installed I2O block-storage devices. Operating system not found Operating system cannot be located on either drive A: or drive C:.
GoBook Pro Help Page 60 of 74 System BIOS shadowed System BIOS copied to shadow RAM. UMB upper limit segment address: nnnn Displays the address nnnn of the upper limit of Upper Memory Blocks, indicating released segments of the BIOS which can be reclaimed by a virtual memory manager. Video BIOS shadowed Video BIOS successfully copied to shadow RAM. 79_0100_001 © 2001 Itronix Corporation. All rights reserved. A.
GoBook Pro Help Page 61 of 74 Non-System disk or disk error Replace and press any key when ready This can occur if media is in the card socket and you restart the computer. Remove the media, and then press any key. Not ready reading drive X (where X is any drive letter) Abort, Retry, Fail? Make sure that the media is inserted fully into the card socket, then press r to retry. 79_0100_001 © 2001 Itronix Corporation. All rights reserved. A.
GoBook Pro Help Page 62 of 74 l First look through the categories in this section for a solution. l If you don’t find a solution for your situation here, try one of the resources listed below. l If you are having a problem with a computer application , use the online Help that comes with the application to find a solution. l If you still cannot resolve your problem, contact the help desk at your organization. B.
GoBook Pro Help Page 63 of 74 B. Troubleshooting Topics GoBook Pro Help Batteries The battery does not charge l To prevent possible damage to the battery, the system will not allow a charge if the battery temperature is extremely hot or cold (such as in a closed, unattended vehicle). If possible, charge the battery in a location with a moderate temperature of around 20°C (68°F). l If possible, turn off the computer while the battery is charging.
GoBook Pro Help Page 64 of 74 The gas gauge isn’t full after charging the battery l This may indicate that the charging process terminated prematurely. The gas gauge reads “full,” but the indicator light is still On l If you charge your battery daily, rely on the gas gauge reading to determine battery capacity. The charging process may continue even if the gas gauge reads full. External power can be removed because the battery is virtually full.
GoBook Pro Help l Page 65 of 74 Make the online hypertext jumps black by adding the line JumpColor=0,0,0 to the [Windows Help] section of WIN.INI. I can’t see the cursor while using the DOS editor l Press FN+insert to change from insert mode to overwrite mode to enable a block cursor. When it defaults to insert mode, the DOS editor uses an underline cursor which is less visible than the block cursor for overwrite mode.
GoBook Pro Help Page 66 of 74 79_0100_001 © 2001 Itronix Corporation. All rights reserved. B. Troubleshooting Topics GoBook Pro Help I/O Ports I can’t access a serial port l Make sure another application is not using the same port . l Make sure the correct COM port is selected in your application. Refer to the online Help for your application. 79_0100_001 © 2001 Itronix Corporation. All rights reserved. B.
GoBook Pro Help Page 67 of 74 79_0100_001 © 2001 Itronix Corporation. All rights reserved. B. Troubleshooting Topics GoBook Pro Help Landline Modems The modem doesn’t work l When you first try to use HyperTerminal or similar application , the system responds with a message asking if you want to install the modem. Answer “Yes” to this question and follow the instructions on the screen to install it. l Make sure the communication settings are correct in your application.
GoBook Pro Help Page 68 of 74 message asking if you want to install the modem. Answer “Yes” to this question and follow the instructions on the screen to install it. The modem dials and the answering modem generates tone, but our modem does not begin the training sequence to establish a connection Although the problem may appear to originate from the computer, the source of the problem is the answering modem. l Try setting up the answering modem to generate the correct V.
GoBook Pro Help Page 69 of 74 l Connect external power to charge the battery if it is not charged. l If you are using the AC adapter , check the electrical outlet you are using to make sure it is working properly. l If the GoBook Pro computer does not turn on, restart the computer by holding down both mouse buttons for at least 10 seconds and then release the buttons. The computer won’t turn off l Press and hold the FN+Q keys.
GoBook Pro Help l Page 70 of 74 Try resetting the computer again. If this doesn’t work, remove all power, and allow the unit to remain idle for ten minutes. After ten minutes, connect external power and retry. 79_0100_001 © 2001 Itronix Corporation. All rights reserved. B. Troubleshooting Topics GoBook Pro Help Mouse I have difficulty double-clicking the mouse fast enough l From the Start Menu, select Settings, Control Panel, and then choose Mouse.
GoBook Pro Help Page 71 of 74 I can’t remove the PC card l Press the ejector button located inside the PC card door on the side of the computer. The button will pop out. Press the ejector button again to eject the PC card. Slide the card out. l If the ejector button malfunctions when you press it, release the button and then press it again. Diskette Read Error l Any card in the PC Card socket except for a properly formatted memory card will cause this error since it is trying to read the PC Card.
GoBook Pro Help Page 72 of 74 2. Follow the instructions on the screen to calibrate the touch screen. The touch screen display warps or pillows in high humidity l The computer remains functional; however, moving the computer to a more suitable environment will allow the display to recover. 79_0100_001 © 2001 Itronix Corporation. All rights reserved. B. Troubleshooting Topics GoBook Pro Help Wireless Modems How can I tell if my CDPD radio is working? Try the following procedure: 1.
GoBook Pro Help Page 73 of 74 8. If a red X is displayed in the check box next to “Ping the network” then your CDPD radio cannot deliver a packet to itself through the CDPD network. Check with your CDPD network provider to verify your NEI and DNS are correct. If your NEI and DNS are correct, you may be at the edge of RF coverage or have a RF performance problem. Check your RF coverage and antenna position. Press Back to repeat test. 9.
GoBook Pro Help Page 74 of 74 MOTIENT & RAM/BSWD) R – Displays RSSI level in dBuV (dBuV - 107 = dBm). (ARDIS/MOTIENT & RAM/BSWD) D – Displays RF Modem system status. (ARDIS/MOTIENT & RAM/BSWD) P – Ping, which can be used to send a system check to yourself. (ARDIS/MOTIENT & RAM/ BSWD) N – Set the current network. (ARDIS/MOTIENT & RAM/BSWD) 7. Select an option from the menu for your session. For troubleshooting purposes, D, R, and P will generally establish if the RF Modem is functional.