
User Manual

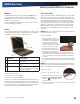
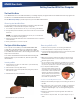
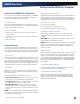

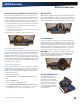
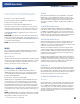
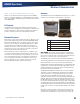
Table Of Contents
- Notices and Compliance
- Getting Started
- Getting Familiar With Your Computer
- Top View
- Left Side View
- Right Side View
- Back Edge View
- Bottom View
- Keyboard Basics
- Primary Keys
- Keyboard ergonomics
- LED Status Indicators
- Touchpad
- Display
- Memory
- Audio
- The PC Card Slot
- The Hard Disk Drive
- The Optical Disk Drive (option)
- Smart Card or EXPRESS Card Slot (option)
- Computer Security
- ENERGY STAR®
- Ports and Connectors
- Making Connections
- Wireless Communication
- Operating with Battery Power
- Customizing Your BIOS Settings
- Optional Equipment and Accessories
- Maintenance
- Service
- Troubleshooting
- Application Troubleshooting
- Battery Troubleshooting
- Display Troubleshooting
- Hard Disk Troubleshooting
- Keyboard and Mouse Troubleshooting
- Modem Troubleshooting
- Miscellaneous Troubleshooting
- The computer shuts off unexpectedly
- The speaker volume is too high or too low
- The computer won’t turn on
- The computer will not come on when the power button is pressed but the power, external power and battery indicators flash in sequence.
- The computer won’t turn off
- The computer enters suspend mode too quickly
- The computer doesn’t automatically suspend
- The system date and time are incorrect
- I receive an “out of memory” error message
- PC Card Troubleshooting
- FAQs
- I’ve heard that cleaning up and rearranging files on the hard drive will improve the startup speed of my programs. How do I do this?
- How do I adjust the volume?
- How do I change the battery?
- How long will the battery last?
- How do I change the display brightness?
- How do I clean the display?
- How do I calibrate the touch screen?

General Dynamics Itronix | 72-0136-004
GD6000 User Guide
Getting Familiar With Your Computer
The Hard Disk Drive
Your GD6000 features a removable hard disk to provide high-capacity storage and fast access. Windows and most programs are
stored here. Your GD6000 identifies the hard disk drive as drive C.
See the BIOS Setup Utility to password protect your removable hard disk drive.
Removing the Hard Disk Drive
You should print these instructions before continuing. They will not be
available after you shut down the computer in step two.
1. Turn off the computer and turn it over so you are looking at the bottom.
2. Using a Phillips head screwdriver, remove the screw next to the hard disk
drive lock.
note If you prefer quick hard disk drive removal, do not reinstall this
screw. It is an additional locking feature.
3. Slide and hold the hard disk drive lock toward the back of the computer to
unlock the drive .
4. Gently pull the drive out of the computer.
The Optical Disk Drive (option)
Your computer comes with a pre-installed DVD-RW/CD-RW
combo drive. This drive allows you to read data from DVDs
and CDs, including audio or video CDs and burn your data onto
a recordable disc. Please refer to the recording software online
help for more information.
Your notebook identifies the drive with the letter following the
hard drive letter. If your hard drive is C, then the optical disk
drive will be D.
Inserting a Disk
1. Press the button on the front of the drive to open the disk tray
and pull the tray open.
2. Place the disk on the tray, label side up.
3. Place the disk on the central spindle and press gently until the
disk clicks into place.
4. Slide back the tray until it clicks shut.
Removing a DVD or CD
1. Make sure the computer is not accessing the DVD drive.
2. Press the eject button and pull the tray all the way out.
3. Pick up the disk by the edges and remove it from the tray. Push
the tray into the computer until it closes fully.
Cautions
When the computer is reading from a DVD or CD, the Optical
Disk Drive LED will flash on. Do not attempt to remove a disk
while this light is active.
Do not insert any foreign objects into the disk tray. Do not force
the tray to open or close manually. When not in use, keep the
tray closed to prevent dust or dirt from entering the drive unit.
If you experience difficulty when
removing a disk, stretch a paper clip
and insert it into the emergency eject
hole located on the front panel. The
disk tray should eject immediately.
This procedure can also be used to
remove a disk from the drive when
the notebook is powered off.
Precautions for Handling DVDs and CDs
Always hold the disk by the edges; avoid touching the surface of
the disk.
Use a clean, dry, cloth to remove dust, smudges, or fingerprints.
Wipe from the center outward. Do not use benzene, thinners,
or cleaners with detergent. Only use cleaning kits designed for
DVDs or CDs.
Extremes in temperature may damage disks. Store disks in a
cool dry place.
Do not bend or drop the disks. Do not place objects on top of
disks.