
User Manual

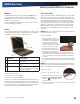

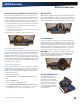
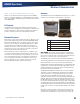
Table Of Contents
- Notices and Compliance
- Getting Started
- Getting Familiar With Your Computer
- Top View
- Left Side View
- Right Side View
- Back Edge View
- Bottom View
- Keyboard Basics
- Primary Keys
- Keyboard ergonomics
- LED Status Indicators
- Touchpad
- Display
- Memory
- Audio
- The PC Card Slot
- The Hard Disk Drive
- The Optical Disk Drive (option)
- Smart Card or EXPRESS Card Slot (option)
- Computer Security
- ENERGY STAR®
- Ports and Connectors
- Making Connections
- Wireless Communication
- Operating with Battery Power
- Customizing Your BIOS Settings
- Optional Equipment and Accessories
- Maintenance
- Service
- Troubleshooting
- Application Troubleshooting
- Battery Troubleshooting
- Display Troubleshooting
- Hard Disk Troubleshooting
- Keyboard and Mouse Troubleshooting
- Modem Troubleshooting
- Miscellaneous Troubleshooting
- The computer shuts off unexpectedly
- The speaker volume is too high or too low
- The computer won’t turn on
- The computer will not come on when the power button is pressed but the power, external power and battery indicators flash in sequence.
- The computer won’t turn off
- The computer enters suspend mode too quickly
- The computer doesn’t automatically suspend
- The system date and time are incorrect
- I receive an “out of memory” error message
- PC Card Troubleshooting
- FAQs
- I’ve heard that cleaning up and rearranging files on the hard drive will improve the startup speed of my programs. How do I do this?
- How do I adjust the volume?
- How do I change the battery?
- How long will the battery last?
- How do I change the display brightness?
- How do I clean the display?
- How do I calibrate the touch screen?

General Dynamics Itronix | 72-0136-004
GD6000 User Guide
Getting Familiar With Your Computer
Double-Clicking
Double-clicking is a common technique for selecting objects
or launching programs from icons. Once you have moved the
pointer over the object you wish to select, rapidly press the
left button two times. This action is commonly referred to as
“double-clicking” an object.
Dragging
Move the pointer to the desired location then press down the left
button. While still holding down the left button, move the pointer
to the desired location. Release the button
Move the pointer to the desired location. Tap the touchpad twice
quickly as if you were double-clicking; however, do not remove
your finger after the second tap. Move the cursor to the desired
location. Lift your finger to finish dragging
Display
The GD6000 features a 13.3-inch, XGA, outdoor-viewable, color
display with an optional integrated touch screen. The Dyna-
vue
®
Transmissive display technology uses a built-in backlight
for easy reading in most ambient light conditions. The back-
light remains on whenever the display is on. The transmissive
display enhancement provides improved outdoor visibility and
even works well in sunlight.
Calibrating the (optional) Touch Screen
1. Remove the stylus pen from its slot on the top of the display.
2. Select Start, All Programs, Touchkit, Configure Utility.
3. Select 4 pts Cal.
4. Touch and hold the tip of the pen to the center of each blink-
ing symbol as they appear on the screen until calibration is
complete.
5. Select OK to save and exit.
note Under Calibration, you can change the orientation of
your display and calibrate your display using the Tablet PC Pen
to improve accuracy of targeting items on the screen.
Adjusting Display Brightness
Windows XP:
Function keys can increase or decrease the display brightness.
Press FN + F6 to decrease display brightness
Press FN + F7 to increase display brightness
Windows Vista:
Click on the Start button and then on the Control Panel open
the Mobile PC menu. Under Windows Mobility Center, click
Adjust Screen Brightness. Under Display Brightness, use the
slide bar to adjust display brightness.
Adjusting Display Resolution
Windows XP:
1. Right click on the desktop.
2. Select Properties and then select the Settings tab. The dialog
box indicates the monitor screen resolution.
3. Use the slide bar to adjust the resolution. Normally, you should
use the resolution suggested for the display or monitor.
Windows Vista:
1. Click on the Start button and then on Control Panel.
2. Under Appearance and Personalization, click on Adjust screen
Resolution
.
3. Use the slide bar to adjust the resolution.
note Using a lower resolution than the screen was designed
for will reduce the area of the display. You can stretch low reso-
lution displays to full screen size by enabling Screen Expan-
sion on the Main Menu of the BIOS Setup Utility. However, the
stretching may cause distortion, especially to fonts.
Higher resolution modes may be used, as long as the monitor
supports them.