
User's Guide
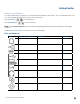
Table Of Contents
- Notices and Safety
- Getting Started
- Getting Familiar
- Making Connections
- Wireless Communication
- Battery Power
- BIOS Setup Utility
- Maintenance and Storage
- Optional Equipment
- Service and Support
- Troubleshooting
- For More Help
- Applications
- Batteries
- Hard Disk
- Landline Modems
- The modem doesn’t work
- The modem doesn’t dial a number
- The modem dials and receives an answer but does not establish a connection
- Communications programs such as HyperTerminal don’t seem to work or they lock Windows®
- The modem dials and the answering modem generates tone, but our modem does not begin the training sequence to establish a connection
- Miscellaneous
- The computer shuts off unexpectedly
- The speaker volume is too high or too low
- The computer won’t turn on
- The computer won’t turn off
- The computer enters suspend mode too quickly
- The computer doesn’t automatically suspend
- The system date and time are incorrect
- I receive an “out of memory” error message
- Holding down the Power button to reset the computer doesn’t always work
- PC Cards
- Pen / Display
- When I try to use the pen on my display, nothing happens
- The display warps or pillows in high humidity
- The touch screen doesn’t respond after a suspend
- I cannot change the orientation
- The display performance is slow
- I can’t read the display
- The underlined, inverse, and hypertext characters are difficult to read on the screen
- I can’t see the cursor while using the DOS editor
- The display appears to have random pixels darkened after scrolling
- I changed my display resolution, but I see no difference on the screen
- The display cuts off the right side of the application or page in portrait mode
- FAQs
- How do I calibrate the pen/display?
- How do I change the main battery?
- How do I adjust the speaker volume?
- How do I clean the display screen?
- How do I change the display screen’s brightness?
- How do I change the display orientation?
- How do I switch between Digitizer and Touch Screen modes?
- How long will the battery last?
- How do I optimize the GD3080 for left handed use?
- Where can I find the user manual?

General Dynamics Itronix | 72-0145-001
GD3080 User Guide
The GD3080 uses Dynamic Power Management ( DPM ) so you
can reduce the amount of energy used, especially during periods
of inactivity. It is powered by a smart Lithium-ION battery pack.
A CMOS coin battery maintains the Real Time Clock and CMOS
memory. There is also an optional second external battery pack that
effectively doubles your battery powered runtime.
Battery Installation and Replacement
Over time, the battery’s capacity gradually decreases. We
recommend that you replace your battery when you notice that
it begins to store significantly less charge. Change the main
battery pack as follows (you may want to print this topic for
reference).
Caution The GD3080 battery and unit are only weather
sealed when the battery is properly installed and the bat-
tery door is closed. Shelter the computer when you install or
replace the battery. To prevent damage when the unit is in
use, keep the battery door closed with all screws in place and
secured tightly.
Installing the Battery
Caution The GD3080 should always be shut down prior to
battery removal, because data may be lost when the battery is
removed.
1. Turn off the computer.
2. Unplug the power supply if connected.
3. Turn the computer upside down.
4. Remove the three screws on the secondary battery, if installed
and remove the battery.
5. Using a Phillips screwdriver, remove the six screws from the
battery cover and remove the battery cover.
Caution Internal components of the GD3080 will be dam-
aged if exposed to contaminants. When dust covers, the PC
card door, or the bottom access panel are open on the com-
puter, shield the unit from all contaminants such as liquids,
rain, snow, and dust.
6. Using the tab on the battery, lift the battery pack up and out of
the battery bay.
7. Orient the replacement battery correctly and insert it into the
battery compartment, making sure it is fully seated.
8. Replace the battery cover over the battery bay and install the
six screws.
9. Install the secondary battery if equipped.
10. Completely charge the battery before using the Tablet PC on
battery power.
NOTE When the battery is installed and the computer is con-
nected to AC power it starts charging automatically. At moder-
ate temperatures, approximately 70° Fahrenheit (21°C), the
battery will be fully charged in 3-5 hours. In warmer or cooler
temperatures, the battery can take much longer to fully charge.
Battery calibration is disabled if the temperature is > 122°F
(50°C) or < 41°F (5°C).
Battery Power