
User's Manual
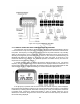
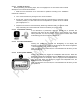
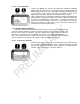
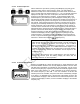
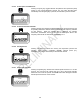
Table Of Contents

2-6
2-3.1.5 Select Meter Mode
Pressing the [MODE] key and then the [PWR] key activates the METER
MODE. When the transceiver is in the receive mode, the display becomes a
signal strength meter in the form of a bargraph, indicating the relative strength
of the incoming receive signal. The meter will indicate a single bar at
approximately -115 dBm and be full scale at approximately +3 dBm.
When the transceiver is in the transmit mode (PTT pressed), indicated by the
TX annunciator, the display becomes a power meter. At high UHF frequencies
its accuracy is approximately 1 Watt per bar. As frequency decreases the
power meter may be indicating a decrease in output power. This does not
reflect a true reduction in output power. The true output power will be within
specification across the frequency band.
2-3.2. SETTING PRESET CHANNELS
This section describes how the preset channels are set. The transceiver
is initially assumed
to be set-up with the following conditions: low power, AM, plain text (PT), and a frequency of 225
MHz (for both receive and transmit), these are
default values that are achieved when the
transceiver is powered-up with the [MODE] key pressed, as described in Paragraph 2-3.1.,
above. The transceiver does not need to be set-up with these default settings; the following
procedure applies for any settings except that the display examples will be different.
2-3.2.1 Select Preset Channels
Pressing the [CH] key and then one of the numbered [n] keys, selects channel
[n], the display shows the frequency and the attributes associated with that
channel. This example shows the key-press sequence for selecting Preset
Channel 1. Any channel from 0 to 9 may be selected.