
Installation Manual

DRAFT COPY
NOMAD MXU Installation Manual
3:36 PM 02/12/99
DRAFT COPY
20
5.2 PSTN Check
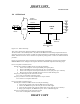
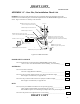
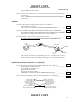
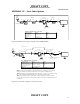
Figure 5.2-1: PSTN Test Setup
Three to five minutes after the Power LED lite, the Ready LED should light.
The Power LED = ON and Ready LED = ON, indicates the MXU has successfully completed its internal
self testing and at least one channel is capable of passing traffic between the PSTN and the Iridium System.
NOTE: This does not insure all four channels are capable of passing traffic. Continue on with the checkout
procedure.
Figure 5.2-1 illustrates the setup to initially test and determine if the PSTN is correctly connected to the
NOMAD MXU console. Using the test telephone attached to the PSTN complete the following steps.:
Line # 1 Telephone connection check:
Dial the phone number for MXU line #1 and verify the following:
1. Listen on the test phone and verify the MXU picks up the phone.
2. Observe the MXU front panel and verify the “Line 1” LED” lights.
3. Listen on the test phone and verify the modem tone occurs, (may take up to 1 minute).
4. Hang up the test phone, the MXU front panel “Line 1” LED should go out.
If steps 1,2,3 and 4 happened, the connection is valid.
Go to “Line # 2 Telephone connection check”
If steps 1,2,3 and 4 are not correct the telephone line may be at fault”
Go to section 6.2 “Telephone Problems”
Line # 2 Telephone connection check:
Dial the phone number for MXU line #2 and verify the following:
1. Listen on the test phone and verify the MXU picks up the phone.
2. Observe the MXU front panel and verify the “Line 2” LED” lights.
3. Listen on the test phone and verify the modem tone occurs, (may take up to 1 minute).
4. Hang up the test phone, the MXU front panel “Line 2” LED should go out.
If steps 1,2,3 and 4 happened, the connection is valid.
Go to “Line # 3 Telephone connection check”
RS232
NOMAD
MXU
Analog
Phone Lines
Local
PSTN
110/230VAC
50/60 Hz.
Optional, Local
Admin or Monitor
PC
Line #1
Line #2
Line #4
Line #3
Test
Phone