
Installation Manual
DRAFT COPY
NOMAD MXU Installation Manual
3:36 PM 02/12/99
DRAFT COPY
14
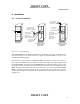
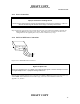
fasteners from the threaded end. Re-install one each of the nut, lock washer, and flat washer. Thread the
lightning rod into the mount and secure the jam nut.
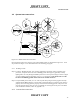
The lightning rod mount shall be secured to the top of the mast by engaging the circular cut out portion of
the mount to the top of the mast and installing the u-bolts, item14 (3043T78), and lock washers, item 15
(91102A031).
Step 4: Grounding Cable: The lightning rod that extends from the top of the array has a grounding cable
(not shown above) attached and should be attached to the building ground in accordance with the
instructions in Section 4.3, step 5, below.
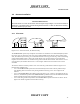
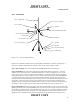
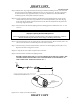
Step 5: Antennas: The Antenna kit 01-P43455F001 is now required to continue the assembly. The cross
bar(s), item 2 (07-P43411F001), slip through the 3-way fitting and should extend from the fitting an equal
distance on each side. Tighten the set-screws with the enclosed allen wrench to secure the cross bars.
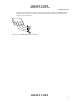
The metal plate that the antenna, item 4 (07-P43412F001), is supplied with, is to be replaced by the cable-
mounting bracket, item 3 (07-P43415F001), included in the kit. If necessary, reorient the u-bolts to allow
the antenna, when installed on to the cross bar, to have the cone shape perpendicular to the cross bar. Install
the antenna onto the cross bar so that the antenna and it’s clamps are resting on the tape on the end of the
cross bar, and the cone is inverted above the cross bar as shown. The plastic end caps, item 5 (FCR-16),
that have been supplied shall be installed on the end of the cross bars.
Installation of the surge suppressors and coax cables are described in the following section.