
User's Manual


- 4 -
Step 2. Insert the USB Stick Modem and Obtain the Best Radio Signal
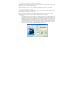
Fit the SIM or USIM card, where one has been provided, into the SIM slot in the USB Stick Modem,
observing the correct orientation and with the gold contacts on the SIM/USIM face down.
Connnect the USB Stick Modem into a USB port on your computer either directly or using the cable
supplied. The modem will draw power from the computer that it needs in order to operate. The red power
on indicator will glow steady after a few seconds to indicate that it is ready for operation.
To obtain the best signal strength position the USB Stick Modem near a window. If connection fails with low
signal strength try relocating the USB Stick Modem.
When the computer detects that the USB Stick Modem has been connected,, the computer will attempt to
use the USB Stick Modem driver files that were loaded during step 1.
The USB Stick Modem will automatically attempt to find a base station. During this process the green
connection indicator will flash on and off, when connection is established the indicator will become steady.
When data is being transferred the indicator will flicker intermittently.
Step 3. Perform On-line Registration
If you have been supplied with a username and password your installation software may skip this step. If
this step is not skipped you will be prompted to supply your username and password details the first time
you run the Client Software.
Note some network operators may perform user authentication with SIM/USIM rather than username and
password.
Note - In order for the registration process to complete successfully, the Internet browser application on your
computer must accept ‘cookies’. Browsers accept cookies by default. However, if you have disabled
cookies, enable them before continuing (refer to the Internet browser help on your computer on how to
enable cookies).
To start the On-line registration process, again click Next> which will result in the Wireless Broadband
Status Monitor program automatically starting.
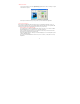
The program will attempt to automatically establish an Internet connection, and if successful, it will
automatically start an Internet browser to your Service Provider’s pre-defined registration web page.
Follow the instructions on each screen to complete the registration process.
At the end of the registration process the Internet browser should be closed. This will result in the Internet
connection being automatically disconnected.
You have now completed the installation and registration process. If you experience any trouble with
installation or registration, consult the Troubleshooting Tips in the User Guide or call your Service Provider
for assistance.