
User's Manual


P1D Wireless Broadband Modem User Manual
- Page 11 of 46 -
Section 3 – Installation and Registration
This chapter explains how to install the hardware, software, register your user information, and
operate your P1D Wireless Broadband Modem.
The instructions are split into the following sub-sections:
Prepare the P1D Modem for use
Find the Best Radio Signal
Install the Computer Software
Connect the Cable between the Modem and the Computer
Perform On-line Registration
Prepare the P1D Modem for use
Unpack the unit and ensure all the parts are there (see section 2).
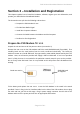
Remove the rear cover on the P1D modem and fit the small SIM/USIM card (if provided). First
carefully break out the small section from the main credit-card sized body. The break-out
section is known as a “small SIM card”, the type used by most mobile phones and by the P1D
modem. Note, not all service providers will supply a SIM or USIM card. If one is not provided
then it is likely that one is not needed in the particular network setup for your service provider.
Do not fit any other SIM card if one is not provided as this will prevent the P1D Modem from
working.
Fit the battery and replace the rear cover. Insert the P1D Modem in the stand in the stand
provided, if used. Plug in the PC interface cable into the side of the P1D modem, do not plug
the other end into your PC at this stage. Plug in power supply connector into the side of the
Modem and then fit the power pack unit into an appropriate wall socket.
SIM/USIM card
as supplied
Break out section