
User Manual


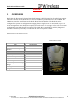

Table Of Contents
- IMPORTANT
- Legal Terms Governing This Document
- 1 OVERVIEW
- 2 PRE-INSTALLATION
- (Step 3) MOUNTING THE NODE B BRACKET
- 4 Site Preparation for Node B Installation
- 5 (Step 10) PHYSICAL INSTALLATION OF THE NODE B
- 5.1 Placing the Node B into the Rack
- 5.2 Service Area Interfaces
- 5.3 (Step 6) Grounding Installation and Inspection
- 5.4 Cable Clamp Seal
- 5.5 Connecting Power to the Node B
- Backhaul Connections to INC
- 5.7 Alarm Connections
- 5.8 Replacement of the Seal cable clamp
- 5.9 Conduit Pivot Bracket Securing
- 5.10 Closing the Door and securing the NodeB
- 5.11 GPS
- 6 (Step 11) Power up and Initial Setup of Node B
- 8
- 8 (Step 12) SOFTWARE INSTALLATION
- 9 (Step 13) On Air final check
- 10 Operation & Maintenance

Node B Installation Guide
DRAFT
17 July, 2001 IPWireless Proprietary
IT IS ILLEGAL TO MAKE COPIES OF THIS DOCUMENT WITHOUT EXPRESS PERMISSION BY IPWIRELESS
9
2 PRE-INSTALLATION
2.1 Installation Check Card
The following steps should be taken during the installation process in order to ensure safe and
timely installations.
Initials/Date Step Action Page
1 Perform pre-installation site check
2 Parts shipped/tools required
3 Install Node B mounting bracket
4 Install conduit for power and INC connectivity
5 Install Antennas and Coax
6 Grounding installation and inspection
7 Inspect site for GPS line of site
8 Install 100 BaseT connections between INC and NodeB
9 Local Alarm Connections
10 Physical installation of Node B
11 Power up and Initial setup and test of Node B
12 Software installation
13 On Air final check
2.2 (Step 1) Pre-Installation Site Check
1. Review site construction drawings to determine if site was constructed according to the
drawings
2. Review drawings and actual installation to determine location of Node B installation.
3. Check availability of electrical connections
4. Review if construction is completed to the point that it is safe to install the Node B.