
Replacement Part List


Owner’s Manual for Trimmer/Mower™ 7
General Information and Setup
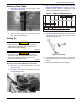
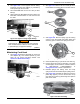
Attaching Cord Caddy
1. See Figure 2-6. Attach top and bottom caddy
clamps (A) on handle bar.
Figure 2-6. Manual Caddy
2. Secure manual caddy with #10 screw and #10
nylon locknut (B) and tighten
Adding Oil
IMPORTANT NOTE: The unit is shipped without oil in
the engine. Oil must be added prior to operation.
1. Place unit on a firm, level surface, and verify
engine is cooled.
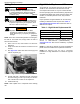
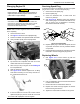
2. See Figure 2-7. Remove oil dipstick/ fill cap (A)
and wipe dipstick clean.
Figure 2-7. Oil Fill and Dipstick Location
3. Add 14 oz (414 mL) of engine oil. See Table 2:
Engine Oil Requirements to select the recom-
mended viscosity grade by temperature. SAE
15W-40 is recommended for general use.
Table 2 – Engine Oil Requirements
4. Wait one minute for oil to settle.
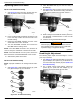
5. See Figure 2-8. Reinsert dipstick into oil filling hole
without screwing it in and verify oil level is in the
crosshatched section (A).
Figure 2-8. Oil Range
6. If oil level is low add a few ounces of oil at a time.
Check dipstick frequently to prevent overfill. Do not
overfill
7. Install oil fill cap/dipstick and hand-tighten.
006813
A
B
B
A
(000135)
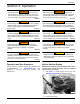
CAUTION
Engine damage. Verify proper type and quantity of
engine oil prior to starting engine. Failure to do so
could result in engine damage.
(000210)
WARNING
Skin irritation. Avoid prolonged or repeated contact with
used motor oil. Used motor oil has been shown to cause
skin cancer in laboratory animals. Thoroughly wash
exposed areas with soap and water.
005958
A
SAE 30
5W-30
10W-30
006809
A