
Use and Care Manual


Maintenance
30 Owner’s Manual for Spark-Ignited Stationary Generators
Checking Fluid Level
Check the fluid level of unsealed batteries. If necessary,
fill w
ith distilled water only. DO NOT use tap water.
Verifying Battery State of Charge
Verify the battery state of charge using a digital multime-
ter (DM). Recharge and retest
if state of charge is below
manufacturer's recommendations. Replace battery if
necessary.
Battery Replacement
Removal
(000164)
WARNING
Electrical shock. Disconnect battery ground
terminal before working on battery or battery
wires. Failure to do so could result in death
or serious injury.
(000130)
WARNING
Accidental Start-up. Disconnect the negative battery
cable, then the positive battery cable when working
on unit. Failure to do so could result in death
or serious injury.
Proceed as follows to remove the battery:
1. Rem
ove negative battery cable (black) from nega-
tive (-) battery terminal.
2. Re
move positive battery cable (red) from positive
(+) battery terminal.
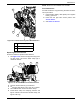
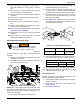
3. See Figure 5-10. Install rubber protective cover
over positive (+) battery terminal (A).
001499
A
B
Figure 5-10. Remove/Install Battery
4. L
oosen two screws with nylon washers to release
battery hold-down clamp from battery tray.
5. Gr
asp battery strap (B), and lift battery from battery
tray.
6. Remo
ve rubber protective cover from positive (+)
battery terminal.
Installation
(000130)
WARNING
Accidental Start-up. Disconnect the negative battery
cable, then the positive battery cable when working
on unit. Failure to do so could result in death
or serious injury.
Proceed as follows to install the battery:
1. Inst
all rubber protective cover over positive (+) bat-
tery terminal.
2. Gr
asp battery strap and lift battery.
3. Set battery
onto battery tray.
4. T
ighten two screws with nylon washers to secure
hold-down clamp to battery tray.
5. Remo
ve rubber protective cover from positive (+)
battery terminal.
6. Inst
all positive battery cable (red) to positive (+)
battery terminal.
7. Insta
ll negative battery cable (black) to negative (-)
battery terminal.
NOTE: I
f continuing with Schedule A maintenance pro-
cedures, leave negative battery cable (black) discon-
nected.
Inspecting Accessory/Drive Belt
Inspection
NOTE: 4
.5L (48 kW) units are provided with an auto-
matic belt tensioner and do not need adjustment.
Proceed as follows to inspect accessory/drive belt condi-
tion:
1. Per
form visual inspection as follows:
• Inspect belt for cracks, fraying, excessive wear, or
other damage.
• Verify belt is free of grease and oil.
• Replace belt if contaminated, damaged, frayed, or
worn.
NOTE: Use
a solution of soap and warm water to clean
pulleys, if necessary. Avoid use of solvents, but if used,
always follow by a soap and water wash.
2. V
erify fan belt deflection.