
Use and Care Manual


Maintenance
Owner’s Manual for Spark-Ignited Stationary Generators 29
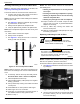
3. Drain oil into a suitable container.
4. Install oil dr
ain plug onto end of oil drain hose.
5. Install oil dr
ain hose into holding clamp.
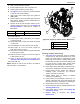
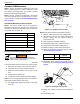
6. See Figure 5-2. Turn oil filter (C) counterclockwise
to remove from oil filt
er adapter.
7. App
ly a light coat of clean engine oil to gasket of
new oil filter.
8. Install
oil filter by hand until gasket just contacts oil
filter adapter. Tighten oil filter an additional three-
quarters to one full turn.
9. Remove
oil fill cap and fill engine with the recom-
mended quantity and type of oil. See Engine Oil
Recommendations. Crankcase oil capacity is
listed below:
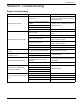
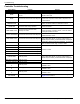
Model Engine System Capacity
48 kW 4.5 L 12 qts (11.4 L)
10. Install oil fill cap.
11. Install
negative battery cable (black) onto negative
(-) battery terminal.
12. Pull
up rubber flap covering fuse holder and install
7.5 amp fuse.
13. Pr
ess MANUAL on control panel to start engine.
14. Allo
w engine to run for one minute. Inspect for
leaks while engine is running.
15. Press
OFF on control panel. A red LED illuminates
to verify system is OFF.
16. W
ait 10 minutes for engine to cool and to allow oil
to drain back to oil pan.
17. Che
ck oil level and add oil as necessary. See
Checking Lubricating Oil Level and Drain Hose.
18. Install oil fill cap.
NOTE: Dispose
of used oil and oil filter in accordance
with local, state, or national laws.
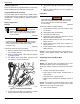
010152
B
A
C
Figure 5-9. Engine Oil and Air Cleaner Maintenance
A Oil fill cap/oil dipstick
B Oil filter
C Air cleaner
Checking Battery Condition/Fluid Level
Checking Condition and Cleaning
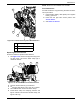
1. See Figure 3-3 for illustration. Verify top of battery
is clean and dry. Dirt and electrolyte on top of the
ba
ttery can cause battery to self-discharge. Clean
battery top with a solution of baking soda (sodium
bicarbonate) and water (5 teaspoons baking soda
per quart or liter of water). When solution stops
bubbling, rinse off the battery with clean water.
2. Cle
an cable clamps and battery terminals using a
wire brush or sandpaper to remove any oxidation.
3. In
spect battery screws, clamps, and cables for
breakage, loose connections, and corrosion.
Tighten and clean as necessary.
4. Inspe
ct battery posts for melting or damage
caused by over tightening.
5. Inspe
ct battery for discoloration, raised top, or a
warped or distorted case, which might indicate bat-
tery has been frozen, overheated, or overcharged.
6. Inspec
t battery case for cracks or leaks.
7. Chec
k battery fluid level of unsealed batteries. See
Checking Fluid Level.
8. V
erify battery state of charge. See Verifying Bat-
tery State of Charge.
9. Rep
lace battery if necessary. See Battery
Replacement.