
Use and Care Manual


Maintenance
28 Owner’s Manual for Spark-Ignited Stationary Generators
Checking Lubricating Oil Level and Drain Hose
NOTE: If changing engine lubricating oil and filter, see
Replacing Lubricating Oil and Oil Filter.
Proceed as follows to check oil level and oil drain hos
e:
1. If
engine was running, wait at least 10 minutes to
verify oil has fully drained into oil pan.
NOTE: The
most accurate oil level readings are obtained
when engine is cold.
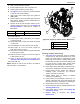
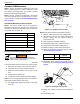
2. See Figure 5-2. Remove oil dipstick (D) and wipe
dry with a clean, lint
free cloth.
3. Slowly inser
t oil dipstick into oil dipstick tube.
4. V
erify oil dipstick is fully seated in oil dipstick tube.
NOTE: So
me oil dipsticks require more effort to fully seat
than others.
5. Allo
w at least 10 seconds to elapse.
6. Slowly re
move oil dipstick.
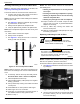
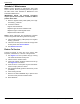
7. See Figure 5-7. Verify oil level is at or near FULL
mark (A). Add oil as necessary.
009883
FULL
A
Figure 5-7. Oil Level Dipstick Full Mark
NOTE: Ob
serve oil level on both sides of oil dipstick. The
lower of the two readings is the correct oil level measure-
ment.
8. If
necessary, remove oil fill cap and slowly add oil.
Do not fill above “FULL” mark on oil dipstick.
9. Install oil dips
tick and oil fill cap.
10. Install
negative battery cable (black) onto negative
battery (-) terminal.
11. Pull
up rubber flap covering fuse holder and install
7.5 amp fuse.
12. Pr
ess MANUAL on control panel to start engine.
13. Allo
w engine to run for one minute.
14. Pr
ess OFF on control panel to shut down engine. A
red LED illuminates to verify system is OFF.
15. Return to s
tep 1.
NOTE: T
he most common reasons for inaccurate oil
level readings are:
• Reading oil dipstick before oil has fully drained
into oil pan.
• Inserting and removing oil dipstick too quickly.
• Reading oil dipstick when it has not been fully
seated in oil dipstick tube.
• Reading only the high level side of oil dipstick.
16. In
spect oil drain hose for leaks. Inspect oil drain
hose for nicks, cuts, tears, or general deterioration.
Replace as necessary.
17. Pull
up rubber flap covering fuse holder and
remove 7.5 amp fuse.
18. Remo
ve negative battery cable (black) from nega-
tive battery (-)
terminal.
Replacing Lubricating Oil and Oil Filter
(000139)
WARNING
Risk of burns. Allow engine to cool before
draining oil or coolant. Failure to do so could
result in death or serious injury.
(000210)
WARNING
Skin irritation. Avoid prolonged or repeated contact with
used motor oil. Used motor oil has been shown to cause
skin cancer in laboratory animals. Thoroughly wash
exposed areas with soap and water.
NOTE: Complete this procedure once yearly, or every
200 hours of operation, whichever comes first.
Proceed as follows to replace lubricating oil and oil filter:
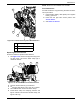
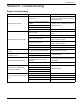
1. See Figure 5-8. Remove oil drain hose from hold-
ing clamp (B).
009884
B
Figure 5-8. Oil Drain Hose Holding Clamp
2. Use
one wrench to hold hex on oil drain hose fitting
(to prevent rotation), and use second wrench to
remove oil drain plug.