
Instructions / Assembly


12 Owner’s Manual for Powerwagon
General Information and Setup
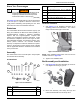
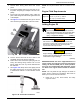
2. See Figure 2-11. Remove oil dipstick/fill cap (A).
Figure 2-11. Oil Dipstick and Fuel Fill
3. Add 14 oz (414 mL) of recommended high deter-
gent oil. Wait one minute for oil to settle. See
Engine Fluid Requirements.
4. Install oil dipstick; do not screw in.
5. Remove oil dipstick and check oil level. Clean oil
dipstick after checking.
6. Add a few ounces of oil at a time. Check oil dipstick
frequently to prevent overfill. Do not overfill.
Adding Fuel
NOTE: The unit is shipped without fuel. Fuel must be
added prior to first starting attempt.
1. Place unit on a firm, level surface, and verify
engine is cooled.
2. See Figure 2-11. Remove fuel fill cap (B).
3. Fill tank with fresh, unleaded gas (with a minimum
85 octane rating) to 0.25 in (6.4 mm) from the bot-
tom of the fill neck to allow for fuel expansion.
4. Install fuel fill cap.
Connecting Battery Cables
1. Remove protective caps from battery terminals.
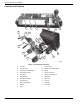
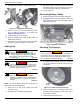
2. See Figure 2-12. Connect red battery cable to red
battery terminal, and connect black battery cable to
black battery terminal.
Figure 2-12. Battery Installation
Checking Tire Pressure
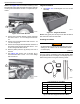
1. See Figure 2-13. Remove valve stem protective
cap (A) and check tire pressure using a tire pres-
sure gauge.
Figure 2-13. Valve Stem Protective Cap
2. Verify tire pressure is in accordance with recom-
mended pressure stamped on side of tire. Add or
remove air as needed.
3. Install valve stem protective cap.
006172
A
B
(000105)
DANGER
Explosion and Fire. Fuel and vapors are
extremely flammable and explosive. Add fuel
in a well ventilated area. Keep fire and spark
away. Failure to do so will result in death
or serious injury.
(000214)
DANGER
Explosion and Fire. Do not fill fuel tank past full line.
Allow for fuel expansion. Overfilling may cause fuel
to spill onto engine causing fire or explosion, which
will result in death or serious injury.
WARNING
Explosion and Fire. Do not smoke while
refueling unit. Failure to do so could result in
death, serious injury, or property or equipment
damage.
(000284a)
006173
WARNING
Loss of control. Do not overinflate tires. Overinflation
could cause a blow out, which could result in loss of
control. Loss of control could result in death, serious
injury, property or equipment damage.
(000428)
006181
A