
Install Manual
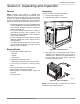
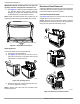


Table Of Contents
- Installation Guidelines 60 Hz Air-Cooled Generators
- Table of Contents
- Section 1: Safety Rules & General Information
- Section 2: Unpacking and Inspection
- Section 3: Site Selection and Preparation
- Section 4: Generator Placement
- Section 5: Fuel Conversion / Gas Connections
- Section 6: Electrical Connections
- Section 7: Control Panel Startup / Testing
- Section 8: Troubleshooting
- Section 9: Quick Reference Guide
- Section 10: Accessories
- Section 11: Diagrams

Unpacking and Inspection
Installation Guidelines for 60 Hz Air-Cooled Generators 7
Section 2: Unpacking and Inspection
General
NOTE: Carefully inspect contents for damage after
unpacking. Unpack and inspect unit immediately upon
delivery to identify any damage which may have occurred
in transit. Any claims for shipping damage must be filed
as soon as possible with freight carrier. This is especially
important if unit will not be installed for a period of time.
• This standby generator is ready for installation with
a factory supplied and pre-mounted base pad and
has a weather protective enclosure intended for
outdoor installation only.
• If any loss or damage is noted at time of delivery,
have delivery person(s) note all damage on the
freight bill, or affix their signature under consignor’s
memo of loss or damage.
• If a loss or damage is noted after delivery, separate
damaged materials and contact freight carrier for
claim procedures.
• “Concealed damage” is understood to mean dam-
age to contents of a package not evident at time of
delivery, but discovered later.
Required Tools
• General SAE and Metric hand tools
– Wrenches
– Sockets
– Screwdrivers
• Standard electrician’s hand tools
– Drill and bits for mounting and routing conduits
• 4 mm hex key (for access to customer connec-
tions)
• 3/16 in hex key (test port on fuel regulator)
• Manometer (for fuel pressure checks)
• Meter capable of measuring AC/DC voltage and
frequency
• Torque wrenches
Unpacking
Proceed as follows to unpack the generator:
1. Remove outer shipping carton.
2. See Figure 2-1. Remove wood frame.
Figure 2-1. Crated Generator
3. See Figure 2-2. Lid will be locked. A set of keys is
attached to the cardboard sheet on top of unit. An
additional set is attached to the pallet bracket on
the front intake end of unit. Remove keys from
cardboard and pallet bracket.
Figure 2-2. Keys As Shipped
NOTE: The enclosed keys provided with this unit are
intended for service personnel only.
000427
006729