
User Manual Part 2


LaCie Wireless Space • DESIGN BY NEIL POULTON Administering The LaCie Wireless Space
User Manual page 61
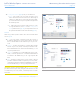
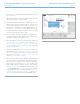
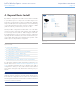
8. A pop-up Warning will ask to confirm the configuration change
(Fig. 95). Select YES.
9. The Dashboard will lose connection with the Wireless Space as
the device executes the change in settings.
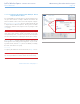
10. Disconnect the Ethernet cable from the Wireless Space to the
Ethernet router, switch, or Internet provider. Connect the com-
puter directly to the Wireless Space using any one any one of
the LAN ports. For information on the INTERNET port, see 3.7.
INTERNET Port: NAS+Switch. You may also reach the Dash-
board by Wi-Fi if the computer is using the same access point
and wireless network as the Wireless Space.
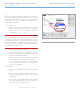
11. Please be patient and wait a minute before attempting to re-
launch the Dashboard. Note that the light will change from
green (Wi-Fi inactive) to blue (Wi-Fi active)
12. When the light turns solid blue, reconnect with the Dashboard
(3.4.1. Connect to the LaCie Wireless Space Dashboard using
LaCie Network Assistant & 3.4.2. Connect to the LaCie Wire-
less Space Dashboard directly from the browser) to confirm the
change in configuration.
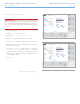
13. To move the Wireless Space to a new location, shut it down in
the Dashboard (3.6.4. Dashboard: Shut Down or Restart the
Wireless Space). Once off, you may move the Wireless Space,
plug in the power cable (3.1. Connect the Power Supply), and
turn it on (1.5. Power Button Functions).
14. The Wireless Space light will turn solid blue, indicating that the
device is ready for use. With the Wi-Fi network extended, con-
nect devices such as computers or game systems to the Wireless
Space similar to a switch. Please use one of the three ports
marked LAN1, LAN2, or LAN3 on the back of the Wireless
Space (1.4.2. Rear View). DO NOT connect the cable to the
port named INTERNET (1.4.2. Rear View). LaCie recommends
a Gigabit Ethernet cable for optimal performance (1.6. Giga-
bit Ethernet Cables And Connectors). See 3.7. INTERNET Port:
NAS+Switch for further information on the INTERNET port.
Fig. 95