
User Manual Part 2


LaCie Wireless Space • DESIGN BY NEIL POULTON Administering The LaCie Wireless Space
User Manual page 47
3.6.6. Dashboard: Network LAN
This page allows you to modify your Wireless Space’s network set-
tings. For a change to take effect, select APPLY at the bottom of the
main area of the Dashboard.
IMPORTANT INFO: Use caution when adjusting the Wireless
Space network settings. Please consult the user manual for the serv-
er, router, or Internet provider to determine how best to manage
devices on the network.
3.6.6.1. IP Address and Remote Access
WAN Interface
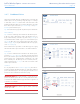
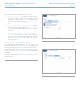
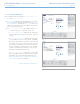
Most home and business networks have a DHCP server that man-
ages the IP addresses for all devices. Therefore, the default setting
for all Switch+NAS modes (2. What is the best configuration for
my network?) is DHCP (Fig. 67). If your network does not include a
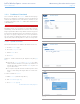
DHCP server or you intend to create a static IP address for the Wire-
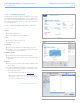
less Space, please make certain to:
✦ Establish the static IP address with your server, router, or In-
ternet provider.
✦ Fill in all the necessary fields (Fig. 68).
Dynamic DNS
You can manage your Wireless Space while away from the network.
To access the Dashboard from the office, a friend’s house, or any
location with Internet service, enable Dynamic DNS.
Dynamic DNS provides access to your Wireless Space via a URL
name that is easily entered into a web address bar. To begin, you
must create a Dynamic DNS account with a third-party provider.
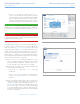
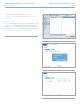
Please note that there are many companies that offer free remote
access service using Dynamic DNS (see Fig. 69 displaying the pull-
down menu of third-party services from the Dashboard).
Once you have selected a company and created an account on its
web site, enter the pertinent information in the fields:
✦ Full Hostname, Account, and Password
For more information, view LaCie’s screencast tutorial on setting
up Dynamic DNS at: http://www.lacie.com/us/support/faq/faq.
htm?faqid=10706
continued on the next page>>
Fig. 67
Fig. 68
Fig. 69