GIoT ODU-LBT User Guide WMDS-183 LoRa RF Borad
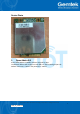
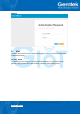
Device Photo 1. Open Admin GUI Access ODU WebUI via WAN IP address assigned by dhcp. The WAN IP address will configure to 192.168.77.1 after enabling 3G/4G LTE. Default username is “admin” and password is "admin“ Copyright © 2017 Gemtek Technology Corporation. All Rights Reserved. 1 QW_02_0035.
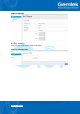
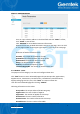
Figure 1 2. GIoT The GIoT menu consists of the following categories: Status, Provision, Configuration and Network Server. 2.1 GIoT - Status The purpose of this category is to view GIoT information as in its provision code, gateway type, gateway ID or LoRa modules, channels and spreading factor. Copyright © 2017 Gemtek Technology Corporation. All Rights Reserved. 2 QW_02_0035.
Figure 2 - GIoT Info 2.2 GIoT - Provision GIoT provision code can be setup on this page. Figure 3 - Provision Code Copyright © 2017 Gemtek Technology Corporation. All Rights Reserved. 3 QW_02_0035.
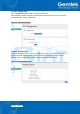
2.3 GIoT - Configuration Click “PERFORM RESTART” button to restart LoRa server. LoRa provides 3 modes: Normal AP, Repeater AP and Repeater. Users can set up the required mode in LoRa Configuration. Figure 4 - GIoT Management 2.4 GIoT - Network Server Users can configure ODU to connect to mqtt broker over the network server. The proper provision code has to be in place to reveal and access the network server features on the system menu. Please contact GIoT personnel if needed.
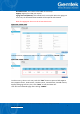
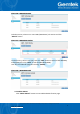
3. LoRaWan The LoRaWan menu consists of the following categories: OTAA Status, Node Parameters, OTAA and ABP. The proper provision code has to be in place to reveal and access the LoRaWan features on the system menu. Please contact GIoT personnel if needed. 3.1 LoRaWan - OTAA Status The purpose of this category is to view the process status of a node joining Network Server via OTAA, which includes DevAddr, Device EUI, App EUI, OTAA Group Index and Latest Update Time.
Figure 7 - Node Parameters User can input a device address in the blank field and click “APPLY” to filter, click “CLEAR” to cancel filter. Click “REFRESH”to renew Node Parameter information. When there are over 20 Node Parameters entries on the page, users can click on the page number on the upper-right corner to move on to the next page. Definition of Node Parameters Fields: DevAddr: The unique device address of node. Rx1DrOffset: The downlink data rate offset of Rx1.
DevAddr Counts: The number of DevAddr in this Group. AppKey: Appkey for OTAA join request. Aging Out Time(Minutes): If the Node hasn't sent uplink within the aging out time limit, the allocated OTAA DevAddr will be expired and released. Note: The Aging Out Time must be at least 60 minutes. Figure 8.A - OTAA - Add To delete entries, select one or more OTAA rule entries and click “DELETE” button. Figure 8.B - OTAA - Delete To edit an entry, select a rule entry and click “EDIT” button to proceed.
Figure 8.C - OTAA - Edit 3.4 LoRaWan - ABP The main function of this feature is to add/delete/edit ABP rule entries on this page. The ABP menu consists of the following categories: INDIVIDUAL and NETID GROUP. 3.4.1 INDIVIDUAL Click “INDIVIDUAL” button to enter the INDIVIDUAL function page. Figure 9.A – INDIVIDUAL Click “ADD” button to enter ABP add page and input DevAddr, NwkSKey and AppSKey then click “SAVE” to create an ABP (INDIVIDUAL) rule. User will leave ABP add page after clicking “CANCEL”.
Figure 9.B – INDIVIDUAL–Add To delete entries, select one or more ABP (INDIVIDUAL) rule entries and click “DELETE” button. Figure 9.C – INDIVIDUAL–Delete To edit an entry, select a rule entry and click “EDIT” button to proceed. Edit NwkSKey and AppSKey then click “SAVE” to edit the ABP (INDIVIDUAL). User will leave ABP edit page after clicking “CANCEL”. Figure 9.D – INDIVIDUAL–Edit 3.4.2 NETID GROUP Click “NETID GROUP” button to enter NETID GROUP function page.
Figure 10.A – NETID GROUP Click “ADD” button to enter ABP add page and input NwkID, NwkAddr Start, NwkAddr Total Number ,NwkSKey and AppSKey then click “SAVE” to create an ABP (NETID GROUP) rule. User will leave ABP add page after clicking “CANCEL”. Definition of ABP (NETID GROUP) Fields: NwkID: The unique NETID of ABP group. NwkAddr Start: The start number of ABP device address in the Group. NwkAddr Total Number: The number of ABP device address in this Group.
Figure 10.C - NETID GROUP - Delete To edit an entry, select a rule entry and click “EDIT” button to proceed. Edit NwkAddr Start, NwkAddr ,NwkSKey and AppSKey then click “SAVE” to edit the ABP (NETID GROUP). User will leave ABP edit page after clicking “CANCEL”. Figure 10.D - NETID GROUP - Edit Copyright © 2017 Gemtek Technology Corporation. All Rights Reserved. 11 QW_02_0035.
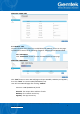
4. Network The System menu consists of the following categories: WAN. Introduction and input procedures for each category are described in the following paragraphs. 4.1 Network - WAN The purpose of this category is to view current WAN settings. This category is further divided into three sectors: Ethernet Wan and 3G/4G LTE. These individual options are lodged and labeled above the main content panel. Figure 11.A - WAN 4.1.
4.1.2 3G/4G LTE This page is to setup required information for 3G/4G LTE. Note: Make sure the SIM card is installed. Figure 12 - WAN: 3G/4G LTE Copyright © 2017 Gemtek Technology Corporation. All Rights Reserved. 13 QW_02_0035.
.Federal Communication Commission Interference Statement This equipment has been tested and found to comply with the limits for a Class B digital device, pursuant to Part 15 of the FCC Rules. These limits are designed to provide reasonable protection against harmful interference in a residential installation. This equipment generates, uses and can radiate radio frequency energy and, if not installed and used in accordance with the instructions, may cause harmful interference to radio communications.
This device is intended only for OEM integrators under the following conditions: 1) The antenna must be installed such that 20 cm is maintained between the antenna and users, and 2) The transmitter module may not be co-located with any other transmitter or antenna, As long as 2 conditions above are met, further transmitter test will not be required.
Professional installation instruction Please be advised that due to the unique function supplied by this product, the device is intended for use with our interactive entertainment software and licensed thirdparty only. The product will be distributed through controlled distribution channel and installed by trained professional and will not be sold directly to the general public through retail store. 1.