Wireless LAN Card Quick Installation Guide GemTek WL201
INFORMATION TO USER FCC REQUIREMENTS This device complies with part 15 of the FCC Rules. Operation is subject to the following two conditions: (1)This device may not cause harmful interference, and (2)This device must accept any interference received , including interference that may cause undesired operation. NOTE: This equipment has been tested and found to comply with the limits for a Class B digital device, pursuant to Part 15 of the FCC Rules.
CONTENTS 1. PCMCIA Adapter Quick Installation............................ 2. User Defined Installation......................................... 3. Usage.........................................................................
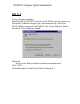
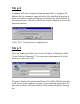
PCMCIA Adapter Quick Installation Step 1 Power off your computer. Installing WL201 PCMCIA card in the PCMCIA slot, then power on. Windows 95 should recognize the card automatically. When the WL201 had been inserted in PCMCIA slot, it then display a dialog box titled “New Hardware Found”. Select the “Driver from disk provided by hardware manufacturer” Click “OK” [It should display “Install From Disk“ dialog box.
Step 2 Insert the diskette label [WL201 Utility] into the floppy disk driver. and type “ A:\ ” at copy manufacturer‘s files from: Click “ OK ” Step 3 Computer will load softwares from drvier A automatically. Some softwares will be copied from original WIN95 CD, following the instruction displayed on the screen, and type in the source driver which contain the WIN95 CD.
Step 4 Computer will display a dialog box titled “System Settings Change”. Drawing out the floppy disk “WL201 Utility” from disk driver A . Click “Yes” to restart computer now. Step 5 After the restart procedure, the screen will show a dialog box titled “Enter Network Password”. You can enter your password if it had been set or just click “OK”.
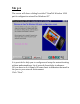
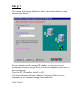
Step 6 The screen will show a dialog box titled “GemTek Wireless LAN quick configuration wizard for Windows 95”. It is provided to help you to configure and setup the network setting without understanding a lot of network knowledge in advance. All you have to do is simply fill some basic information that used in the peer to peer network environment. Click “Next”.
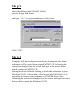
Step 7 The screen will change display to basic information need to setup network like below. Every computer need a unique ID number in your peer to peer workgroup, assign a unique ID to your each computerin your peer to peer workgroup. Type the PC ID number from 1 to 255. You also can assign & type a unique Computer Name for your computer or let computer assign it automatically. Click “Next”.
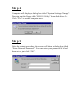
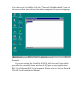
Step 8 Computer will have network setting automatically. It assign an IP address for the computer, open the utility like hard-disk & printer to share with others in your workgroup, and assign the identification in the network icon. After all it need to be restart computer to active the network function. Click “Yes‘” to restart your computer now. Step 9 After the restart procedure, the screen will show a dialog box titled “Enter Network Password”.
You can test it by double click the “Network Neighborhood” icon on the screen, then you will see the others computer on your workgroup. Remark: If you are setting the GemTek WL201 with Access Point which provides the extention from wireless LAN peer to peer application 802.11 to Ethernet 802.3 environment. Please refer to Access Point & WLAN Card Installation Manual.