BreezeMAX® USB 250 User Manual Software Version: 1.
Legal Rights Legal Rights © Copyright 2010 Alvarion Ltd. All rights reserved. The material contained herein is proprietary, privileged, and confidential and owned by Alvarion or its third party licensors. No disclosure thereof shall be made to third parties without the express written permission of Alvarion Ltd. Alvarion Ltd. reserves the right to alter the equipment specifications and descriptions in this publication without prior notice.
Legal Rights (b) With respect to the Firmware, Alvarion warrants the correct functionality according to the attached documentation, for a period of fourteen (14) month from invoice date (the “Warranty Period”)". During the Warranty Period, Alvarion may release to its Customers firmware updates, which include additional performance improvements and/or bug fixes, upon availability (the “Warranty”). Bug fixes, temporary patches and/or workarounds may be supplied as Firmware updates.
Legal Rights FULLEST EXTENT ALLOWED BY LAW, THE WARRANTIES AND REMEDIES SET FORTH IN THIS AGREEMENT ARE EXCLUSIVE AND IN LIEU OF ALL OTHER WARRANTIES OR CONDITIONS, EXPRESS OR IMPLIED, EITHER IN FACT OR BY OPERATION OF LAW, STATUTORY OR OTHERWISE, INCLUDING BUT NOT LIMITED TO WARRANTIES, TERMS OR CONDITIONS OF MERCHANTABILITY, FITNESS FOR A PARTICULAR PURPOSE, SATISFACTORY QUALITY, CORRESPONDENCE WITH DESCRIPTION, NON-INFRINGEMENT, AND ACCURACY OF INFORMATION GENERATED.
Safety Information Safety Information Federal Communication Commission Interference Statement This equipment has been tested and found to comply with the limits for a Class B digital device, pursuant to Part 15 of the FCC Rules. These limits are designed to provide reasonable protection against harmful interference in a residential installation.
Safety Information application like handheld PC or similar device has not been verified and may not compliance with related RF exposure rule and such use shall be prohibited. The availability of some specific channels and/or operational frequency bands are country dependent and are firmware programmed at the factory to match the intended destination. The firmware setting is not accessible by the end user. Industry Canada statement This device complies with RSS-210 of the Industry Canada Rules.
Important Notice Important Notice This user manual is delivered subject to the following conditions and restrictions: This manual contains proprietary information belonging to Alvarion Ltd. Such information is supplied solely for the purpose of assisting properly authorized users of the respective Alvarion products.
Contents Contents 1. About BreezeMAX USB250.................................................................. 1 1.1 BreezeMAX USB250 Hardware....................................................................................1 1.2 Specifications ...............................................................................................................1 1.2.1 Hardware Specifications .....................................................................................1 1.2.2 Wireless Specifications .....
About BreezeMAX USB250 1. BreezeMAX USB250 Hardware About BreezeMAX USB250 The BreezeMAX USB 250 device supports IEEE 802.16e-2005 state of the art Scalable OFDMA based Technology. BreezeMAX USB250 operates on 2.3, 2.5 and 3.5 GHz frequency licensed band. It provides users a seamless broadband wireless access, video streaming at home, office or on the move.
About BreezeMAX USB250 Specifications Standards Wireless IEEE 802.16e-2005 I/O 1.2.2 DC Power input port DC +5.0V LED indicator WiMAX Link Status Wireless Specifications Model 2.3 GHz 2.5 GHz 3.5 GHz Operating Frequencies 2.302 ~ 2.397 GHz 2.483 ~ 2.687 GHz 3.302~3.
About BreezeMAX USB250 1.2.4 1.2.5 Specifications Environmental Specifications Operating Temperature 0° to +40°C Storage Temperature -20° to 60°C Operating Humidity max. 90% Storage Humidity max. 90% Standards Model Standard Details 2.3 GHz CE Health: EN 62311 (SAR) RF: EN 302 326 EMC: EN 301 489-1 V1.4.1 Safety: EN 60950-1, 2nd edition Notify Body review (0560) 2.
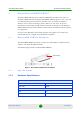
Installation 1.3 LED Indication LED Indication Color Status Description Red On Power on No Network Entry Firmware download complete Driver initialized Yellow/green 2. Blinking WiMAX connected Installation The following section will guide you through the hardware and software installation. The software installs drivers on your laptop, which allow you to use the BreezeMAX USB250 just like a regular modem. 2.
Installation Installation Procedure NOTE Please ignore the “Found new hardware” message. 2 A new removable storage “WiMAXCM” is displayed in the Explorer (see Figure 2). If auto-run is enabled in your PC, the installer is executed automatically. Otherwise, execute the installer manually. Figure 2: Removable Storage “WiMAXCM” 3 The WiMAX Connection Manager Setup Wizard is displayed; Click Next to continue.
Installation Installation Procedure Figure 4: Choose Installation Location Window 5 The installation process starts, displaying the status of installed components. The utility and drivers are automatically installed and may take several minutes. Wait for the installation completion. IMPORTANT Windows Vista and Windows 7 users, a security screen may prompt you to identify the WCM program.
Uninstalling the Software Installation Procedure Figure 6: Installation Complete 7 The installation is complete. Click Finish to complete the installation and close the wizard. After installing the WCM, an icon is displayed in your System Tray and the Connection Manager main window opens automatically. Figure 7: WiMAX Connection Manager 8 If necessary, proceed either with “Settings the WiMAX Connection Manager (WCM)” on page 9 or “Viewing Status Details” on page 13. 3.
Using Your BreezeMAX USB250 3.1 Prerequisites Prerequisites Before proceeding, ensure that your Wireless Connection Manager is closed and the BreezeMAX USB250 is not plugged in to facilitate an easy uninstallation procedure. IMPORTANT A reboot will be required after uninstalling the Wireless Connection Manager. 3.2 Uninstallation Procedure To uninstall BreezeMAX USB: 4. 1 Navigate to Start > Programs > WCM and click Uninstall. 2 You are prompted to verify the process. Click Yes to proceed.
Using Your BreezeMAX USB250 4.2 Settings the WiMAX Connection Manager (WCM) Settings the WiMAX Connection Manager (WCM) This chapter describes the general settings available for users, including basic settings and authentication. To configure general settings: 1 In the main WCM window click Settings. The Settings page is displayed, containing the Basic and Authentication tabs . NOTE The Basic tab may contain Language selection, depending on your configuration.
Using Your BreezeMAX USB250 2 Settings the WiMAX Connection Manager (WCM) In the Basic tab select or deselect the following and click OK: » Automatically Start CM when Device is Plugged: If it is enabled, WiMAX Connection Manager starts automatically when the USB250 is plugged into the PC. (Default: Enabled) » Automatically Connects When CM Starts: If it is enabled, WiMAX Connection Manager tries to connect to WiMAX network automatically when it starts.
Using Your BreezeMAX USB250 Connecting to the WiMAX Network Figure 9: Settings: Authentication Tab Your USB is now ready to connect to the WiMAX network. 4.3 Connecting to the WiMAX Network This section describes how to connect to WiMAX network with proper configurations.
Using Your BreezeMAX USB250 Operation Verification Figure 10: CM Main Window: WiMAX Connecting If “Automatically Connects When CM Starts” is disabled, click the orange button to start the connection. Figure 11: CM Main Window: WiMAX Disconnected 4.4 Operation Verification To verify proper operation of the unit, examine the LED indicator. To verify data connectivity, from the end-user's PC or from a portable PC connected to the unit, connect to a known internet site (e.g www.Alvarion.com).
Using Your BreezeMAX USB250 Viewing Status Details To disconnect from the network, click the blue circle. An Error message is displayed when the CPE does not find a base station. Figure 12: CM Main Window: WiMAX Connected Some basic information is also shown in this window, which includes: Service: Network service provider (NSP) name. The Service parameter is hidden if WCM cannot obtain the operator's name via NSP discovery.
Using Your BreezeMAX USB250 Viewing Status Details To view status details: 1 In the main window click Status. The Status page is displayed, showing the IP Network tab. 2 To view various parameters, select the appropriate tab: The IP Network tab includes: » Physical Address » IP Address - WAN IP address. For DHCP mode - IP address acquired on the WAN interface is displayed. Otherwise it is 0.0.0.
Using Your BreezeMAX USB250 Viewing Status Details The WiMAX tab includes: » State - The status of the device, including “Init”, “Ready”, “Scan”, “Network Entry”, “Operational”, and “Idle”. » Session Duration - Time of device function (hours:minutes:seconds) » Temperature - Unit’s current temperature » Base Station ID - Base Station ID number (e.g. 00:01:21:00:03:5A) » Center Frequency - The middle frequency of the bandwidth of a channel.
Using Your BreezeMAX USB250 Viewing Status Details Figure 14: Status - WiMAX Tab The About tab includes » Product Name » Product Version » Driver Version » Firmware Version » Copyright » URL BreezeMAX USB 250 16 User Manual
Using Your BreezeMAX USB250 Software Upgrade Figure 15: Status - About Tab 4.6 Software Upgrade This section describes how to update your wireless connection manager. NOTE Software upgrade availability is dependent on your service provider. To upgrade the software found in your BreezeMAX USB 250 device: 1 When a new version is available, the following message is displayed, allowing you to choose if to install the new update or not.
Maintenance and Troubleshooting Software Upgrade Figure 16: WiMAXCM Update To update immediately, click OK; the management application closes and the 2 installation starts automatically. Click Next to confirm each step of the installation. When the new software is installed, the management application restarts. To continue running the existing version of the application click Cancel. The new firmware image remains in C:\Program Files\WiMAXCM\oma\temp folder, but it will not be installed automatically th
Maintenance and Troubleshooting Software Upgrade A The client utility currently supports Windows XP, Windows 7 and Windows Vista. Q My device failed to connect after I inserted my USB device. What can I do at this time? A Take out the USB adapter at this time and reinsert it in the USB slot. When your device is detected the main screen appears. Q I have followed the procedures in the user manual, why can't I access the Internet? A Please make sure the USB adapter has been activated successfully.
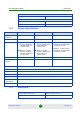
Glossary 6. Software Upgrade Glossary This section details terms used in this manual. Authentication The process to verify the identity of a client requesting network access. IEEE 802.11 specifies two forms of authentication: open system and shared key. BS Base Station Channel Allocation CAPL scan list is defined by the customer provisioned list. Priority Level (CAPL) There are some parameters with CAPL scan: NAPID, priority and RefID. NAPID is used to filter some BS if the NAPID is not matched.
Glossary Software Upgrade mRCT Mobile Radio Conformance Test Network Access Point Network exchange point equipped with large-scale switching (NAP) facilities and serving as a connection point between individual Internet Service Providers Open Mobile Alliance OMA DM (device Management) is a protocol specified by Open (OMA) Mobile Alliance (OMA) for Device Management purposes, by the Device Management Working Group and the Data Synchronization (DS) Working Group.