
User's Manual
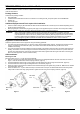
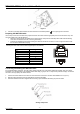
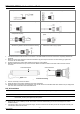
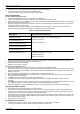
Table Of Contents
- Package Content
- Additional Equipment and Tools required for Installation
- Equipment Location Guidelines
- ODU Installation
- Preparing the IDU-ODU Cable
- Connecting and Sealing the IDU-ODU Cable
- NG_VG Installation
- Basic Configuration
- Aligning the ODU's Antenna
- Verifying Proper Operation
- Radio Frequency Interference Statement
- Radiation Hazard Warning
- R&TTE Compliance Statement
- Disposal of Electronic and Electrical Waste

PRO 3000 CPE Quick Installation Guide
- 4 -
P/N: 215805
4. Connect one end of the straight Ethernet cable (8P8C) to the PoL-PoE adapter.
5. Connect the other end to the LAN port of the PRO 3000 CPE.
For more information refer to the NG_VG Quick Installation Guide.
Basic Configuration
Using the Web Configuration Server
1. Use the Web Configuration Server to configure the basic parameters.
2. Connect a PC/Notebook to the LAN port of the NG_VG, using the supplied Ethernet cable.
3. Ensure that the NG_VG has a WAN Data Service configured with NAT enabled and with all NG_VG LAN ports grouped to it
(Refer to the NG-VG manual for details).
4. By default, the CPE has a DHCP server enabled. In this case, ensure that the NG_VG WAN Data Service is configured to
receive its IP by DHCP from the CPE.
If the DHCP server of the CPE is disabled, for the WAN Data Service on the NG_VG you can manually set a static IP
address, netmask, and gateway according to your CPE model (refer to the table below):
Table 1: Connectivity Parameters
Model Name Basic Connectivity Parameters
4M-K2-CPE-Si-1D-2.5
4M-CPE3000-PRO-1D-2.3
4M-K2-CPE-PRO-ODU-1D-2.5
4M-K2-CPE-PRO-ODU-1D-3.3
4M-CPE3000-PRO-1D-3.6
IP address: 192.168.254.x, 1 < x < 253, excluding 251
Netmask: 255.255.255.0
Gateway: 192.168.254.251
4M-CPE3000-PRO-1D 3.4-3.7 IP address: 192.168.209.x, 2 < x < 253
Netmask: 255.255.255.0
Gateway: 192.168.209.1
5. From a PC connected to the NG_VG open a web browser, and connect to http:// 192.168.254.251/. The Login page is
displayed. Enter the user name and password and click Login.
6. Configure the parameters, as needed.
7. Reset the unit to apply the changes.
Using the Auto-configuration Tool
1.
Connect a PC/Notebook to the LAN port of the NG_VG, using the supplied Ethernet cable.
2. Ensure that the NG_VG has a WAN Data Service configured with NAT enabled and with all NG_VG LAN ports grouped to it
(Refer to the NG_VG manual for details). Also, ensure that the NG_VG WAN Data Service is configured to receive its IP by
DHCP from the CPE.
3. Switch on the CPE and wait until the NG_VG Data service connection receives an IP.
4. From the CDROM supplied with the unit, run the CPE Auto Configuration Tool: CPEAutoConfigTool.exe; The Installation
Setup Wizard window is displayed.
5. Click Next to continue; The Choose Your ISP window is displayed.
6. Choose the ISP (Internet Service Provider) ConfigFile from the list and click Next. The Ready To Install window is
displayed.
7. Click Install. The tool starts the auto-configuration process of the CPE settings. It will change default configuration by using
the *.CONF file, and then run “reset to factory default” by using default configuration in the file.
8. When the installation is complete, click Finish. The CPE is now configured with the parameters from the ConfigFile.
Aligning the ODU's Antenna
1. Point the ODU toward the general direction of the serving BTS.
2. Verify that the unit is synchronized with a BTS. If the SU is not synchronized with a BTS, ensure that all parameters are
configured properly. If the unit is still not synchronized with a BTS, improve the quality of the link by changing the direction
of the ODU or by placing the ODU at a higher or in an alternate location.
3. Ensure that the front of the ODU is always facing the location of the BTS. However, in certain conditions, such as when the
line of site to the BTS is hampered, better reception may be achieved using a reflected signal. In this case, the ODU is not
always directed toward the BTS.
4. Secure the unit firmly to the pole.
Verifying Proper Operation
1. Verify data connectivity by sending a ping command to the BTS or by connecting to the Internet.
2. To verify proper operation of the SU, examine the LED indicators on the NG_VG: