
User's Manual
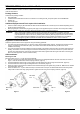
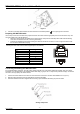
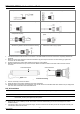
Table Of Contents
- Package Content
- Additional Equipment and Tools required for Installation
- Equipment Location Guidelines
- ODU Installation
- Preparing the IDU-ODU Cable
- Connecting and Sealing the IDU-ODU Cable
- NG_VG Installation
- Basic Configuration
- Aligning the ODU's Antenna
- Verifying Proper Operation
- Radio Frequency Interference Statement
- Radiation Hazard Warning
- R&TTE Compliance Statement
- Disposal of Electronic and Electrical Waste

PRO 3000 CPE Quick Installation Guide
- 3 -
a. Strip the cable sheath.
b. Insert the screw nut into the housing.
c. Insert the seal at the back end of the housing. d. Insert the cable all the way through.
e. Crimp the RJ-45 plug
f. Insert the plug into the housing. Secure the sealing nut in
place.
g. Stricken the gasket on the front end of the housing. h. Secure the screw nut (C) in place.
4. Connect the Ethernet cable to the RJ-45 connector of the ODU. Make sure that the connector is completely inserted and
tightened.
5. Attach the mastic tape (Scotchfil™ Electrical Insulation Putty) and wrap it around the connector butting up against the
connector. Do not over stretch.
6. Squeeze to tighten the mastic sealer. Make sure there are no air bubbles.
7. Slide the cold shrink sleeve on top of the connector. Make sure that the sleeve covers both cable connector and unit
connector.
Figure 4 Cold Shrink Tubing
Cold Shrink Sleeve
Cold Shrink Seal
Cord
8.
Pull the cord slowly to shrink the sleeve.
9. Route the cable to the location selected for the indoor equipment.
10. Assemble an RJ-45 connector with a protective cover on the indoor end of the IDU-ODU cable. Refer to the pin assignment
and color codes in standard cables described above.
NG_VG Installation
WARNING:
Make sure to use the PoL-PoE adapter. Failing to do so may damage the equipment.
Note:
It is assumed that the installation and configuration of the PRO 3000 CPE has already been completed, and
that the NG_VG was preconfigured by the operator.
1. Connect the PoL-PoE adapter to the NG_VG WAN port.
2. Place the NG_VG on a desktop or shelf. The location should be selected taking into account the Equipment Location
Guidelines above.
3. Connect the mains power cord to the power supply. Connect one end to the 48 VDC jack on the rear panel of the NG_VG.
Connect other end to the AC mains.
P/N: 215805