
User's Manual

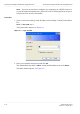
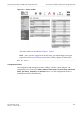

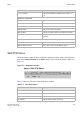
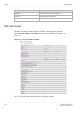
Table Of Contents
- About this document
- Contents
- 1 Product overview
- 2 Hardware installation
- 3 TCP/IP configuration
- 4 Accessing the CellPipe 7130 RG web configuration tool
- 5 Status
- 6 Network
- 7 WiFi Setup
- 8 Firewall Setup
- 9 Advanced Setup
- 10 QoS PTM Setup
- 11 Utilities
- 12 Telephony
- 13 USB Service
- 14 FCC and IC Statement
- A Troubleshooting
- B Product conformance
- Glossary

............................................................................................................................................................................................................................................................
To access the CellPipe 7130 RG web configuration toolAccessing the CellPipe 7130 RG web configuration tool
4-2
3EQ-10422-AAAA-TCZZA
Edition 01 February 2011
............................................................................................................................................................................................................................................................
Note: If you are not sure how to configure your computer to be a DHCP client or to
set your IP address and subnet mask, please refer to the TCP/IP Appendix or the Quick
Installation Guide for more information.
Procedure
1. Open a web browser and type in the IP address of the CellPipe 7130 RG in the address
bar:
http://192.168.2.1
The login window appears; see Figure 4-1.
Figure 4-1 Login window
2. Enter your username and password and click OK.
The default admin username is admin and the default admin password is admin.
The Status window appears; see Figure 4-2.