
User's Manual

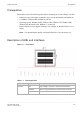
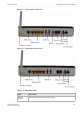
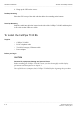
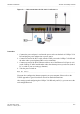
Table Of Contents
- About this document
- Contents
- 1 Product overview
- 2 Hardware installation
- 3 TCP/IP configuration
- 4 Accessing the CellPipe 7130 RG web configuration tool
- 5 Status
- 6 Network
- 7 WiFi Setup
- 8 Firewall Setup
- 9 Advanced Setup
- 10 QoS PTM Setup
- 11 Utilities
- 12 Telephony
- 13 USB Service
- 14 FCC and IC Statement
- A Troubleshooting
- B Product conformance
- Glossary

2-1
3EQ-10422-AAAA-TCZZA
Edition 01 February 2011
............................................................................................................................................................................................................................................................
2 Hardware installation
Overview
Purpose
This chapter provides the instructions to install the CellPipe 7130 RG hardware.
Contents
This chapter covers the following topic:
Mounting Procedure
There are multiple ways for mounting the CPE:
Wall Mounting
Pre-Requirements
•
Anchors
• Screws
• Drill & Drill bit
1. Locate a high position on the wall that is free of obstructions.
2. Connect two screws in the wall 5 cm(2 in.) apart. Do not screw the screws all the way
into the wall.
Important! Make sure that the screws are securely fixed to the wall and strong
enough to hold the weight of the CPE. (recommended screw type and size: Nylon wall
plug (T8x25mm) and screws (T3.5x16mm)).
3. Align the holes on the back of the CPE with the screws on the wall.
Mounting Procedure 2-1
To install the CellPipe 7130 RG 2-2