
User's Manual
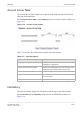
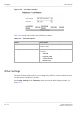
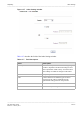

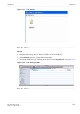
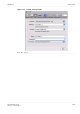

Table Of Contents
- About this document
- Contents
- 1 Product overview
- 2 Hardware installation
- 3 TCP/IP configuration
- 4 Accessing the CellPipe 7130 RG web configuration tool
- 5 Status
- 6 Network
- 7 WiFi Setup
- 8 Firewall Setup
- 9 Advanced Setup
- 10 QoS PTM Setup
- 11 Utilities
- 12 Telephony
- 13 USB Service
- 14 FCC and IC Statement
- A Troubleshooting
- B Product conformance
- Glossary

............................................................................................................................................................................................................................................................
Printer ServerUSB Service
13-4
3EQ-10422-AAAA-TCZZA
Edition 01 February 2011
............................................................................................................................................................................................................................................................
Printer Server
CellPipe 7130 RG can also be a printer server. The configuration steps is described below:
Windows
1. Plug the USB printer into the CellPipe 7130 RG USB port.
2. Open Windows setting.
3. Under Printer Tasks, click Add a printer to open the Add Printer Wizard and then
click Next.
4. Click A network printer or a printer attached to another computer and then click
Next.
5. Click Connect to a printer on the Internet or on your intranet.
6. Enter the URL of the printer using the following format:
http://Gateway_IP_address:Printserver_port/printers/share_name
Here are the explanation for each field:
Gateway_IP_address: see Table 6-2.
Printserver_port: fixed to 631 by gateway.
share_name: Please make a reference to Table 6-1 (where value can be configrued)
By default the printer server will be:
http://192.168.2.1:631/printers/USBPrinter
7. Follow the instructions on-screen to complete the setup of the network printer.
........................................................................................................................................................
E ND OF STEPS
Mac OS
1. Plug the USB printer into the CellPipe 7130 RG USB port.
2. Open System Preference from the Panel.
3. Choose Print & Fax from System Preference.
4. Configure the settings as shown in Figure 13-3 and click Add.