&HOO3LSH 9'6/ 5HVLGHQWLDO *DWHZD\ 9 VHULHV 5* 9H $ DQG 5* 9H % 86(5 0$18$/ 0$< ,668(
Alcatel, Lucent, Alcatel-Lucent and the Alcatel-Lucent logo are trademarks of Alcatel-Lucent. All other trademarks are the property of their respective owners.. The information presented is subject to change without notice. Alcatel-Lucent assumes no responsibility for inaccuracies contained herein. Copyright © 2008 Alcatel-Lucent. All Rights Reserved.
&RQWHQWV $ERXW WKLV GRFXPHQW Purpose ......................................................................................................................................................... v Reason for revision ....................................................................................................................................... v Intended audience .........................................................................................................................................
DDNS Setting .......................................................................................................................................... 2-36 Port Range Forwarding ...............................................................................
$ERXW WKLV GRFXPHQW 3XUSRVH The purpose of the User Manual is to provide installation information, procedures for installation, service activation and system reconfiguration for the 7130 RG 5Ve.A2000/7130 RG 5Ve.B2000 VDSL2 gateway. Additionally the User Manual contains status indicators and troubleshooting information and a comprehensive description of safety guidelines. 5HDVRQ IRU UHYLVLRQ This version 1.0 of the User Manual is the first issue.
information than needed by many of the readers. Before you start reading the manual, it is therefore necessary to assess which aspects or chapters will cover the individual area of interest.
(FR HQYLURQPHQWDO VWDWHPHQWV The statements that follow are the eco-environmental statements that apply to 7130 RG 5Ve.A2000/7130 RG 5Ve.B2000 products.
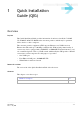
4XLFN ,QVWDOODWLRQ *XLGH 4,* 2YHUYLHZ 3XUSRVH This Quick Installation Guide provides information about how to install the 7130 RG 5Ve.A2000/7130 RG 5Ve.B2000 at the customers premises, which may be apartment blocks, hotels or office complexes. This customer premises equipment (CPE) supports Ethernet-over-VDSL2 via four Ethernet data link rated up to 100 Mbps symmetrically.
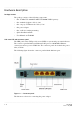
+DUGZDUH GHVFULSWLRQ 3DFNDJH FRQWHQW The package consists of the following components: • One 7130 RG 5Ve.A2000/7130 RG 5Ve.B2000 VDSL2 gateway • One standard telephone cable (1.8 m) • One category 5 UTP network cable (1.
:$51,1* Please use for this inlet only the power adapter, which is shipped with your 7130 RG 5Ve.AL2000/7130 RG 5Ve.B2000 VDSL2 gateway. Failure to comply with may cause damage to the CPE.
/(' LQGLFDWLRQV IRU V\VWHP DQG SRUW VWDWXV Six LEDs on the front panel indicate the following system and port status: /(' 6WDWXV 'HVFULSWLRQ System Status Indicators PWR (Power) On Power supply is okay. Off Power failure or disconnected.
,QVWDOO WKH &3( :KHQ WR XVH Use this procedure to install the 7130 RG 5Ve.A2000/7130 RG 5Ve.
5. Do not place the CPE on an unstable stand or table; the CPE may drop and become damaged. 6. For an Internet access, a PC with a 10/100 Mb/s Ethernet adapter card installed is required. The PC must be configured for TCP/IP. %HIRUH \RX EHJLQ Make sure that
Connect one end of the attached standa
:HE 0DQDJHPHQW ,QWHUIDFH 2YHUYLHZ The Web Management Interface is provided to let the configuration of 7130 RG 5Ve.A2000/7130 RG 5Ve.B2000 as easily as possible. It provides a user-friendly graphical interface through a Web platform. You can configure bridge or router functions to accommodate your needs. In the section below, each configuration item is described in detail. &RQWHQWV This chapter covers these topics.
DMZ and UPnP 2-44 Filter 2-47 NAT Passthrough 2-49 QoS Setup 2-51 Default QoS 2-54 QoS Policy 2-56 QoS Interface Policy 2-58 QoS ALG 2-60 Reboot Gateway 2-62 Restore Factory Defaults 2-64 Web Firmware Upload 2-66 System Settings 2-68
7KH :HE 0DQDJHPHQW ,QWHUIDFH 2YHUYLHZ The following summarizes how to configure the 7130 RG 5Ve.A2000/7130 RG 5Ve.
$GYDQFHG 6HWXS On this pages you can configure the WAN ports connection method.
$FFHVV WR :HE 0DQDJHPHQW ,QWHUIDFH YLD ,QWHUQHW EURZVHU 3XUSRVH Use this procedure to access to the 7130 RG 5Ve.A2000/7130 RG 5Ve.B2000 :HE 0DQDJHPHQW ,QWHUIDFH via Internet browser. 5HODWHG LQIRUPDWLRQ The 7130 RG 5Ve.A2000/7130 RG 5Ve.
Enter the 8VHU QDPH and the 3DVVZRUG (
5HWULHYH 6WDWXV 3XUSRVH Use this procedure to retrieve the basic settings of your current configuration as well as a network and connection statistics. %HIRUH \RX EHJLQ Make sure that you are connected to the +RPH $UHD from the 7130 RG 5Ve.
Following parameters are displayed in the 6WDWXV window: 3DUDPHWHU 'HVFULSWLRQ Version Info: The version of currently used firmware Release Date: The release date of your firmware System Up Time: Shows how long the system has been up and operated Tot
/$1 6HWWLQJV 3XUSRVH Use this procedure to configure the network settings for your gateway and LAN port. %HIRUH \RX EHJLQ Make sure that you are connected to the +RPH $UHD from the 7130 RG 5Ve.A2000/7130 RG 5Ve.B2000 via your internet browser.
To configure the gateway and the LAN p
Enable/Disable '16 5HOD\.
:L)L 6HWWLQJV 3XUSRVH Use this procedure to configure the basic wireless network settings. The Router can connect up to 253 wireless clients. %HIRUH \RX EHJLQ Make sure that you are connected to the +RPH $UHD from the 7130 RG 5Ve.A2000/7130 RG 5Ve.
To configure the wireless LAN settings
Configure +LGH 66,'.
6HFXULW\ 0RGH FRQILJXUDWLRQ 3XUSRVH Use this procedure to configure security mode on your wired or wireless network, the 7130 RG 5Ve.A2000/7130 RG 5Ve.
Following options are available: • 2S
:L )L 0$& 3XUSRVH Use this procedure to restrict some of the wireless clients association with the Access Point. 5HODWHG LQIRUPDWLRQ Every Ethernet device has a unique MAC (Media Access Control) address.
Example of a :L), 0$& window:
:L)L 4R6 3XUSRVH Use this procedure to enable the media access prioritization Wi-Fi Multimedia (WMM). Three access categories are support by the Wi-Fi QoS, for audio, video, and voice applications over the wireless network.
Example of a :L)L 4R6 window:
$,)6 $UELWUDU\ ,QWHUIUDPH 6SDFH : The back-off timing for each access category consists of a fixed period called the Arbitrary Inter-Frame Space Number followed by a random period called the Contention Window (CW), both specified in multiples of the slot t
7;23/LPLW These will allow multiple MAC frames consecutively as long as the whole transmission time does not exceed the TXOP limit.So keep it larger for delay-sensitive data.
$GYDQFHG 6HWXS 3XUSRVH Use this procedure to setup your WAN ports connection method. 5HODWHG LQIRUPDWLRQ These settings determine how the router will make a connection with the modem/internet.
'+&3 3XUSRVH Use this procedure to configure the '+&3 settings. %HIRUH \RX EHJLQ Make sure that you are connected to the +RPH $UHD from the 7130 RG 5Ve.A2000/7130 RG 5Ve.B2000 via your internet browser.
Enter the appropriate +RVW 1DPH and 'R
333R( 6HWWLQJV 3XUSRVH Use this procedure to configure the 333R( settings. %HIRUH \RX EHJLQ Make sure that you are connected to the +RPH $UHD from the 7130 RG 5Ve.A2000/7130 RG 5Ve.B2000 via your internet browser.
Enter the 8VHUQDPH and the 3DVVZRUG fo
9/$1 333R( 6HWWLQJV 3XUSRVH Use this procedure to configure the 333R( settings over VLAN for multiple PPPoE connections. %HIRUH \RX EHJLQ Make sure that you are connected to the +RPH $UHD from the 7130 RG 5Ve.A2000/7130 RG 5Ve.
Enter the VLAN ID: Please give the Vla
%ULGJH 6HWWLQJV 3XUSRVH Use this procedure to set the connection type for your wireless network. %HIRUH \RX EHJLQ Make sure that you are connected to the +RPH $UHD from the 7130 RG 5Ve.A2000/7130 RG 5Ve.B2000 via your internet browser.
Click $SSO\ &KDQJHV at the bottom of t
5RXWH 6HWWLQJ 3XUSRVH Use this procedure to setup static routes when the routing packets come from a specific network to another. %HIRUH \RX EHJLQ Make sure that you are connected to the +RPH $UHD from the 7130 RG 5Ve.A2000/7130 RG 5Ve.
Enter the ,3 $GGUHVV for the destinati
%ULGJH 0$& )LOWHU 3XUSRVH Use this procedure to provides filtering for traffic from certain MAC addresses, i.e., MAC access control list. %HIRUH \RX EHJLQ Make sure that you are connected to the +RPH $UHD from the 7130 RG 5Ve.A2000/7130 RG 5Ve.
Enter the ,3 $GGUHVV for the destinati
''16 6HWWLQJ 3XUSRVH Use this procedure to register a dynamic IP address with a Domain name over DDNS (Domain Name Service). %HIRUH \RX EHJLQ Make sure that you are connected to the +RPH $UHD from the 7130 RG 5Ve.A2000/7130 RG 5Ve.
Enable your DDNS Service first then se
3RUW 5DQJH )RUZDUGLQJ 3XUSRVH Use this procedure to add a new or to change existing 3RUW 5DQJH )RUZDUGLQJ rules. %HIRUH \RX EHJLQ Make sure that you are connected to the +RPH $UHD from the 7130 RG 5Ve.A2000/7130 RG 5Ve.B2000 via your internet browser.
In the 6WDUW 3RUW column enter the num
9LUWXDO 6HUYHU %DVLF 3XUSRVH Use this procedure to activate and configure a virtual server in your router. %HIRUH \RX EHJLQ Make sure that you are connected to the +RPH $UHD from the 7130 RG 5Ve.A2000/7130 RG 5Ve.B2000 via your internet browser.
From the $SSOLFDWLRQ pull-down menu se
9LUWXDO 6HUYHU $GYDQFH 3XUSRVH Use this procedure to activate and configure an advance virtual server in your router. %HIRUH \RX EHJLQ Make sure that you are connected to the +RPH $UHD from the 7130 RG 5Ve.A2000/7130 RG 5Ve.B2000 via your internet browser.
Specify the $SSOLFDWLRQ name first, en
'0= DQG 83Q3 3XUSRVH Use this procedure to enable or disable DMZ and UPnP. 5HODWHG LQIRUPDWLRQ 83Q3 (Universal Plug and Play) is a distributed, open networking standard that uses TCP/IP for simple peer-to-peer network connectivity between devices.
Example of a '0= DQG 83Q3 window:
Click $SSO\ &KDQJHV at the bottom of t
)LOWHU 3XUSRVH Use this procedure to disable some internet applications with associated service port numbers for the specific clients. %HIRUH \RX EHJLQ Make sure that you are connected to the +RPH $UHD from the 7130 RG 5Ve.A2000/7130 RG 5Ve.
Enter the $SSOLFDWLRQ name first.
1$7 3DVVWKURXJK 3XUSRVH Use this procedure to enable or disable security protocols NAT Passthrough.
Example of a 1$7 3DVVWKURXJK window:
4R6 6HWXS 3XUSRVH Use this procedure to configure QoS Setup. 5HODWHG LQIRUPDWLRQ The IEEE 802.1p specifies the user priority field and defines up to eight separate traffic types. You can give weights to each queue.
Example of a 4R6 6FKHGXOHU window:
• &RQWULEXWH: If you enable this, you may let your queues to give away some of their resource to other queues so that they may also be transmitted when the queue does not use up all of the available bandwidth.
'HIDXOW 4R6 3XUSRVH Use this procedure to setup the QoS default policy for the Internet and IPTV traffic. %HIRUH \RX EHJLQ Make sure that you are connected to the +RPH $UHD from the 7130 RG 5Ve.A2000/7130 RG 5Ve.B2000 via your internet browser.
In the 4R6 0DSSLQJ E\ field choose the
4R6 3ROLF\ 3XUSRVH Use this procedure to configure the QoS Policy as provided on the screen. This screen lists the QoS classifiers or policy.
Please enter your settings into the fi
4R6 ,QWHUIDFH 3ROLF\ 3XUSRVH Use this procedure to configure the Quality of Service for the network interface. Enable or disable the 4R6 ,QWHUIDFH 3ROLF\ for WLAN and LAN. %HIRUH \RX EHJLQ Make sure that you are connected to the +RPH $UHD from the 7130 RG
The 4R6 ,QWHUIDFH 3ROLF\ screen will l
4R6 $/* 3XUSRVH Use this procedure to enable or disable 4R6 for the SIP (Session Initiated Protocol) and RTP (Real-time Transport Protocol). SIP is for the implementation of VOIP.
The 6,3 $/* 4R6 screen will let you to
5HERRW *DWHZD\ 3XUSRVH Use this procedure to reboot the gateway. %HIRUH \RX EHJLQ Make sure that you are connected to the +RPH $UHD from the 7130 RG 5Ve.A2000/7130 RG 5Ve.B2000 via your internet browser.
Click 5HERRW to reboot your router.
5HVWRUH )DFWRU\ 'HIDXOWV 3XUSRVH Use this procedure to the restore factory defaults. Before you begin Make sure that you are connected to the +RPH $UHD from the 7130 RG 5Ve.A2000/7130 RG 5Ve.B2000 via your internet browser.
Click 5HVWRUH 'HIDXOWV to reset all co
:HE )LUPZDUH 8SORDG 3XUSRVH Use this procedure to update your router's firmware in this screen Before you begin Make sure that you are connected to the +RPH $UHD from the 7130 RG 5Ve.A2000/7130 RG 5Ve.B2000 via your internet browser.
Download the firmware upgrade file fro
6\VWHP 6HWWLQJV 3XUSRVH Use this procedure to change your web administrator's login name and password. Before you begin Make sure that you are connected to the +RPH $UHD from the 7130 RG 5Ve.A2000/7130 RG 5Ve.B2000 via your internet browser.
In the *8, 6HWWLQJV section you can c
0&/ 6HWWLQJV 3XUSRVH Use this procedure to turn on or off certain type of service from the router. Thus, it gives you more control over the router's security. %HIRUH \RX EHJLQ Make sure that you are connected to the +RPH $UHD from the 7130 RG 5Ve.
From the pull-down menu for each servi
$ 7URXEOHVKRRWLQJ 2YHUYLHZ 3XUSRVH This Appendix provides guidance for troubleshooting. The CPE operation can easily be monitored via the LED indicators to identify problems. The table below describes common problems you may encounter and possible solutions. 'LDJQRVLQJ 6\PSWRP 3RVVLEOH FDXVH 6ROXWLRQ PWR LED does not light up after power on. Power outlet, power cord, or power adapter may be defective. • DSL LED is flashing slowly after making a connection.
7URXEOHVKRRWLQJ 2YHUYLHZ 6\PSWRP 3RVVLEOH FDXVH 6ROXWLRQ DIAG LED is flashing At the moment a CPE firmware upgrade is executed. • Wait until the firmware upgrade is passed and the DIAG LED is “On” (wireless enabled).
% &RQILJXULQJ WKH 7&3 ,3 SURWRFROV RQ WKH 3& 2YHUYLHZ 3XUSRVH To connect the CPE to a PC through its Ethernet port, the PC must have an Ethernet network adapter card installed, and be configured for the TCP/IP protocol. Many service providers configure TCP/IP for client PC automatically using a networking technology known as Dynamic Host Configuration Protocol (DHCP). Other service providers may specify an IP configuration (known as a static IP address), which must be entered manually.
&RQILJXULQJ WKH 7&3 ,3 SURWRFROV RQ WKH 3& 2YHUYLHZ :LQGRZV ;3 1. Click “Start/Control Panel/Network and Internet Connections.” (You may need to choose Settings before Control Panel, depending on your Start Menu configuration.) 2.
& 3URGXFW FRQIRUPDQFH 2YHUYLHZ 3XUSRVH This section provides the EU Declaration of Conformity (CE) statements, additional international conformity statements. Note that in regions such as the European Union, the statements that are required are determined primarily by national or multi-national regulations. However, in some regions, contact terms determine which statements are required.
3URGXFW FRQIRUPDQFH (XURSH ² (8 'HFODUDWLRQ RI &RQIRUPLW\ – EN 301 489-1 V1.6.
3URGXFW FRQIRUPDQFH
3URGXFW FRQIRUPDQFH )HGHUDO &RPPXQLFDWLRQ &RPPLVVLRQ ,QWHUIHUHQFH 6WDWHPHQW )HGHUDO &RPPXQLFDWLRQ &RPPLVVLRQ ,QWHUIHUHQFH 6WDWHPHQW This equipment has been tested and found to comply with the limits for a Class B digital device, pursuant to Part 15 of the