
User Manual


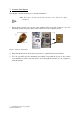
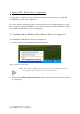
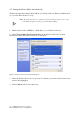
Table Of Contents
- Table of Contents
- Table of Figures
- 1. Introduction
- 1.1 Inventory Checklist
- 1.2 Supported Security
- 2. Antenna Attachment
- 1. Please find a connector at one end of the antenna cable. Screw this connector (A) to the matching antenna receptable (B) located at the back of the computer chassis.
- 2. Place the antenna in an elevated and open area for optimal wireless performance.
- 3. You can optionally use the 'attachment pad' which comes with the accessory kit to make your antenna base stick to any flat surface. Avoid using the front panel of your computer to stick the antenna
- 3. Security Setting
- 4. WindowsXPWireless Zero Configuration
- 4.1. Launching MicrosoftWindowsXP Wireless Network Configuration
- 4.2. Setting the Network Key Automatically
- 1. Find the Network Key (WEP Key or WPA Key) for your Wireless Network.
- 2. Select View Available Wireless Networks from the Wireless Network icon menu.
- 3. Select the Wireless Network of your choice by clicking on its name and the entire block will become highlighted.
- 4. Select Connect in the lower right corner.
- 5. Enter your Network Key (WEP Key or WPA Key) for your Wireless Network.
- 6. Input the Network Key a second time into the “Confirm network key” field.
- 7. Select Connect.
- 4.3. Setting the Network Key Manually
- 1. Choose your Wireless Network in the Available Wireless Networks selection box.
- 2. Select Change advanced settings found on the left side of the dialog box.
- 3. Select the General tab in the Wireless Network Connection Properties dialog box.
- 4. Highlight Internet Protocol (TCP/IP) in the “This connection uses the following items:” selection box.
- 5. Select Properties.
- 6. Verify that the following choices are selected:
- 7. Select OK.
- 4.3.1 WEP: Setting the Network Key (Network Security)
- 1. Open the Wireless Network Connection Properties dialog box:
- 2. Select Add under the Preferred networks selection box.
- 3. Input your Network name (SSID).
- 4. Uncheck the box “The key is provided for me automatically”.
- 5. Verify that the Network Authentication is set to Open.
- 6. Verify that the Data Encryption is set to WEP.
- 7. Input the Network Key of your Access Point, Wireless Broadband Router or Wireless Gateway.
- 8. Input the Network Key a second time into the "Confirm network key" box.
- 9. Select OK.
- 4.3.2 WPA: Setting the Network Key (Network Security)
- 1. Open the Wireless Network Connection Properties dialog box:
- 2. Select Add under the Preferred networks selection box.
- 3. Uncheck the box “The key is provided for me automatically”.
- 4. Verify that the Network Authentication is set to WPA-PSK.
- 5. Verify that the Data Encryption is set to TKIP or AES.
- 6. Input the Network Key of your Access Point, Wireless Broadband Router or Wireless Gateway.
- 7. Input the Network Key a second time into the “Confirm network key” box.
- 8. Select OK.
- Glossary
- Appendix A: Troubleshooting
- Appendix B: Regulatory Notices
- Appendix C: Product Specifications
- Index

9 USB Wireless 802.11 b/g Adaptor
WindowsXPWireless Zero Configuration
4.
WindowsXP Wireless Zero Configuration
It is necessary to complete the steps in Chapter 2, Antenna Attachment prior to using Win-
dowsXP Wireless Network Configuration.
If you have already established a wireless network with access to the internet and you would
like to wirelessly connect this HP PC to your wireless network, use WindowsXP Zero Config-
uration (WindowsXP Wireless Auto Configuration).
4.1. Launching MicrosoftWindowsXP Wireless Network Configuration
To launch WindowsXP Wireless Network Configuration:
1. In the Systems Tray find the Wireless Networking icon.
Figure2:WirelessNetworkIcon
2. Select View Available Wireless Networks and the Wireless Network Connection dialog
box will appear.
Note: There may be multiple Network icons in the system tray. Choose the
one for Wireless Network Connection as shown above.
®
®