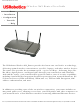
Wireless Nd1 Router User Guide Wireless Nd1 Router User Guide Home ● ● ● Installation Configuration ● Tutorials ● Help The USRobotics Wireless Nd1 Router provides the latest 802.11n Draft 1.0 technology, delivering optimal wireless connections to your PCs, laptops, and other wireless devices. The router also provides the maximum speed – up to 270 Mbps – delivering large files like MP3s, digital photos, and digital video through your network fast and efficiently.
Wireless Nd1 Router User Guide And to assure a simple, straight-forward installation, the USRobotics router offers SecureEasySetup™. SecureEasySetup walks you through the wireless security configuration between your router and your wireless clients. Sharing Internet access securely, wirelessly or wired, has never been easier. System Requirements ● ● ● ● A computer with an Ethernet adapter installed A functioning Ethernet-based cable or DSL modem or other WAN connection for Internet access An HTML 4.
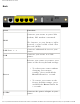
Wireless Nd1 Router User Guide Symbol Name Power WLAN State Condition Off Not receiving power. Solid Receiving power. Off Wireless connection is disabled. Solid Wireless connection is enabled. Flashing Sending and receiving data. Off SecureEasySetup mode is not ready on 1 the router. SecureEasySetup WAN LAN 1 to 4 Printer Solid SecureEasySetup mode is ready. Blinking Communicating with SecureEasySetup devices. Off No Internet connection is established.
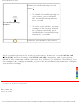
Wireless Nd1 Router User Guide Back Item Function Connects your router to your Cable modem, DSL modem or network. WAN The Internet, or your business/office network, is often called a Wide Area Network (WAN). LAN Ports 1 - 4 Connects additional devices to your router. USB Connects your router to a USB printer. Reboots your router or restores your router to the factory default settings.
Wireless Nd1 Router User Guide Enables SecureEasySetup on your router. ● SecureEasySetup button ● 1 To enable SecureEasySetup on your router, press and hold the SecureEasySetup button for 1 second. To reset your wireless security settings to the factory default (no security enabled), press and hold the SecureEasySetup button for 7 seconds. Connects an antenna to the router.
Wireless Nd1 Router User Guide Wireless Nd1 Router User Guide Home ● ● ● Installation Configuration Tutorials ● ● Help Product Specifications ● ● ● ● ● ● ● ● ● ● ● ● ● ● ● Integrated 270 Mbps 802.11n Draft 1.
Wireless Nd1 Router User Guide ● ● MAC address authentication and wireless association control 802.1x pass-through support (not supported in WDS Mode) © 2006 U.S. Robotics Corporation file:///G|/CSO/Documentation/Documentation%20-%20Draf...%20Mach-1%20Router/User%20Guide/English/features.
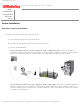
Wireless Nd1 Router User Guide Wireless Nd1 Router User Guide Home ● ● ● Installation Configuration ● Tutorials ● Help Router Installation Step One: Connect Your Router 1. Connect your DSL or Cable modem to the router: A. Power off your computer and your modem. B. Connect the provided antennas to the back of the router. C.
Wireless Nd1 Router User Guide Note: The USB port on the router is for connecting a USB printer only. Do not connect your modem to the USB port on the router. For instructions on connecting a USB printer to your router, see Install a USB Printer. A. Connect the free end of the Ethernet cable to the WAN port on the rear of the router. 2. Connect the router to your computer: A. Connect one end of the supplied Ethernet cable to your computer’s Ethernet adapter. B.
Wireless Nd1 Router User Guide 3. Power up the network: 1. Turn on your modem. Wait until the LEDs stabilize before powering up your router. 2. Connect the supplied power cord to the 15VDC port on the router. Note: UK Users: With the power adapter unplugged, connect the appropriate power plug for your country on to the power adapter. Apply enough pressure to cause a click and firmly seat the plug. 4. Plug the power adapter into a standard power outlet. 5. Turn on your computer.
Wireless Nd1 Router User Guide Step Two: Configure the Basic Connection Settings 1. Start your Web browser. 2. In the location or address line, type 192.168.2.1 and press ENTER to access the router configuration pages. Note: The router's default IP address is 192.168.2.1. 3. Click Start. The Setup Wizard leads you through the basic router configuration process.
Wireless Nd1 Router User Guide If the router does not automatically detect your Internet connection, verify the power cord and all the Ethernet cables are connected correctly. This includes the cables connecting the router, the modem, and all the computers in the network. Also, verify your Internet connection is in working order. Then, click Detect Connection until you reach the "Internet Connection Configured" screen.
Wireless Nd1 Router User Guide B. To manually set your wireless's security information, deselect Set wireless security using SecureEasySetup and enter the Network Name (SSID), select a security Method, and enter your wireless security information for the router, then click Next. file:///G|/CSO/Documentation/Documentation%20-%20Dra...%20Mach-1%20Router/User%20Guide/English/install.
Wireless Nd1 Router User Guide Note: For your wireless security settings, it is recommended that you select the WPA2 and WPA (PSK) wireless security method using TKIP and AES encryption for the most secure wireless network. 9. Enter a User name and Password for your router and click Finish. file:///G|/CSO/Documentation/Documentation%20-%20Dra...%20Mach-1%20Router/User%20Guide/English/install.
Wireless Nd1 Router User Guide Your password must meet the following criteria: ❍ The Wireless Nd1 Router lets you set a password up to 15 characters long. The most secure passwords are usually between 8 and 15 characters long. ❍ The router will allow you to enter a space or other punctuation in your password. ❍ Use a mixture of upper (A through Z) and lower (a through z) case letters. ❍ Adding numbers 0 through 9 to a password increases security.
Wireless Nd1 Router User Guide Point-to-Point Tunneling (PPTP) Users If your ISP uses a PPTP connection, you will need to perform the following additional steps to complete your Installation procedure and create an Internet connection. If you have any questions regarding any of the connection settings, contact your ISP. 1. In the router configuration pages, click the Internet tab and scroll down to the Point-to-Point Tunneling (PPTP) section. 2. Select the My ISP uses a PPTP connection checkbox. 3.
Wireless Nd1 Router User Guide connection. You can go to the Status page to view your connection information. Backing Up Your Configuration Settings Having a backup reduces the effort required in reapplying your configuration settings should you ever restore your router to its factory default settings. USRobotics recommends that you back up your settings now. 1. In the router configuration pages, click the Device tab, and scroll down to Back Up Settings. 2. Select Back Up. 3.
Wireless Nd1 Router User Guide Wireless Nd1 Router User Guide Home ● ● ● Installation Configuration Tutorials ● ● Help USB Network Printer Installation A USB printer can be connected to the Wireless Nd1 Router and used as a network printer if both your operating system and your printer support the Internet Printing Protocol (IPP). Windows Server® 2003, Windows® XP and 2000 have built-in support for this function. Contact your printer manufacturer to determine if your printer supports IPP.
Wireless Nd1 Router User Guide ● Linux Computer © 2006 U.S. Robotics Corporation file:///G|/CSO/Documentation/Documentation%20-%20Draf...4%20Mach-1%20Router/User%20Guide/English/printer.
Wireless Nd1 Router User Guide Wireless Nd1 Router User Guide Home ● ● ● Installation Configuration ● Tutorials ● Help Installing a USB Printer in a Windows XP or 2000 Environment A USB printer can be connected to the router and used as a network printer if you are using an operating system that supports printing to an Internet Printing Protocol (IPP)-based printer. Windows XP and 2000 have built-in support for this function.
Wireless Nd1 Router User Guide Step Two: Get Your Print Server Information 1. Disconnect the printer from your computer and Plug the thin rectangular end of the USB cable into the USB port on the router. 5. Connect the power supply to your printer and turn your printer on. 6. Start a Web browser. In the location or address line type 192.168.2.1 and press ENTER. Note: If you have modified your router's IP address, enter the new IP address instead of 192.168.2.1. 2.
Wireless Nd1 Router User Guide Note: You are not prompted to log in the first time you connect to the router configuration pages. During the Setup Wizard procedure, you created a user name and password to log on to the router. You will need to use these whenever you log on to the router. The user name and password are casesensitive. 3. In the Device section of the Status page, look for the Printer status and Printer location information. Write down the Printer location address.
Wireless Nd1 Router User Guide Step Three: Connect Clients to the Wireless USB Print Server Note: You must perform this procedure on each computer on your network to allow printing using the print server on the router. 1. Windows XP Users: Click Windows Start > Printers and Faxes. Windows 2000 Users: Click Windows Start > Settings > Printers. file:///G|/CSO/Documentation/Documentation%20-%20Draf...20Router/User%20Guide/English/win2000_xp_printer.
Wireless Nd1 Router User Guide 2. Click Add a Printer. Windows XP: Windows 2000: file:///G|/CSO/Documentation/Documentation%20-%20Draf...20Router/User%20Guide/English/win2000_xp_printer.
Wireless Nd1 Router User Guide 3. The Add Printer Wizard will start. Click Next. file:///G|/CSO/Documentation/Documentation%20-%20Draf...20Router/User%20Guide/English/win2000_xp_printer.
Wireless Nd1 Router User Guide 4. Choose the radio button labeled A network printer, or a printer attached to another computer. Click Next. 5. Select Connect to a printer on the Internet or on a home or office network. In the URL field, enter the Printer location address recorded during step 5. Click Next. file:///G|/CSO/Documentation/Documentation%20-%20Draf...20Router/User%20Guide/English/win2000_xp_printer.
Wireless Nd1 Router User Guide Note: The URL information is case-sensitive and must be entered exactly as it is listed on the Printer Location section on the router's Status page. If you have modified the IP address of your router, then use your router's IP address in place of 192.168.2.1. 6. Select the manufacturer and model of your printer. Click OK. Note: If your printer does not appear in the list, please repeat Step One: Local Printer Installation.
Wireless Nd1 Router User Guide 7. When prompted, select Yes to set this printer as your default printer. If prompted, you can choose to print a test page. file:///G|/CSO/Documentation/Documentation%20-%20Draf...20Router/User%20Guide/English/win2000_xp_printer.
Wireless Nd1 Router User Guide 8. You will be shown the information regarding your printer. Click Finish to complete the setup process. file:///G|/CSO/Documentation/Documentation%20-%20Draf...20Router/User%20Guide/English/win2000_xp_printer.
Wireless Nd1 Router User Guide Step Three: Verify the printer's connectivity 1. Windows XP Users: Click Windows Start > Printers and Faxes. file:///G|/CSO/Documentation/Documentation%20-%20Draf...20Router/User%20Guide/English/win2000_xp_printer.
Wireless Nd1 Router User Guide Windows 2000 Users: Click Windows Start > Settings > Printers. file:///G|/CSO/Documentation/Documentation%20-%20Draf...20Router/User%20Guide/English/win2000_xp_printer.
Wireless Nd1 Router User Guide 2. Right-click on your printer and select Properties. 3. Click Print Test Page. file:///G|/CSO/Documentation/Documentation%20-%20Draf...20Router/User%20Guide/English/win2000_xp_printer.
Wireless Nd1 Router User Guide Note: If the test page fails to print, refer to I cannot print to a network printer attached to my router in Windows XP or 2000 in the Troubleshooting section of this guide for additional information. © 2006 U.S. Robotics Corporation file:///G|/CSO/Documentation/Documentation%20-%20Draf...20Router/User%20Guide/English/win2000_xp_printer.
Wireless Nd1 Router User Guide file:///G|/CSO/Documentation/Documentation%20-%20Draf...20Router/User%20Guide/English/win2000_xp_printer.
Wireless Nd1 Router User Guide Wireless Nd1 Router User Guide Home ● ● ● Installation Configuration ● Tutorials ● Help Installing a USB Printer in a Windows Me or 98SE Environment A USB printer can be connected to the router and used as a network printer if you are using an operating system that supports printing to an Internet Printing Protocol (IPP)-based printer.
Wireless Nd1 Router User Guide 4. Power off your printer. Step Two: Internet Print Services Installation Windows Me Users: 1. Install the Internet Print Services from the Add-on folder located on the Windows Millennium Edition CD-ROM. 2. Follow the instructions provided by Microsoft. 3. When the installation is complete, restart your computer. Windows 98SE Users: 1. Download and install the Internet Print Services from Microsoft's Web site. http://www. microsoft.
Wireless Nd1 Router User Guide 2. Connect the power supply to your printer and turn your printer on. 3. Start a Web browser. In the location or address line type 192.168.2.1 and press ENTER. Note: If you have modified your router's IP address, enter the new IP address instead of 192.168.2.1. 4. When the user name and password window appears, type in the user name and the password you created. Click OK to load the router's setup page. file:///G|/CSO/Documentation/Documentation%20-%20Draf...
Wireless Nd1 Router User Guide Note: You are not prompted to log in the first time you connect to the router configuration pages. During the Setup Wizard procedure, you created a user name and password to log on to the router. You will need to use these whenever you log on to the router. The user name and password are case-sensitive. 5. In the Device section of the Status page, look for the Printer status and Printer location information. Write down the Printer location address.
Wireless Nd1 Router User Guide Step Three: Connect Clients to the Wireless USB Print Server Note: You must perform this procedure on each computer on your network to allow printing using the print server on the router. 1. Click Windows Start > Settings > Printers. 2. 6. Click Add Printer. file:///G|/CSO/Documentation/Documentation%20-%20Draf...20Router/User%20Guide/English/win98se_me_printer.
Wireless Nd1 Router User Guide 7. The Add Printer Wizard will start. Click Next. 8. Choose the radio button labeled Network printer. Click Next. file:///G|/CSO/Documentation/Documentation%20-%20Draf...20Router/User%20Guide/English/win98se_me_printer.
Wireless Nd1 Router User Guide 9. In the Network path or queue name field, enter the Printer location address. Click Next. file:///G|/CSO/Documentation/Documentation%20-%20Draf...20Router/User%20Guide/English/win98se_me_printer.
Wireless Nd1 Router User Guide Note: The URL information is case-sensitive and must be entered exactly as it is listed on the Printer location section on the router's Status page. 10. Select the manufacturer and model of your printer. Click Next. Note: If your printer does not appear in the list, please repeat Step One: Local Printer Installation. 6. Select Keep existing driver (recommended). Click Next. file:///G|/CSO/Documentation/Documentation%20-%20Draf...
Wireless Nd1 Router User Guide 7. When prompted, select Yes to set this printer as your default printer. Click Finish. Step Four: Verify the printer's connectivity file:///G|/CSO/Documentation/Documentation%20-%20Draf...20Router/User%20Guide/English/win98se_me_printer.
Wireless Nd1 Router User Guide 1. Click Windows Start > Settings > Printers. 2. Verify that your printer is listed. Right-click on your printer and select Properties. file:///G|/CSO/Documentation/Documentation%20-%20Dra...0Router/User%20Guide/English/win98se_me_printer.
Wireless Nd1 Router User Guide 3. Click Print Test Page. file:///G|/CSO/Documentation/Documentation%20-%20Dra...0Router/User%20Guide/English/win98se_me_printer.
Wireless Nd1 Router User Guide Note: If the test page fails to print, refer to I cannot print to a network printer attached to my router in Windows Me or 98SE in the Troubleshooting section of this guide for additional information. © 2006 U.S. Robotics Corporation file:///G|/CSO/Documentation/Documentation%20-%20Dra...0Router/User%20Guide/English/win98se_me_printer.
Wireless Nd1 Router User Guide file:///G|/CSO/Documentation/Documentation%20-%20Dra...0Router/User%20Guide/English/win98se_me_printer.
Wireless Nd1 Router User Guide Wireless Nd1 Router User Guide Home ● ● ● Installation Configuration ● Tutorials ● Help Installing a USB Printer in a Macintosh OS X Environment A USB printer can be connected to the router and used as a network printer if you are using an operating system that supports printing to an Internet Printing Protocol (IPP)-based printer. Macintosh OS X 10.3 and later has built-in support for this function.
Wireless Nd1 Router User Guide 1. Disconnect the printer from your computer and Plug the thin rectangular end of the USB cable into the USB port on the router. 2. Connect the power supply to your printer and turn your printer on. 3. Start a Web browser. In the location or address line type 192.168.2.1 and press ENTER. Note: If you have modified your router's IP address, enter the new IP address instead of 192.168.2.1. 4.
Wireless Nd1 Router User Guide Step Three: Connect Clients to the Wireless USB Print Server Note: You must perform this procedure on each computer on your network to allow printing using the print server on the router. 1. Open Utilities and double click Print Center. 2. Hold down the Alt/Option key and click Add. file:///G|/CSO/Documentation/Documentation%20-%20Draf...Mach-1%20Router/User%20Guide/English/mac_printer.
Wireless Nd1 Router User Guide 3. Select Advanced and select or enter the values shown below: Device: Internet Printing Protocol using HTTP Device Name: HP Deskjet 990c (example only, select your printer) Device URI: http://192.168.2.1:1631/printers/My_Printer Note: The Device URI information is case-sensitive and must be entered exactly as it is listed on the Printer location section on the router's Status page.
Wireless Nd1 Router User Guide Note: If you do not see your printer manufacturer or model listed contact the manufacturer to obtain an IPP compatible PostScript Printer Description (PPD) file for the Macintosh. Note: If you do not see the screen shown above hold down the Alt/Option key and click More Printers... 10. With the printer selected, click Make Default. Step Two: Verify the printer's connectivity 1. Open Applications and double click TextEdit to create a printer test page.
Wireless Nd1 Router User Guide 1. Enter some text. 2. Print the page to confirm that the printer works. file:///G|/CSO/Documentation/Documentation%20-%20Draf...Mach-1%20Router/User%20Guide/English/mac_printer.
Wireless Nd1 Router User Guide © 2006 U.S. Robotics Corporation file:///G|/CSO/Documentation/Documentation%20-%20Draf...Mach-1%20Router/User%20Guide/English/mac_printer.
Wireless Nd1 Router User Guide Wireless Nd1 Router User Guide Home ● ● ● Installation Configuration ● Tutorials ● Help Installing a USB Printer in a Linux Environment A USB printer can be connected to the router and used as a network printer if you are using an operating system that supports printing to an Internet Printing Protocol (IPP)-based printer. Linux provides support using the Common UNIX Printing System (CUPS).
Wireless Nd1 Router User Guide 3. Print a test page to ensure that the printer is working properly. 4. Power off your printer. Step Two: Get Your Print Server Information 1. Disconnect the printer from your computer and Plug the thin rectangular end of the USB cable into the USB port on the router. 5. Connect the power supply to your printer and turn your printer on. 6. Start a Web browser. In the location or address line type 192.168.2.1 and press ENTER.
Wireless Nd1 Router User Guide 5. In the Device section of the Status page, look for the Printer status and Printer location information. Write down the Printer location address. Step 2: CUPS Configuration Note: You must perform this procedure on each computer on your network to allow printing using the print server on the router. 1. Start a Web browser. In the location or address line type http://localhost:631 and press ENTER. 2. Click Manage Printers.
Wireless Nd1 Router User Guide 3. Click Add Printer. 4. Enter the Super User (SU) account user information and click OK. file:///G|/CSO/Documentation/Documentation%20-%20Draft...ach-1%20Router/User%20Guide/English/linux_printer.
Wireless Nd1 Router User Guide 5. Enter the name, location, and description of the printer that you are installing and click Continue. The specific names are not dependent upon any information already entered. Note: "Location" is not the same as the "Printer Location" that you recorded in the Get Your Print Server Information procedure. "Location" notes the physical location of the printer. For example, a printer located at home and in the basement could be assigned the location "Home-Basement.
Wireless Nd1 Router User Guide 7. In the Device URI field, enter the "Printer Location", that you recorded in the Get Your Print Server Information procedure above and click Continue. Note: The Device URI information is case-sensitive and must be entered exactly as it is shown in the Printer location section on the router's Status page. If you have modified the IP address of your router, use your router's IP address in place of 192.168.2.1. 8.
Wireless Nd1 Router User Guide 9. Select the model of your printer and click Continue. Note: If your printer does not appear in the list, open the Software link in the menu into a new window or tab, and search the CUPS repository for your printer drivers. 10. Click Printers to display information about your printer. Step Four: Verify the printer's connectivity 1. Click Print Test Page to confirm that the printer is communicating with your computer.
Wireless Nd1 Router User Guide © 2006 U.S. Robotics Corporation file:///G|/CSO/Documentation/Documentation%20-%20Draft...ach-1%20Router/User%20Guide/English/linux_printer.
Wireless Nd1 Router User Guide Wireless Nd1 Router User Guide Home ● ● ● Installation Configuration ● Tutorials ● Help Using SecureEasySetup SecureEasySetup™ makes it easy to connect wireless clients to your wireless router. SecureEasySetup automatically configures wireless security settings between your 1 router and your wireless clients.
Wireless Nd1 Router User Guide ❍ ❍ If you already have a Network Name (SSID) and WPA2 and WPA (PSK) wireless security, with TKIP and AES encryption, and a pass phrase set on the router, SecureEasySetup will not change any of these settings.
Wireless Nd1 Router User Guide Disable SecureEasySteup 1. Press the SecureEasySetup button on your router for 7 seconds. Note: This is not the same as a restore to factory defaults or a reboot of the router. The SecureEasySetup button only impacts your wireless security settings. 2. The SecureEasySetup LED will turn off. The security method and encryption type for your wireless network will be reset to None. No other settings on your router will be changed.
Wireless Nd1 Router User Guide © 2006 U.S. Robotics Corporation file:///G|/CSO/Documentation/Documentation%20-%20Draf...0Mach-1%20Router/User%20Guide/English/config_ses.
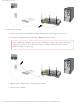
Wireless Nd1 Router User Guide Wireless Nd1 Router User Guide Home ● ● ● Installation Configuration ● Tutorials ● Help Connect Wireless Clients You can use the SecureEasySetup™ button to connect installed Nd1 or other certified SecureEasySetup wireless devices to your router.
Wireless Nd1 Router User Guide 1. Press the SecureEasySetup button on the back of your router for 1 second. The SecureEasySetup LED on the front of your router will start blinking. 2. Initiate SecureEasySetup in the client utility for your wireless adapter. 3. The router and the wireless device will synchronise wireless security settings, and the device will be securely connected to the router. To connect a device to your wireless router manually: 1.
Wireless Nd1 Router User Guide © 2006 U.S. Robotics Corporation file:///G|/CSO/Documentation/Documentation%20-%20Draft...-1%20Router/User%20Guide/English/connect_wireless.
Wireless Nd1 Router User Guide Wireless Nd1 Router User Guide Home ● ● ● Installation Configuration Tutorials ● ● Help Using the Router Configuration Pages The router provides configuration pages you can use to configure the router to meet your networking needs. The router configuration pages also let you view statistics in order to monitor network activity. Under normal operating conditions, you do not need to change the basic configuration that you established when you installed your router.
Wireless Nd1 Router User Guide You may also need to disable the HTTP Proxy feature of your Web browser so the configuration pages will display the most current information. Internet Explorer users: 1. Click Tools > Internet Options, and select the Connections tab. 2. Select Never dial a connection, then click Apply. 3. Click OK. 4. Click Tools > Internet Options, and select the Connections tab again. 5. Click the LAN Settings button. 6. Clear all the check boxes and click OK. 7. Click OK again.
Wireless Nd1 Router User Guide Logging In to the Router Configuration Pages 1. Start your Web browser. 2. In the location or address line, type: 192.168.2.1 and press ENTER to access the router configuration pages. 3. Enter your user name and password and click LOGIN. Using the Router Configuration Pages Configurable parameters have a text box or a drop-down list. Once a configuration change has been made on a page, click Save or you will lose your settings.
Wireless Nd1 Router User Guide ● ● LAN: Use to configure advanced settings for your LAN. Device: Use to manage, backup and restore your device settings, update your firmware, etc. © 2006 U.S. Robotics Corporation file:///G|/CSO/Documentation/Documentation%20-%20Dra...5464%20Mach-1%20Router/User%20Guide/English/wui.
Wireless Nd1 Router User Guide Wireless Nd1 Router User Guide Home ● ● ● Installation Configuration ● Tutorials ● Help Router Status Information From Status page, you can view the current status of your router and its features. Refresh: Click Refresh at the bottom of the page to update the page with the most current information. Device file:///G|/CSO/Documentation/Documentation%20-%20Draf...64%20Mach-1%20Router/User%20Guide/English/status.
Wireless Nd1 Router User Guide ● ● Name: Displays the name of the router. Time: Displays the current date and time settings for your router. To set the time for your router, go to the Device page. ● Firmware: Shows the current firmware version on your router. ● Boot loader: Displays the boot loader version that is running on your router. ● Printer status: Displays the status of the printer connected to the router.
Wireless Nd1 Router User Guide ● ● Method: The security method and security settings (Encryption, Pass phrase, Key, etc.) for your router. This information can be configured from the Security page. Wireless MAC filter: Displays whether the wireless MAC Filter is Enabled or Disabled on your network. This information can be configured from the Security page.
Wireless Nd1 Router User Guide ● ● ● ● ● ● ● Wireless: Displays the status of the wireless functions of the router, either Enabled or Disabled. This can be configured from the Wireless page. Network name: Displays the Network name of the router that is broadcast for wireless connections. This can be configured from the Wireless page. Broadcast name: Displays the whether the broadcasting of the network name is Enabled or Disabled. This can be configured from the Wireless page.
Wireless Nd1 Router User Guide ● Protocol: Displays type of protocol your network is using to connect to the Internet. ❍ DHCP: The IP address for your Internet connection is assigned dynamically using the Dynamic Host Configuration Protocol. ❍ Static: A specific, single IP address is assigned for your Internet connection. ❍ PPTP: Your Internet connection uses the Point-to-Point Tunneling Protocol. ❍ PPPoE: Your Internet connection uses Point-to-Point Protocol over Ethernet.
Wireless Nd1 Router User Guide network. ● ● ● DNS server 2: Lists the IP address of the second DNS server that is being used on your network. Lease expires: Displays the amount of time before your IP address lease expires or shows your IP address lease as Expired. If your IP address lease has expired, click the Renew button. This option will only display if your ISP uses DHCP. Renew: Clicking the Renew button will attempt to release and then renew your WAN IP address.
Wireless Nd1 Router User Guide Clients Note: Any devices connected to the router that have static IP addresses will not show up in the Clients list. Also, devices that are connected through a WDS connection will be displayed as wired clients. ● Type: The type of connection for the device, either wired or wireless. ● Name: The name of the connected device. ● MAC Address: The MAC address of the connected device. ● IP Address: The IP address that has been assigned to the connected device.