Chapter 1 The Gateway WG R-250 Wireless-G Router = Product features wm Safety =» Package contents = Connectors and LED
Chapter 1: The Gateway GR-250 Wireless-G Router Features Your Gateway Wireless Router features; Compact, modern design High speed (55 Bps in the 2.4 GHz band 802.11g) Downward compatibility to the 802.
Package contents Package contents Along with your wireless router, the package also contains the following items: | Power supply wm Ethernet cable m CD containing Gateway Wireless-G Access Point/Router Setup Wizard and Gateway GR-250 Wireless-G Router user guide BW Gateway GR-250 Wireless-G Router setup poster Parts and accessories The following additional parts and accessories may be helpful in setting up your wireless network: um Wireless Network Controller cards (for desktop computers or notebooks) ® JR-
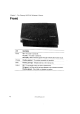
Chapter 1 The Gale way GR-250 Wireless-G Router Front HENS LED Description Power Off The router is furred off. On (red) The router is turned on. Blink (red) After a firmware upgrade this LED wil blink. after the first minute. Flashing (yellow) The wireless consecration i is operating Flashing (orange) Indicates ACTH ty c on the Internet | fink. LAN 4-1 Off The connection does not have an | Ethernet link. On (green) An Ethernet link has been detected on the indicated connection.
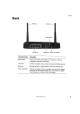
Back Back Antenna Antenna Reset switch LAN Ports WAN Port Power connection Interconnection Description Reset switch Press and hold the reset button for 10 seconds fo return all . configuration settings io the | default. Connects computer, hub, or r switch to these R45 Ethernet ports. Connect the DSL or cable modem to ins JR-45 Ethernet port. Power connection Plug the AC adapter nto this connection, Use only the AC adapter that came with the wireless router.
Chapter 1: The Gateway WOG-250 Wireless-G Router Getting started If you are a typical user that wants to set up and use the wireless router and adjust the basic security settings, go to “Initial Setup for ‘Typical Users” on page 7. If you are an advanced user that wants to set up and use the wireless router and adjust the advanced security settings or use advanced features such as router secure ty schemes, access authentication, and port forwarding, go to “Initial Setup for Advanced Users” on page 13. www.
Chapter 2 eases Initial Setup for Typical Users some m Preparation u Using the wizard = Configuring your computer for wireless
Chapter 2; Intifada Setup for Typical Users . Preparation If you intend to use the router to connect your network to the Internet, you need a broadband Internet connection (DSL or cable).
Using the wizard Using the wizard @ To configure the router using the wizard: 1 Insert the CD into the disc drive on the computer attached to your broadband modem. If the The Gateway Wireless-G Access Point/Router Setup Wizard opens, go to Step the wizard does not start automatically, go to Step 2. 2 Click Start, then click Run. The Run dialog box opens. 3 1n the Open text box, type (where d is the drive letter of your disc drive). 4 Click OK. The Gateway Wireless-G Access Point/Router Setup Wizard opens.
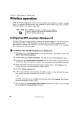
Chaplet 2: Initial Setup for Typical Users . . Wireless operation After the initial configuration is done, you ran operate your network in wired or wireless mode. To operate in wireless mode, each computer in your network must have a wireless network interface card and the same SAID. Tips & Tricks For additional information on setting up your wireless network Interface card, see the documentation that came with your wireless network card.
Wireless operation 8 In the Network key box, type the WEP encryption key that was generated when you configured the router. Important The WEP encryption key must be entered exactly as generated. All 10 (64-bit encryption) or 26 (128-bit WA encryption} hexadecimal digits must be entered. 9 Make sure that the Key format box indicates hexadecimal digits and that the Key length box indicates the correct length key (10 or 26 digits). 10 Click OK to accept the settings.
Initial Setup for Advanced Users Chapter 3 RR RADS Making connections ‘Configuring the computers Contacting and configuring the router Configuring your computer for wireless 13
Chapter 3: Initial Sep for Advanced Users Important I you are not comfortable with the procedures covered in this chapter, use the Gateway Wireless-G Access % Point/Router Setup Wizard. For more information, see “Initial Setup for Typical Users” on page 7. Making connections Preparation If you intend to use the router to connect your network to the Internet, you need a broadband Internet connection (DSL or cable).
Configuring the computers 4 Plug the AC adapter into an electrical outlet. Connect the other end of the adapter to the power connector on the back of the router. For more information, see the illustration on page 5. m The red Power LED turns on m The Wireless LED starts blinking Warning Use only the AC adapter and power cord provided with the router. Use of any other adapter or power cord may $ damage your router and void your warranty. 5 Turn on the DSL or cable modem.
Chapter 3: Initial Setup for Advanced Users ® To configure computers using Windows 2000: Click Start, Settings, then click Control Pans. Double-click the Network and Dial-up Connections icon to open the Network dialog box. Double-click the Local Area Connection icon for your network interface card. If you see more than one icon, select the one that connects to your local network. The Local Area Connection Status dialog box opens. Click Properties.
Contacting and configuring the router Contacting and configuring the router Now that all the hardware connections have been made, you must configure the router to operate on your network and to connect to the Internet through an ISP. Important If you are not comfortable with the procedures covered in this section, use the Gateway Wireless-G Access % Point/Router Setup Wizard. For mots information, see “initial Setup for Typical Users” on page 7. Initial configurations vary somewhat, depending on your ISP.
Chapter 3: Initial Setup for Advanced Users 2 In the address field, type 192.168.1.1, then press ENTER The Connect to dialog box opens. Type admin in the User name box. 4 Type admin in the Password box, then click OK. The Setup page opens. Tile tic ts, Loa Ar Ho (200, aod Wile . SrA Toerags mane: Damn Toni: Commission Tore: Herr 8 Goth “Configuring the router” on page 19. 18 wow.
Contacting and configuring the router Configuring the router @ To configure the router: 1 Ont he Setup page, click the arrow to open the Time Zone list, then click your time zone. If your location uses Daylight Savings Time, click to select the Automatically adjust clock for daylight savings changes check box. 2 In the Internet area, type the Host Name and the Domain Name if your ISP requires those entries {contact your ISP if you have a question about this).
Chapter 3: Initial Setup for Advanced Users 4 In the LAN area, accept the default settings unless you have a specific reason to change them (for example, two routers with the same address on your LAN). If you need to change these settings, type the IP Address and subset mask of the router (as it will be seen by your local network). wns ® ads Siberia task: Swiss o Andes Wireless ester tS we Crm: 5 In the Wireless area, click Mods, then click Mixed, G-Only, or Disable. Select Mixed if you are using both 802.
Contacting and configuring the router WEP (Wired Equivalent Privacy) Wireless security settings designed to prevent unauthorized access to your network. Select either Enable or Disable. If you choose to turn on WEP, click Edit Security Settings, then click one of four different types of wireless security. Type settings for the type of security you selected. If any of your computers use Windows XF, see “Configuring WEP security in Windows XP” on page 26.
Chapter 8: Initial Setup for Advanced Users Wireless The Rotor supposition 4 fern types of security settings, The ace: WPA Bre. A Stared Rey, WPA RADIUS, RADIUS and WEP, Firebase ses the bap feb fof Security mote details on the different types of security sittings.
According and configuring the router et wee se os Setting page Fi pe ‘The Router opponents 4 different types of security settings, There are WPA] Pressured Key, WPA RADIUS, RADIUS and WEP. Flossie 144 Ure help tat fot more details the different types of security seeings. Security Mode: WPA Algorithms: RADIUS Server Address: WPA RADIUS (Remote Authentication Dial-in User Service) WPA Algorithms Select an algorithm method: either TIP (Temporal Key Integrity Protocol) or AES (Advanced Encryption Standard).
Chapter 3: Initial Setup for Advanced Users Wireless Security Shared Key: Te Roster supports ¢ different types of securely settings. Thee sce: WEA re-Shoved Key RADIUS, RADIUS and WEP. Please se the help ob for more details on he different types of security settings. Default Transmit Key: WEP Encryption: Passphrases: Hey 1: Key 2: Hey 3 Key +] RADIUS (Remote Authentication Dial-in User Service) RADIUS Server Address RADIUS Port ) 24 Type the IP address of the RADIUS server.
Contacting and configuring the router 6 In the CPD area, click CPD Server Sating Lo select the CPD options for the router. The CPD Server setting screen opens. Os Nisan thi selling if you seedy have another touch or devise serving 2 1 CPD serve con you network, CPD Server: i Starting IP Address: 492 . 188 . 1 . [160] Maximum Husker of CPD Users: Sent Sense Time: fetus 0 means one day) Static DNS 1: % WINS: Currently Assigned [2 DUTCH Blair Tabs.
Chapter 3! Initial} Setup for Advanced Users ‘When you are finished making entries in the above fields, click Apply to save your entries and exit, or click Can eel to exit without saving any changes. Click Close to close the window if you did not make any changes. 7 When you are finished making entries on the Setup page, click Apply to save your entries. Click Cancel to revert to the previous settings.
Wireless operation 6 If the correct wireless network {check the SAID) is shown in. the Preferred Networks area, double-click the connection and continue to Step 7. -Or Click the connection in the Available Networks area, then click Configure. The Wireless Networks Properties window opens. 7 Click to select the Data encryption (WEP enabled) check box and click to clear the The key is provided for me automatically check box.
sas Chapter 4 DOSE ss Routine Router Settings and Status Restore the router's default settings Upgrade the firmware Change default router settings Check router status 29
Chapter 4: Routine Router Settings and Status Using router settings and features From the Router window in the Gateway Wireless Router Setup utility, you can turn many of the router's features on and off. You can also restore the router's settings to the defaults and upgrade the firmware to the latest version. Restoring the router's default settings The router comes with per-set settings that lets it operate in most situations.
Using router settings and features 3 Click the Yes check box to select Router Defaults, then click Apply at the bottom of the window. The router settings are returned to the defaults. Caution Any settings you have made and saved will be lost when the default settings are restored. 4 To exit the Gateway Wireless Router Setup utility, close your browser or enter another address in the browser's address field. Upgrading the firmware New firmware for your router is made available periodically by Gateway.
Chapter 4: Routine Router Settings and Status 5 Click Browse and locate the file you downloaded on your computer. Click the file, then click Open. The file name and path appear in the File Path box. 6 Click the Upgrade button and wait while the file is loaded into firmware. Caution Do not turn off or reset the router while the firmware is being upgraded.
Fouler status 4 To use Remote Management, click the arrow to open the Remote Management list, click Enable (factory default is disabled). We also encourage you to change the router's default password at this time, to provide increased security. Remote Management lets you access and manage your router from a remote location through the Internet.
Chapter 4 Routine Router Sat tings and Status @ To release the router's current Interment IP address: 1 Click Status on the left side of the window. The Status window opens. Status # his sae shoe of of he Bess der your savior Di tearjerker, To change cost of fe versed, ‘ S510 co rte ses pe ashed > 121 re tz oun 02005 1975 Hosts: Bonaparte: wat, fay.
Chapter 5 cosponsor os Advanced Configuration and Settings w Setup a security scheme » Use filters Forward ports Set up routing (dynamic/static) 35
Chapter 5: Advanced Configuration and Settings Setting up security Network security is important for home networks ta protect personal information, such as credit card numbers, Social Security numbers, tax records, and other private information.
Setting up security 4 Highlight the row of asterisks in the (Re-enter to Confirm) box and retype the new password to confirm your entry. This will be your password the next time you access the Gateway Wireless Router Setup utility. 5 1 you do not use VPN, click to clear the check boxes for LETUP (Layer-2 Tunneling Protocol) and PT (Point-to-Point Tunneling Protocol) tunnels in the VPN Pass-Through area. 6 In the Web Filters area, click to select the check box for the type of Web filters you want to use.
Chapter 5: Advanced Configuration snd Settings Advanced settings You can customize settings for security, data transmission, filters, port configuration, and routing.
Advanced settings @ To change router security settings: 1 Open your Internet browser and go to the Gateway Wireless Router Setup utility. For more information, see “Contacting the router” on page 17. 2 Click Advanced on the left side of the window. The Advanced (Data) page opens. Advanced Ths screen ahs aac user ont Auscultated 10) chugs ese seo Wk BC Pn anionic Types Fragmentation Mudslides | C15 Protection ude: Seine tas 30 AEE LG www gateway.
Chapter 5: Advanced Configuration and Settings 3 To tun on Wireless MAC Filter, click the arrow to open the Wireless MAC Filters list, then click Enable. Do the following: a Click to select either the Prevent the PC's listed from accessing the wireless network check box. -Or Click to select the Permit the PC's listed to access the wireless network check box.
Advanced settings 5 Click the arrow to open the Transmit Rate list, then click the data transmission rate you want to use in your wireless network. The setting should be based on the speed of your wireless network. The recommended setting is Auto (the default), which allows the router to use the fastest reliable transmission speed.