
User Manual
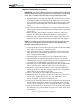

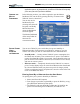

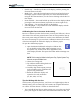
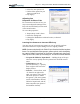
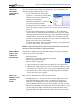
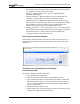
Table Of Contents
- Motion M1200/M1300 User Guide
- About This User Guide
- Chapter 1 Getting Started with Motion M1200 and M1300 Tablet PCs
- Chapter 2 Hardware
- Chapter 3 Motion M1200 and M1300 Tablet PC Software
- Chapter 4 Using Your Motion M1200 and M1300 Tablet PCs
- Initializing Microsoft Windows XP
- Starting and Stopping Your Tablet PC
- Opening the Motion Dashboard
- Saving Power Using Stand By or Hibernate
- Operating the Motion M-Series Digitizer Pen
- Hints for Optimizing Your Display Window
- Making Best Use of the Tablet PC Input Panel
- Hints for Working with the Input Panel
- Eliminating Paper with Windows Journal
- Creating Forms and Editing Them in Windows Journal
- Have Sticky Notes Handy for Jotting Down Information
- Changing Screen Orientation
- Customizing Buttons
- Creating New Power Schemes for Special Situations
- Charging the Battery
- Swapping the Battery
- Adding Memory to Improve System Performance and Increase Battery Life
- Installing Optical Disk Drives
- Mirroring and Extending Your Display
- Setting Up a Wireless Connection
- Setting Up Speech Recognition for Dictation
- Using Speech Recognition for Commands
- Changing Screen Resolution for Using an External Monitor
- Creating a Screen- Resolution Scheme for an External Monitor or Similar Device
- Multimedia Applications
- Setting Up Tablet PC Security
- Clearing Tablet PC Security
- Caring for Your Tablet PC and Its Accessories
- Traveling With Your Tablet PC
- Appendix A Regulatory Compliance Notices
- Appendix B Troubleshooting and Support
- Appendix C Safety
- Appendix D Motion M1200 and M1300 Specifications
- Appendix E Wireless Mini-PCI Installation

Chapter 4
Using Your Motion M1200 and M1300 Tablet PCs
Motion Computing M1200 and M1300 Tablet PC User Guide 33
• Double-tap — Double-tap the Pen on the display, without pressing the
function button on the Pen
• Right-click — Press the function button on the Pen and tap the Pen on
the display (equals a mouse right-click). For more information about
using the Pen function button, see the section “Writing with the Pen” in
this chapter.
• Press and hold — Press and hold the tip of the Pen to the display without
pressing the Pen function button (equivalent to a mouse right-click)
• Tap and drag — Tap and drag the Pen on the display
• Select/Highlight — Tap on the item on the Tablet PC display with the
Pen to activate the function
Calibrating the Pen to Increase Its Accuracy
Be sure to calibrate your Pen the first time you start your Tablet PC, then at
other times if the onscreen pointer doesn’t seem to line up with the Pen tip.
Have each person using the Tablet PC set their own calibration; the Tablet
PC stores Pen settings on a per-user basis. Calibration ensures the accuracy
of the Pen and adjusts the Tablet PC display for different people.
To open the calibration program:
1. Open the Motion Dashboard and tap the Calibrate but-
ton. Or double-tap the Tablet and Pen Settings icon in
the System Tray, located in the lower right-hand corner
of the display window. This opens the Tablet and Pen Settings win-
dow.
NOTE: This icon may be hidden in the System Tray. Tap the System Tray
left-arrow to open all hidden icons.
2. Choose the Settings tab.
3. Tap Calibrate while holding the Pen in
a normal writing manner.
4. Carefully align the Pen point precisely
in the crosshairs in the calibration dis-
play for best performance.
5. Rotate the Tablet PC display and
repeat this for each orientation
(0
o
, 90
o
, 180
o
, or 270
o
).
Tips for Writing with the Pen
The first time you pick up the Pen, you’ll notice it is lightweight (it has no
internal battery), has an unusual tip, and contains an elongated button that
we call the “function button.” The Pen is described below:
• You can hold the Pen like any other writing pen, except that you should
place your fingers on either side of the Pen function button so that you