
User Manual
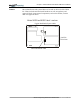
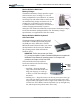
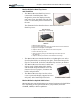
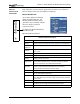
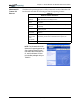
Table Of Contents
- Motion M1200/M1300 User Guide
- About This User Guide
- Chapter 1 Getting Started with Motion M1200 and M1300 Tablet PCs
- Chapter 2 Hardware
- Chapter 3 Motion M1200 and M1300 Tablet PC Software
- Chapter 4 Using Your Motion M1200 and M1300 Tablet PCs
- Initializing Microsoft Windows XP
- Starting and Stopping Your Tablet PC
- Opening the Motion Dashboard
- Saving Power Using Stand By or Hibernate
- Operating the Motion M-Series Digitizer Pen
- Hints for Optimizing Your Display Window
- Making Best Use of the Tablet PC Input Panel
- Hints for Working with the Input Panel
- Eliminating Paper with Windows Journal
- Creating Forms and Editing Them in Windows Journal
- Have Sticky Notes Handy for Jotting Down Information
- Changing Screen Orientation
- Customizing Buttons
- Creating New Power Schemes for Special Situations
- Charging the Battery
- Swapping the Battery
- Adding Memory to Improve System Performance and Increase Battery Life
- Installing Optical Disk Drives
- Mirroring and Extending Your Display
- Setting Up a Wireless Connection
- Setting Up Speech Recognition for Dictation
- Using Speech Recognition for Commands
- Changing Screen Resolution for Using an External Monitor
- Creating a Screen- Resolution Scheme for an External Monitor or Similar Device
- Multimedia Applications
- Setting Up Tablet PC Security
- Clearing Tablet PC Security
- Caring for Your Tablet PC and Its Accessories
- Traveling With Your Tablet PC
- Appendix A Regulatory Compliance Notices
- Appendix B Troubleshooting and Support
- Appendix C Safety
- Appendix D Motion M1200 and M1300 Specifications
- Appendix E Wireless Mini-PCI Installation

Chapter
2
Motion M1200 and M1300 Tablet PC Hardware
Motion Computing M1200 and M1300 Tablet PC User Guide 22
For information about installing these Drives, see the documentation
packaged with each Optical Disk Drive. For general information about using
your Optical Disk Drives, see Chapter 4 of this User Guide.
256MB and 512MB Memory Upgrade Modules
Additional memory modules improve performance and increase the battery
life of both Tablet PCs.
NOTE: For information about installing additional
memory upgrade modules, see Chapter 4 of this User
Guide or the Installation Card packaged with
the upgrade module.
The following configurations are supported:
PC Card Slot
The PC card slot, located on the Power Switch edge, holds one Type-II PC
Card for networking, memory expansion, or accessory connection.
1. To install the PC card, insert it label-side up.
2. To remove the PC card, push the button next to the slot until it pops
out, then push it again to eject the card.
NOTE: Both Tablet PCs ship with a plastic blank in the PC Card slot. When the
slot isn’t in use, we recommend that you leave the plastic blank in place.
Mini PCI Card (Wireless)
Both Tablet PCs to accept a mini-PCI card for wireless communications.
NOTE: Most Tablet PCs ship with an 802.11b mini-PCI card installed.
For information about wireless operations, see Chapter 4 of this User Guide.
Table 2-5
Supported Memory Configurations
Slot ASlot BTotal Memory
256MB 256MB 512MB
512MB 768MB
512MB 256MB 768MB
512MB 1GB