
User Manual
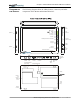
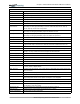
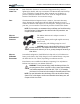
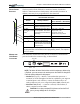
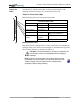
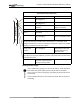
Table Of Contents
- Motion M1200/M1300 User Guide
- About This User Guide
- Chapter 1 Getting Started with Motion M1200 and M1300 Tablet PCs
- Chapter 2 Hardware
- Chapter 3 Motion M1200 and M1300 Tablet PC Software
- Chapter 4 Using Your Motion M1200 and M1300 Tablet PCs
- Initializing Microsoft Windows XP
- Starting and Stopping Your Tablet PC
- Opening the Motion Dashboard
- Saving Power Using Stand By or Hibernate
- Operating the Motion M-Series Digitizer Pen
- Hints for Optimizing Your Display Window
- Making Best Use of the Tablet PC Input Panel
- Hints for Working with the Input Panel
- Eliminating Paper with Windows Journal
- Creating Forms and Editing Them in Windows Journal
- Have Sticky Notes Handy for Jotting Down Information
- Changing Screen Orientation
- Customizing Buttons
- Creating New Power Schemes for Special Situations
- Charging the Battery
- Swapping the Battery
- Adding Memory to Improve System Performance and Increase Battery Life
- Installing Optical Disk Drives
- Mirroring and Extending Your Display
- Setting Up a Wireless Connection
- Setting Up Speech Recognition for Dictation
- Using Speech Recognition for Commands
- Changing Screen Resolution for Using an External Monitor
- Creating a Screen- Resolution Scheme for an External Monitor or Similar Device
- Multimedia Applications
- Setting Up Tablet PC Security
- Clearing Tablet PC Security
- Caring for Your Tablet PC and Its Accessories
- Traveling With Your Tablet PC
- Appendix A Regulatory Compliance Notices
- Appendix B Troubleshooting and Support
- Appendix C Safety
- Appendix D Motion M1200 and M1300 Specifications
- Appendix E Wireless Mini-PCI Installation

Chapter
2
Motion M1200 and M1300 Tablet PC Hardware
Motion Computing M1200 and M1300 Tablet PC User Guide 17
Battery Status Gauge
A five-LED battery gauge is located on the battery on the bottom of
both Tablet PCs. Each LED represents about 20% of available
power. You can activate the gauge by pushing the black button next
to the LEDs.
In the example shown here, the battery has about 40% of its power
remaining.
Table 2-4
Front Panel Battery Status LED
LED Battery Status Action
Steady green Battery 100% charged
(AC plugged in)
None
Steady amber Battery is charging
(AC plugged in)
None
Steady red Battery is overheated or
defective.
Wait for the battery to cool.
Replace the battery.
Flashing green Unit is in Stand By None
Flashing green and
amber
Battery is discharging
abnormally.
Replace the battery.
Slow-flashing amber 10% battery charge
(AC unplugged).
Immediately charge the
battery to avoid loss of data.
NOTE: When the battery reaches a 10% charge, the Tablet PCs issue a Low
Battery alarm message in addition to the LED warning. For information about
modifying this alarm (you can set it to display a message or to produce an audible
warning), see Chapter 4 of this User Guide.
Fast-flashing amber
(for only a few
seconds)
3% battery charge
(AC unplugged)
The Tablet PCs issue a
Critical Battery alarm and
automatically goes into
Hibernate mode.
NOTE: Hibernate mode attempts to save data in any open programs to your hard
drive. When you restart the Tablet PC, it returns to the same place you were before
the system hibernated.
Off Tablet PC is unplugged from
AC power and the system is
running on battery power.
None