Wireless LAN Gemtek Technology Co., Ltd.
Wireless LAN Copyright statement No part of this publication may be reproduced, stored in a retrieval system, or transmitted in any form or by any means, whether electronic, mechanical, photocopying, recording, or otherwise without the prior writing of the publisher. Printed in Taiwan, Nov.
Wireless LAN .Contents 1. Introduction.............................................................................................................. 4 2. Wireless LAN Basics ............................................................................................... 5 3. Installation for Windows platform........................................................................... 6 3.1. Installation Overview ........... 7 3.2. Install Procedure for Windows XP 8 3.3.
Wireless LAN 1. Introduction Thank you for purchasing your Wireless LAN, Wireless LAN 11 Mbps Mini-PCI. This manual will assist you with the installation procedure.
Wireless LAN 2. Wireless LAN Basics Wireless LAN (Local Area Networks) systems offer a great number of advantages over a traditional, wired system. Wireless LANs (WLANs) are more flexible, easier to setup and manage and often more cost effective than their wired equivalence. Using radio frequency (RF) technology, WLANs transmit and receive data over the air, minimizing the need for wired connections.
Wireless LAN 3. Installation for Windows platform The following section will assist you to in installing wireless LAN Mini-PCI successfully. You will first install software (Utility) and then insert / attach the Wireless LAN Mini-PCI to your system, and finally set the network properties to accommodate resource sharing and select the type of wireless network that you wish to install.
Wireless LAN 3.1. Installation Overview Here are some steps you will perform in establishing your wireless network connection: ! Install the Access Point at first. AP is needed in case of Infrastructure network mode. ! Install the software using the Install CD. ! Install the Wireless LAN Card (WIRELESS LAN 11Mbps Mini-PCI). ! Install the network protocol(s) required to communicate on your network. Most likely you will need the TCP/IP protocol.
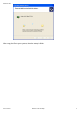
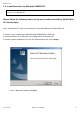
Wireless LAN 3.2. Install Procedure for Windows XP 1. Insert the given Installation CD in the CD-ROM and then click on the Setup. Follow the instruction to finish the installation. 2. Insert your WLAN card into PCMCIA/PCI slot or USB connector of your system, and then system will detect new hardware. Select “Install the software automatically (Recommended) ”, and then click Next to continue. Once your system detected the driver, Microsoft will show a warning message as below.
Wireless LAN After copy the file to your system, then the setup is finish.
Wireless LAN 3.3. Install Procedure for Windows 98/ME/2000 Note: Do not insert the WLAN Adapter until you are asked to do so, failure of which may result in unsuccessful installation of your WLAN device. Please follow the following steps one by one in order to install the WLAN MiniPCI successfully. Note: Install WLAN CF card on your laptop PC must add additional PCMCIA Mini-PCI. 1. Power on your computer and allow Windows 98/ME/2000 to load fully. 2.
Wireless LAN 4. Accept the license agreement. Accept the license agreement. Click Yes to accept. Click Yes to finish the setup. 5.
Wireless LAN Windows will recognize the WLAN Mini-PCI and auto detect the driver, if the system did not find the driver automatically, please install the driver manually. . Click Yes to finish the installation. 6. Click the right button of mouse on My Computer " Properties " Device Manager. Check whether it has WLAN Mini-PCI in one of the sockets or not. If you find Wireless LAN 11Mbps Mini-PCI in one of the sockets, it means the card is detected properly. 7.
Wireless LAN 9. Click on the Configuration tab and then click on the Add button. Select Network Component Type box appears. Click on the Protocol the click the Add button.
Wireless LAN 10. Select Network Protocols box appears. From the list of manufactures, click on Microsoft. From the list of network protocols list, select NetBEUI, then click OK. 11. The NetBEUI protocol is now installed. After clicking on OK return back to Network Component Type box. 12. Repeat the step 15 and 16 to add IPX/SPX protocol. 13. Repeat the step 15 and 16 to add TCP/IP protocol. 14. Click on the TCP/IP option for setting the IP address for your computer.
Wireless LAN 15. Screen message do want to restart your Computer will pop up. Select Yes. It will shut down your computer and restart. Important: Restart your computer to make the changes effective before you reinstall the driver. Uninstall Procedure Step 1: If you want to uninstall the WLAN Mini-PCI, just simply click Start Menu " Program File " Wireless " Uninstalled, it shall uninstall all related programs.
Wireless LAN Step 2: Restart your Computer.
Wireless LAN 4. Configuration Utility Wireless LAN 11 Mbps Wireless LAN Mini-PCI uses its own management software. All functions controlled by user are provided by this application. Usually this application starts automatically, or click icon from Start Menu to start the Utility application. should appear in your Icon tray. If the icon is in red, it means that Wireless LAN 11 A new icon Mbps NIC configuration is invalid or incomplete. Sometimes icon can be colored in red.
Wireless LAN 4.1 Link Status - Status This field is used to display the current status of connection. When the state shows “Connected to SSID“ means normal flow of operation in Infrastructure mode. The PC is connected to access point. Networking is available. A state of “Scanning” means that the node is searching for available access point and unable detects the SSID for an available access point within range.
Wireless LAN 4.2 Connections The Connections Tab shows current status of available APs within the network. User may select profile or ESSID from above list, click “Connect” to connect with the AP. Click “Refresh” to rescan the network, this utility with site survey function, it will detect and list all available APs within network. Place a check mark in the field if you wish attempt Auto-connect to ANY network in the range. .
Wireless LAN 4.3 Profile Setting Profile Setting allow user to create profiles for different network environments. Click “New” button to create new profiles. “Edit” for edit current exist profile. Click “Delete” button if you wish to delete profiles.
Wireless LAN - Network Type This field allows you to select from a list of supported Network “Modes”. The modes displayed will have two values: “Ad Hoc” and “Infrastructure”. Ad Hoc - This is the 802.11 peer-to-peer mode of operation. In 802.11Ad Hoc only one wireless “cell” is supported for each different SSID. All communication is done from Client to Client without the use of an Access Point. 802.11 Ad Hoc networking uses the same SSID for establishing the wireless connection.
Wireless LAN 4.4 About About tab shows the product version including the detail of Driver, Application and firmware version. Users must use this version number when reporting their problems to technical support.
Wireless LAN User manual Wireless LAN 11 Mbps 23
Wireless LAN 4.5 Windows XP Zero Configuration Microsoft provides Windows XP Zero Configuration, which means user doesn’t need to use software provided by the manufacturer. Instead, Windows XP recognizes the Mini-PCI and provides the necessary driver and configuration software. If your station is within range of a WLAN, Windows XP announces that one or more wireless networks are available and suggests that you click the Network icon to see a list of available networks.
Wireless LAN 4. To add another network to the list, click the Add button on the Wireless Networks tab to display the Wireless Network Properties dialog. 5. Type a network name ( SSID) in the Network name test box. 6. If you have implemented a system automatically providing users with network keys and /or WEP keys, click OK to save this network SSID and move on to the next network that you want to configure. 7. If you are setting up an ad hoc mode wireless connection, click the last check box in the dialog.
Wireless LAN 5. Troubleshooting If you encounter any problems during the installation, or to confirm that the WLAN 11Mbps device is installed properly, please read the following troubleshooting section. In Windows 98: To check that the WLAN 11Mbps device is installed properly, please do the following: 1. Go to START>SETTINGS>CONTROL PANEL>NETWORK. Choose the Configuration Tab. If you find the WLAN 11Mbps Mini-PCI, it means the card is installed properly.
Wireless LAN 6. Technical specifications of Wireless LAN Driver support - Windows XP − Windows 98 − Windows 2000 − Windows ME - Win CE (Strong ARM platform) Standards supported − IEEE 802.11 standard for Wireless LAN − All major networking standards (including TCP/IP, IPX) Environmental Operating temperature (ambient): − -10°C to 50°C (Operating),-20 to 70°C (Storing) − Max. Humidity: 95% Non-condensing Power specifications − Transmit Power, 2.7v to 3v: 15 dBm min.
Wireless LAN Specific features Supported bit rates: − 11 Mbps − 5.
Federal Communication Commission Interference Statement This equipment has been tested and found to comply with the limits for a Class B digital device, pursuant to Part 15 of the FCC Rules. These limits are designed to provide reasonable protection against harmful interference in a residential installation. This equipment generates, uses and can radiate radio frequency energy and, if not installed and used in accordance with the instructions, may cause harmful interference to radio communications.
This device is intended only for OEM integrators under the following conditions: 1) The antenna must be installed such that 20 cm is maintained between the antenna and users. For laptop installations, the antenna must be installed to ensure that the proper spacing is maintained in the event the users places the device in their lap during use (i.e.
Statement for Warning & Configuration 1. This device is only for OEM integrator. 2. The use of this device is limited to notebook. 3. Antenna should be the antenna used in FCC’s authorization for ID: MXF-M910725B and it should be the integral part of the notebook with the installation configuration shown in the following diagram.
Wireless LAN R&TTE Compliance Statement This equipment complies with all the requirements of the DIRECTIVE 1999/5/EC OF THE EUROPEAN PARLIAMENT AND THE COUNCIL of 9 March 1999 on radio equipment and telecommunication terminal Equipment and the mutual recognition of their conformity (R&TTE). The R&TTE Directive repeals and replaces in the directive 98/13/EEC (Telecommunications Terminal Equipment and Satellite Earth Station Equipment) As of April 8, 2000 .