LAPLUG USER MANUAL CLICK HERE TO ACCESS UP-TO-DATE ONLINE VERSION of this document for the most recent content as well as for features such as expandable illustrations, easier navigation, and search capability.
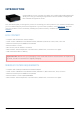
INTRODUCTION Congratulations on your purchase of a LaPlug. This cutting-edge media adapter will allow you to bring your existing storage devices onto the network, making stored files available throughout the house. This manual will guide you through the process of connecting your LaCie product to your network and will assist you in troubleshooting any issues that might arise. If you encounter problems, check Getting Help.
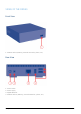
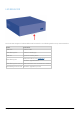
VIEWS OF THE DRIVES Front View 1. USB 2.0 device (USB key, external hard drive, printer, etc.) Rear View 1. 2. 3. 4. Power button Power supply Gigabit Ethernet USB 2.0 devices (USB key, external hard drive, printer, etc.
LED BEHAVIOR The front LED changes to indicate different drive behavior. The following table sums up these behaviors.
POWER BUTTON FUNCTIONS ■ ■ Turn the product on: Push the power button until the front LED turns blue. Release the button and the LED will flash blue. Then the product will boot, which may take up to two minutes. When the light becomes steady blue, the product is ready to use. Turn the product off: Press and hold the power button until the light slowly flashes blue. The product will then: Stop file transfers Unmount volumes Shut down Restore Default Configuration: See Update Product Software.
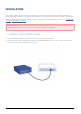
INSTALLATION This chapter explains how to connect your LaPlug to your network. Simply install LaCie Network Assistant, a small utility which will help you to discover and configure your product, then connect the LaPlug to the network. Follow the steps below to get your product up and running. After you finish installation, move on to Access USB Devices or Administer the LaPlug.
2 - CONNECT THE POWER SUPPLY 1. Connect the power supply to a wall outlet and to the product. 2. Push the power button until the front LED turns blue. Release the button and the LED will flash blue. Then the product will boot, which may take up to two minutes. When the light becomes steady blue, the product is ready to use.
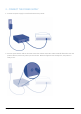
Caution: Only use the power supply supplied with your specific LaCie product. Do not use a power supply from another LaCie device or another manufacturer. Using any other power cable or power supply may cause damage to the device and void your warranty. Always remove the AC adapter before transporting your LaCie drive. Failure to remove the adapter may result in damage to your drive and will void your warranty. 3 - CONNECT USB DEVICES 1. Connect USB storage devices to the LaPlug's USB ports.
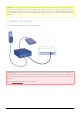
4 - INSTALL LACIE NETWORK ASSISTANT Lacie Network Assistant detects all LaCie network-attached storage devices on your network and gives you easy ways to connect to or configure them. Note: If you've installed LaCie Network Assistant before purchasing this LaCie product, make sure that you've downloaded and installed the latest version from the LaCie website. 1. Insert the CD-ROM into your computer's CD-ROM drive. 2. Windows users, the CD should appear in My Computer or Computer.
ACCESS USB DEVICES You have several options for accessing the USB devices you have connected to your LaCie product. Note: See Advanced Accessibility Features for related features such as accessing your device remotely, creating shortcuts to your USB devices on the network, and multimedia streaming. OPTION 1 1. Launch LaCie Network Assistant. Windows Users: 1. Select LaCie Network Assistant in Start/Programs.
3. The USB device will open in a Finder window (Mac) or an Explorer window (Windows). 4. If you are prompted for a username/password, enter your username and password (by default): Username = admin Password = admin If you have changed the username/password from the default admin/admin (see Administer the LaPlug), enter your new credentials. 5. Transfer files normally between your computer and the USB device.
Technical note: Error notices in LaCie Network Assistant instead of USB device listing: If no USB device is recognized, instead of the USB device name, you will see the text Please connect a USB device. Make sure your device is connected and that it has been formatted. Refer to your device's user manual for formatting procedure. If you see the text Connect Manually instead of the USB device name, click Connect Manually.
Technical note: Mac users: If the USB device does not open in a Finder window, simply navigate in the Finder to Network > LaPlug > [disk name]. OPTION 2 Mac Users 1. In your Finder, navigate to Go > Connect to Server. 2. In the dialogue window that opens, type one of the following: afp://laplug.local smb://laplug.
Windows XP Users 1. In an explorer window address field, type \\[Machine name] or \\[IP address]] and click Go. Alternatively, from the Start menu, click Run, type \\[Machine name] or \\[IP address]] and click OK. Windows 7 and Vista Users 1. In an explorer window address field, type \\[Machine name] or \\[IP address]] and hit enter.
OPTION 3 1. Launch LaCie Network Assistant. Windows Users: Select LaCie Network Assistant in Start/Programs. A Network Assistant icon will appear in the system tray and LaCie Network Assistant will automatically detect your LaCie product on the network. Mac Users: Select LaCie Network Assistant in your Applications folder. A Network Assistant icon will appear in the system tray and LaCie Network Assistant will automatically detect your LaCie product on the network. 2.
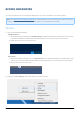
ADMINISTER THE LAPLUG The LaCie LaPlug features an easy-to-use browser-based tool for configuring the drive called the Dashboard. DASHBOARD - ACCESSING There are two ways to access the Dashboard, using the LaCie Network Assistant and using a browser. Use LaCie Network Assistant 1. Click on the LaCie Network Assistant icon in the system tray (Windows users) or menu bar (Mac users) and select LaPlug > Web Access. 2. The LaCie LaPlug login page will open in a new browser window or tab.
Use a Browser 1. Open your Internet browser (Firefox, Internet Explorer, Safari, etc.) and type your LaCie LaPlug's IP address or machine name (by default, LaPlug) in the browser's URL (web address) field. For example: http://[IP-address] or http://LaPlug (Windows) http://LaPlug.local (Mac) 2. In the login prompt, enter your username and password (case sensitive; default is admin/admin). 3. Click Log in. Technical note: Find your device's IP address in the LaCie Network Assistant Configuration Window.
Restart or Shutdown To restart or shut down the drive, click this button, then choose between Restart and Shutdown. DASHBOARD - NAVIGATION The Dashboard is made up of a central area surrounded by widgets, or small boxes that represent the different pages that make up the Dashboard. The widget displays a summary of the information contained in the page. For full information, navigate to the page itself.
DASHBOARD - DRIVES This page will list all the USB devices connected to your LaPlug. Every USB device will take up at least two rows in the table; the first row describes the disk, and its volumes (or partitions) each take up an additional row(s). So a disk with a single partition will take up two rows, and a disk with two partitions will take up three rows, etc. ■ ■ Disk: This column will normally list the drive's manufacturer (or a graphical indication of free space for partitions).
USB Power Failure If you connect hard drive(s) to the LaPlug that experience a USB failure, the LED will blink red, all connected USB devices will become inaccessible, and you will receive an error on the Dashboard. USB failures could be the result of a defective USB device or USB cable, or insufficient power being supplied to the USB device. To resolve the issue, unplug the last-connected USB device. Next: 1. Launch the Dashboard (see Dashboard - Accessing). 2.
3. Click the Reload button. You will see this screen: 4. After a few seconds, the blinking red LED will turn blue, and the Dashboard > Drives page will list any connected USB devices.
DASHBOARD - NETWORK LAN This page allows you to modify your LaPlug's network LAN settings. LAN Interface Mode: Choose whether the LaPlug should be automatically assigned an IP address and other values by your DHCP-managed network (DHCP), or if values should be assigned manually (Static). If you choose static, you will be able to type in the fields below.
Remote Management ■ ■ HTTP/HTTPS: These lights will be green if the UPnP IGD server acknowledges port forwarding is successful. FTP: Toggle this feature on/off to allow your LaPlug to be accessible via File Transfer Protocol (FTP). See Access USB Devices for details. After modifying any of the above settings, click the Apply button.
DASHBOARD - WIRELESS CLIENT This page will allow you to connect your LaPlug to your wireless network. Note that Ethernet is the default connection, so you must initially connect the LaPlug to your network via the Ethernet cable. After successfully connecting to a wireless network, simply disconnect the Ethernet cable. Available Networks Tab All detected wireless networks will be listed as well as their technical specifications. To connect to a wireless network: 1. Click an SSID to select the network.
2. 3. 4. 5. Select the WEP key ID, fill in the WEP key, or fill in the WEP PSK (whichever is applicable). Click the Test Connection button. If successful, a green light will appear. Click the Apply button to make the connection. Unplug the Ethernet cable.
DASHBOARD - GENERAL SETTINGS This page allows you to modify some of your LaPlug's general parameters. Names ■ ■ Host Name: Modify the machine name. The machine name identifies your LaPlug in LaCie Network Assistant and on the local network. The machine name is limited to 15 characters. Please use alphanumeric characters without spaces or symbols. Workgroup: Type a Windows workgroup name to connect your LaPlug to a Windows workgroup.
■ iTunes database: If you've recently added audio files to the a USB device connected to the LaPlug, click the Refresh button. The LaPlug will index the files and make them available to iTunes. Date and Time ■ Mode: Your LaPlug can either sync date/time with your PC or with a Network Time Protocol server. Make your selection, then click the calendar button to sync.
■ Timezone: Choose your timezone. User ■ ■ ■ Login: Change the username used to access the Dashboard and USB devices (using the Finder for Mac users or Explorer Window for Windows users). Password: Change the password used to access the Dashboard and USB devices. Confirm Password: Retype the password. After you modify any of the above parameters, click the Apply button.
DASHBOARD - SYSTEM This page collects technical information about your LaCie device and controls several features. System Tab Online Update See Update Product Software. Printer You can connect a compatible USB printer to one of the LaPlug's USB ports to make that printer available throughout your network. Note that your printer must be compatible with the CUPS (Common Unix Printing System) standard. Check your printer manufacturer's website to verify. Follow these steps: 1. 2. 3. 4.
Light Uncheck this box to turn off the front LED. Configuration Tab See Update Product Software.
DASHBOARD - FILE BROWSER The Dashboard features an interactive file browser that allows you to manage and transfer files via HTTP. Access the File Browser by clicking its icon in the upper right-hand corner of the Dashboard. The File Browser allows you to transfer, copy, and delete files, as well as view photos in thumbnails and even stream multimedia content such as mp3 or view photos.
■ Music: Click the play button in the Details panel. ■ TXT files: Click the Edit button in the toolbar.
ADVANCED ACCESSIBILITY FEATURES This chapter will describe your LaCie product's advanced accessibility features such as remote access, creating shortcuts to your USB devices on the network, and multimedia streaming. REMOTE ACCESS You can access files stored on the USB devices connected to your LaPlug when you are away from home. You can download or upload files from any computer connected to the Internet, or manage your LaPlug. LaCie has created a screencast that demonstrates this process.
5. PC users: The USB device will mount in My Computer/Computer automatically when the computer detects it on the network. Mac users: The USB device volume icon will appear on your desktop and in your Finder automatically when the computer detects it on the network. Create Shortcut Using Operating System If you would like a shortcut to accessing USB devices, follow this procedure. Windows XP, Vista, and Windows 7 Users 1. From an Explorer window in Windows XP, select Tools> Map Network Drive.
2. Browse to and select the device you wish to auto mount. 3. Windows will offer the option to mount the device each time you log on to the computer. 4. Repeat steps 1-3 for other devices. Mac Users 1. Open a new Finder window. On the left of the window, navigate to Shared > LaPlug > [device name]. If prompted, type in your username and password and click Connect. 2. Repeat step 1 for each device. 3. To mount the device automatically each time you log on to you computer: 1.
2. Click on the “i” sign to add a new item to the list and browse for the device. Please note that the devices must be mounted in order to add them to the list. 3. When you log on to the Mac OS, the device(s) will automatically mount on your desktop (as long as you haven't configured your Finder not to display connected servers on your desktop).
ACCESSING USB DEVICES VIA FTP The FTP protocol is used to transfer files from one computer to another through a local network or over the internet. This protocol allows you to exchange files with your friends or relatives securely, as only people with a user account will have access. The FTP service is disabled by default, so you must enable it in on the Dashboard - Network LAN page.
MEDIA SERVERS Once you have established the network connection between your computer and the LaPlug, you can configure your LaPlug to share files to UPnP/DLNA devices. Follow these steps: 1. Make sure the USB device is properly connected to the LaPlug, and that the LaPlug is connected to your home network as described in Installation. 2. Enable Media Servers on the Dashboard (see Dashboard - General Settings). 3.
Media Servers - iTunes The LaPlug can act as an iTunes Music server, streaming audio files to a computer on the network running iTunes. Once configured, a playlist bearing the machine name of your LaPlug (by default LaPlug) will appear in the Shared category within iTunes, and audio files stored on the LaPlug will be listed in this playlist. Follow these steps: 1. Make sure the USB device is properly connected to the LaPlug, and that the LaPlug is connected to your home network as described in Installation.
5. In the dialogue window, click Add, select LaPlug (if you haven't changed the machine name) under the Network section, and click Include Folder. 6. WMP will begin indexing the media files. Once completed, they will appear in the WMP library.
USING BACKUP SOFTWARE Your LaPlug is compatible with Time Machine, Windows Backup and Restore, and Genie Time Line. A USB hard drive connected to the LaPlug can be set as a backup target for these software. Note that you will achieve much better results with backup software if you connect the LaPlug to your network via Ethernet instead of Wi-Fi.
UPDATE PRODUCT SOFTWARE LaCie may improve your LaPlug's software or add new features over time. See below for updating information. Note that there are two ways of checking for new product software, from the Dashboard or from the LaCie website. Note also that the update procedure will not erase files saved to attached USB hard drives, but it will reset settings to the factory defaults.
INSTALL PRODUCT SOFTWARE 1. Save the file you downloaded from the LaCie website onto a USB key or hard drive. Make sure it is saved to the root level of the drive, ie not inside a folder (Mac users, see screenshot for example). 2. 3. 4. 5. 6. Make sure the LaPlug is turned off, then connect the USB key or hard drive to the LaPlug. Press and hold the power button for 10 seconds. When the LED turns red, release the power button.
RESTORE DEFAULT CONFIGURATION This process will revert the LaPlug to its factory settings but will not change the product software version. Caution: Resetting the product will erase all Dashboard data such as network configuration, machine name, and other user-generated settings. It will not change the product software version or erase files saved to attached USB hard drives. 1. Launch the Dashboard as described in Administer the LaPlug and navigate to the System page. 2. Click the System tab. 3.
GETTING HELP If you are having problems with your LaCie product, consult the table below for a list of available resources. Order Source Description Location 1 Quick Install Guide Concise steps to follow for getting your product up and running Printed and included in the product box, or download PDF from the product page 2 Support Pages Includes interactive troubleshooting topics www.lacie.
TROUBLESHOOTING TOPICS Note: Interactive troubleshooting, a highly effective way to resolve problems with your product, is available from www.lacie.com/support/. Select your product, then click the “Troubleshooting” tab. Troubleshooting the Network Connection I connected a USB drive to the USB device port, but the drive does not appear on the network and is not listed in LaCie Network Assistant. Q: Is the USB drive formatted? A: USB devices must be formatted in order to be recognized by the LaPlug.
Dashboard > Network LAN. LaCie Network Assistant is not working as described in this manual. Q: Are you using an obsolete version of LaCie Network Assistant? A: Install the latest version of LNA (see here) to ensure all features work correctly. I've noticed a delay in accessing the shares. Q: Are you transferring multiple files simultaneously? A: Access to a share can slow down during simultaneous file transfers.
A: Select Preferences > Sharing > Look for shared libraries. Some files stored on the LaPlug appear on my Xbox/PS3, but some do not. Problem with file type compatibility? A: Xbox and PS3 have certain file type restrictions. Click here for the PS3 list and here for the Xbox list.
PRECAUTIONS Caution: It is essential that you use only the power supply that shipped with your product, since it is a shielded-type power cord that meets FCC emission limits as well as to prevent interference to the nearby radio and television reception. Caution: Modifications not authorized by the manufacturer may void the user's authority to operate this device. Important info: Do not stack objects on top of the product, as they may interfere with the WiFi antenna.
■ ■ ■ ■ ■ ■ ■ ■ product near a source of heat or exposing it to sunlight (even through a window). Inversely, placing your LaCie product in an environment that is too cold may damage the unit. Rated cooling for altitudes up to 2000 meters. If your product features a power cable, always unplug it from the electrical outlet if there is a risk of lightning or if it will be unused for an extended period of time. Otherwise, there is an increased risk of electrical shock, short-circuiting or fire.
WARRANTY INFORMATION LaCie offers first-rate service and support through our generous three-tiered warranty policy. Our 1-, 2- and 3-year policies include comprehensive, complimentary web-based resources, expert in-house technical support, and worldwide repair and/or replacement coverage. To benefit from this warranty, please contact LaCie Support at www.lacie.com/us/support/index.htm where you can find online support and contact information.
the “LaCie” trademark, trade name, or logo affixed to them. The Limited Warranty does not apply to any non-LaCie hardware products or any software, even if packaged or sold with LaCie hardware. Manufacturers, suppliers, or publishers, other than LaCie, may provide their own warranties to the end user purchaser, but LaCie, in so far as permitted by law, provides their products “as is”.
purchased separately online within 30 days of the purchase date of your LaCie product and you will be asked to provide us with your proof of purchase. The Advance Care Option does not extend the original warranty period. Under this warranty, LaCie will swap out a product without it needing to be returned first for minimal interruption of your workflow. LaCie will replace part of the product or all of it, depending on our screening process. You might receive a reconditioned product in non-retail packaging.
LEGAL INFO COPYRIGHTS Copyright © 2011 LaCie. All rights reserved. No part of this publication may be reproduced, stored in a retrieval system, or transmitted in any form or by any means, electronic, mechanical, photocopying, recording or otherwise, without the prior written consent of LaCie. CHANGES The material in this document is for information only and subject to change without notice.
WEE This symbol on the product or on its packaging indicates that this product must not be disposed of with your other household waste. Instead, it is your responsibility to dispose of your waste equipment by handing it over to a designed collection point for the recycling of waste electrical and electronic equipment.
MANUFACTURER'S DECLARATION FOR CE CERTIFICATION We, LaCie, solemnly declare that, under our sole responsibility, this product is in compliance with the essential requirements and other relevant provisions of the European directives 1999/5/EC (R&TTE), 2004/108/EC (EMC), and 2006/95/EC (Safety). The product fulfills the standards and/or documents below: EN301489-1 v1.8.1 (2008 – 04) EN301489-17 v2.1.1 (2009 – 05) EN300328 v1.7.
GLOSSARY 802.11b/g/n - The number 802.11 is the IEEE (Institute of Electrical and Electronics Engineers) term for the wireless signal on a land area network (WLAN). The letters that follow indicate the levels of strength. The following lists the maximum throughputs for b and g: ■ ■ b = 11 Mb/s g = 54 Mb/s n is the most recent protocol: ■ n = well over 50 Mb/s AFP (Apple Filing Protocol) - Similar to SMB/CIFS and NFS, AFP is a protocol used for requests over a network.
Frame - A frame comprises all the data that is sent between network points, including the addressing and network protocol information. FTP (File Transfer Protocol) - A protocol used to transfer and exchange files over networks that use TCP/IP. With FTP, one person can copy files into a folder within an FTP server for others to access. Permissions are generally set so that anyone seeking to access the files must enter a username and password.
computer that runs iTunes. iTunes™ Scan Interval - Periodic scans of the shared music libraries for updates. For example, a LaCie network device automatically performs an iTunes once every 24 hours. LAN (Local Area Network) - A network within a small or limited geography, such as an office, a school, or a home. MAC Address (Media Access Control) - A unique identifier assigned by the manufacturer of a computer's network interface card.
common example is a web server that acts as the portal for a company's traffic to the Internet. Each client has the server IP address listed as the proxy server in their network settings in order to access the Internet or use email. Remote Access - Accessing data or managing a server or workstation from a separate system or network. The remote access feature on your LaCie product includes the creation of a hostname (essentially, a unique web address name, such as www.lacieNAS.dyndns.
WEP Key - The security code for a Wi-Fi access point using WEP. It is a series of hexadecimal digits (0-9 and A-F). WEP Key ID - WEP encryption allows four keys. The user and the wireless access point start with the base WEP Key, then add one of the four WEP Key IDs to extend the characters and strengthen security. WPA (Wi-Fi Protected Access) - A slightly stronger wireless security protocol than WEP. WPA2 (Wi-Fi Protected Access 2) - Higher level of wireless security than WPA.

