
User Manual


User’s Guide Chapter 3 – Quick Setup
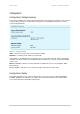
Back – click return to the previous wizard page.
Next – click to continue the access point setup process.
Cancel – click to cancel the access point setup process.
To continue the setup wizard click the Next button and the new Administrator Password Setup
page will appear.
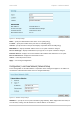
More about WEP settings see the respective chapter: Configuration | Security |
Wireless Security | Wired Equivalent Privacy (WEP)
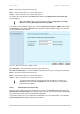
If you want to choose WPA encryption, just select the Wi-Fi Protected Access (WPA) radio button in
the Security page and click the Next button to configure the WPA encryption settings. You can now
specify the WPA password phrase:
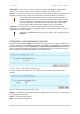
Figure 17 – Wi-Fi Protected Access (WPA) Settings
Pre-shared Key – specify WPA pre-shared key [8-63 characters].
Re-enter Pre-shared Key – re-enter the WPA pre-shared key to verify its accuracy [8-63 character].
Back – click return to the previous
wizard page.
Next – click to continue the access point setup process.
Cancel – click to cancel the access point setup process.
To configure WPA without pre-shared key but with dynamic key exchange via
RADIUS refer to the chapter Configuration | Security | Wireless Security | Wi-Fi
Protected Access (WPA)
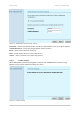
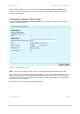
Step 6 Administrator Password Setup
After the security settings have been configured successfully click the Next button and the final step
Administrator Password Setup will be displayed. Here you can choose and modify the administrator
password to protect your AP from unauthorized configuration.
If you want to protect your access point from unauthorized access and configuration, select the Use
password protection checkbox and specify a password:
Gemtek Systems Page 31