
User Manual


Cha
p
te
r
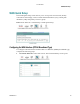
5 Home Network Confi
g
uration
104 4030765 Rev 01
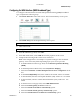
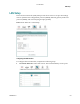
2 Click LAN Setup. The Local Area Network (LAN) setup screen opens.
3 In the IP Address field, enter the IP address for the residential gateway.
4 In the Subnet Mask field, enter the subnet mask for the residential gateway.
5 Do you want to enable UPnP?
If yes, check the Enable UPnP check box.
If no, uncheck the Enable UPnP check box.
6 Do you want to Enable the DHCP server?
If yes, select Enable DHCP Server, and go to step 7.
If no, select Disable DHCP Server, and go to step 8.
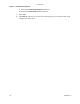
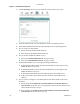
7 Under Enable DHCP server, enter the following information:
a In the Start IP Address field, enter the first IP address in the range for the
DHCP IP address lease pool.
b In the End IP Address field, enter the last IP address in the range for the
DHCP IP address lease pool.
c In the Subnet Mask field, enter the subnet mask for the DCHP server.
d In the Leased Time (hour) field, enter the duration of the DHCP lease
address.
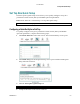
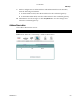
8 Do you want to configure a second IP address and subnet mask for the LAN
interface?
If yes, check the Configure the second IP Address and Subnet Mask for
LAN interface check box. The screen populates with another IP address and
subnet mask field. Go to step 9.
If no, uncheck the Configure the second IP Address and Subnet Mask for
LAN interface check box. Go to step 10.
3-6-2009 Draft