WX-5803 User’s Guide 54Mbps/11Mbps Wireless ADSL Router
Regulatory Information FCC Statement FCC Part 68 This equipment complies with Part 68 of FCC Rules. On the bass unit of this equipment is a label that contains, among other information, the FCC Registration Number and Ringer Equivalence Number (REN) for this equipment. IF REQUESTED, THIS INFORMATION MUST BE GIVEN TO THE TELEPHONE COMPANY.
COMPANY: Gemtech Wireless Inc. ADDRESS: 44790 S. GRIMMER BLVD., SUITE 100, FREMONT, CA 94538 turning the equipment off and on, the user is encouraged to try to correct the interference by one of the following measures: TEL NO: 949-357-3207 Registration Number: US: GEMDL02BWX5803 Equipment Code: DL Ringer Equivalence: 0.2B THIS PRODUCT COMPLIES WITH 47CFR PART 68. THIS PRODUCT HAS BEEN CERTIFIED BY A TCB.
FCC Radiation Exposure Statement This equipment complies with FCC radiation exposure limits set forth for an uncontrolled environment. This equipment should be installed and operated with minimum distance 20cm between the radiator & your body. This transmitter must not be co-located or operating in conjunction with any other antenna or transmitter.
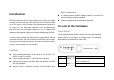
EAP-TLS framework IP sharing feature allows multiple stations to access the internet using a single broadband System configuration and firmware upgrades Introduction WX-5803 Wireless ADSL Router allows you to share the single account of Internet Access. With build-in NAT, this Router allows up to 253 users on the Ethernet LAN simultaneously and up to 16 users on the 802.11g/b Wireless LAN simultaneously.
Connection PC. - Blinking – Data is being transferred over the USB connection. 1, 2, 3, 4 LAN Steady on when there is a link connecting Connection to the unit. Link DSL Blinking – Data is being transferred. Connector Description - Off - ADSL link is not connected. ADSL Connect one end of the RJ-11 telephone cord to ADSL port and connect the other end to the ADSL line outlet that your ISP has installed. LAN 1-4 Accept a RJ-45 Ethernet cable for connecting up to 4 PCs.
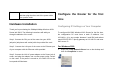
Power Connect the power adapter to this Power port, and then plug the other end of the power cable into a power outlet. Hardware Installation Thank you for purchasing the 54Mbps/11Mbps Wireless ADSL Router WX-5803. The following instructions will walk you through installation of the router. Step 1. Connect the DSL port of the router into your ADSL jackpoint (telephone wall socket) with the provided line cord. Step 2.
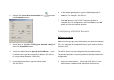
2. Double-click Local Area Connection icon click Properties button. 6. In the default gateway box, type the default gateway IP address. For example, 192.168.1.1. 7. Click OK button in the TCP/IP Properties window to complete the PC configuration, and click Close or the OK button to close the Network window. and then Configuring with Web Browser Before you begin 3. Scroll down to highlight TCP/IP (your network card) and then click Properties button.
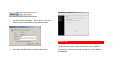
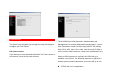
2. A Login window will appear. Enter admin in the User Name field and enter admin in the Password field. I. Device Info 3. After login, WX-5803 Web UI screen will appear. The Device Info page contains information of the software version of your device and some settings, such as IP Address and gateway.
II. Quick Setup The Quick Setup will guide you through the steps necessary to configure your DSL Router. DSL Auto-connect If you want your router automatically detect PVC and connect to the network, check the box Auto-connect. The WX-5803 has OAM (Operation, Administration and Management) for network administration and support. It scans PVC (Permanent Virtual Circuits) using OAM F5 cell starting from 0/32 to 0/60, then 1/32 to 1/60, until the last PVC 8/60 or until it receives OAM response.
PPPoA with VC-MUX encapsulation PPPoA with LLC encapsulation Setup DSL Connection Manually If the ISP doesn't support the Auto-connect, you have to setup the DSL connection manually. If one fails, the router will try the next. If all these connections fail, it will try next PVC. If the responding PVC is not PPPoE or PPPoA, it will choose the first responding PVC and run in Bridging connection type with LLC encapsulation.
SSID is a network name that identifies the wireless devices in the network. The default value is WX5803. All workstations and access points must use the same SSID to be able to communicate with one another. The SSID is a 32-character field, and the value is case sensitive. Close your Web UI window and wait for about 2 minutes before reopening your web browser. Click Next button. The WAN Setup – Summary page will appear. It displays a summary of all WAN setting profiles.
III. Advanced Setup (Virtual Channel Identifier). Consult your ISP to get the numbers. The valid range for the VPI number is from 0 to 255 (The default 1. Click the Advanced Setup tab on the left frame. value is 0.). The valid range for the VCI number is from 32 to 65535 (The default value is 35). 2. Click the WAN tab on the left frame. A WAN Setup page will appear on the right frame. Click Add button.
which way is adopted. Check the radio button of your connection type. 5. button. Scroll down to select the appropriate Encapsulation Type. WX-5803 ADSL router supports the following five network operating modes over an ATM PVC WAN interface: PPP over ATM (PPPoA) PPP over Ethernet (PPPoE) MAC Encapsulated Routing (MER) IP over ATM (IPoA) Bridging 2. The steps to configure PPP over ATM (PPPoA) are similar to PPPoE. PPP over Ethernet (PPPoE) 1.
Allows only one PC on the LAN The public IP address assigned by the remote using the PPP/IPCP protocol is actually not used on the WAN PPP interface. Instead, it is forwarded to the PC’s LAN interface through DHCP. Only one PC on the LAN can be connected to the remote since the DHCP server within the ADSL router has only a single IP address to assign to a LAN device. NAPT and firewall are disabled when this option is selected.
want to enable WAN Service. Click Next. 6. The WAN Setup – Summary page displays a summary of all WAN setting profiles. Click Save button to save all the settings. 7. The WAN Setup page will appear. Click Save/Reboot button. The router will reboot automatically with the new settings in effect.
8. Close your Web UI window and wait for about 2 minutes before reopening your web browser. IP over ATM (IPoA) 1. Select the IP over ATM (IPoA) radio button and scroll down to select the appropriate Encapsulation Mode. There are two encapsulation types available: LLC/Snap-Routing and VC/MUX. Then click Next button.
2. DHCP is not supported over IpoA. Enter your WAN IP address, WAN Subnet Mask, gateway IP address and DNS server IP address provided by your ISP to configure the WAN IP settings. Then click Next button. 3. The Network Address Translation Settings page will appear. If you want to enable NAT function, check the box Enable NAT. If NAT is enabled, it will display a NAT submenu on the left panel after reboot. NAT occurs when multiple IP addresses on a private LAN are converted to one public address.
provided by the ISP. The user may have many private addresses masked by the single address provided by the ISP. 4. If you want to enable Firewall function, check the box Enable Firewall. If Firewall is enabled, it will display a Firewall submenu on the left panel after reboot. Firewall will rejects any unsolicited data from the Internet to access the computer on your LAN. Basically, if you do not request data, the data will not be allowed by the firewall to pass. 5. 6.
Bridging 1. Select the Bridging radio button and scroll down to select the appropriate Encapsulation Mode. There are two encapsulation types available: LLC/Snap-Bridging and VC/MUX. Then click Next button. 2. Check the box Enable Bridge Service. Enter a desired name in Service Name field. It is used to identify the service. Then click Next button.
The LAN IP in bridge operating mode is needed for local users to manage the ADSL router. And no IP address is needed for the WAN in bridge mode. 3. The WAN Setup – Summary page displays a summary of all WAN setting profiles. Click Save button to save all the settings. 4. The WAN Setup page will appear. Click Save/Reboot button. The router will reboot automatically with the new settings in effect.
IV. Configure Wireless Connectivity Basic 5. 1. Click the Wireless tab on the left frame. Click the Basic tab. A Wireless - Basic page will appear on the right frame. Check the box Enable Wireless. 2. Check the box Hide Access Point and then your router will not be "ping"ed by any user on the Internet. This feature is helpful if you do not want to let other Internet users to check the status of your router. However, the station will not be able to find your router.
3. Enter a desired name in SSID field. 4. Click Apply button. Security wired networks and wireless 802.11 networks. It provides a framework for centralized user identification and authentication, and a key distribution management method. Clients authorized by RADIUS servers can access this WX-5803. To use 802.1X, enter the required values on RADIUS Server IP Address, RADIUS Port and RADIUS Key fields. The WX-5803 provides advanced mechanism for wireless security.
To use WPA authentication, enter the required values on WPA Group Rekey Interval, RADIUS Server IP Address, RADIUS Port and RADIUS Key fields. WPA Group Rekey Interval is used to specify the frequency of encryption key rotations. The lower the number, the faster your encryption key will rotate, however, setting this number too low may cause your wireless network to slow down. In WPA, you can select TKIP, or AES or TKIP+AES as data encryption method.
gain access to the network. Note that the Key format must also match the setting for the wireless clients. WPA Group Rekey Interval WPA Group Rekey Interval is used to specify the frequency of encryption key rotations. protect wireless communications. WEP provides a way of creating an encrypted key that is shared between a wireless client and the router. This key encrypts data before it is transmitted. WEP can be implemented with 64-bit or 128-bit key. 128-bit key is relatively securer than 64-bit key. 1.
4. 5. 6. 7. It is possible to enter up to 4 different WEP Keys. The WEP key must match between two parties for secure communications. Enter four different keys in the Network Key fields provided. If you choose 64-bit encryption, enter 5 ASCII characters (or 10 hexadecimal digits). If you choose 128-bit encryption, enter a 13-character (or 26 hexadecimal digits) WEP key. Select only one key out of the four provided in the Current Network Key drop-down list. Click Apply button.
The steps below show how to find the MAC address of the computer in Windows 2000 and XP. 1. Click the Start button, and then click Run. 2. In the Open field, type the following text: cmd 3. Click the OK button. 4. At the command prompt, type the following text to obtain the Physical Address (MAC address): ipconfig/all 5. Click Apply button. The page will return to the Wireless – MAC Filter page.