������ ������������ Gemini GLS User Manual User Manual.
Gemini GLS (Global Location Service) About Device The simple, yet sporty and sleek Gemini GLS is a personal and portable tracking device unlike anything else. Always know where your child may be. Watch over loved ones who may need you. Track your company’s assets wherever they go. With just one push of a button, you can know within seconds the exact location your Gemini device.
Contents Packing List . . . . . . . . . . . . . . . . . . . . . . . . . . . . . . . . . . . . . . . . . . . . . . . . . . . . . . . . ii Description of Unit . . . . . . . . . . . . . . . . . . . . . . . . . . . . . . . . . . . . . . . . . . . . . . . . 1 Front View . . . . . . . . . . . . . . . . . . . . . . . . . . . . . . . . . . . . . . . . . . . . . . . . . . . . . . . . . 1 Rear View . . . . . . . . . . . . . . . . . . . . . . . . . . . . . . . . . . . . . . . . . . . . . . . . . . . . . . . . . .
Packing List Gemini GLS Unit Home Charger Armband Car Charger Desktop Battery Charger � ��� ���� ���������������� ����� ��� ����� ������������� ��� ����� ���� ������ ����� �������������� ������ �� ������ ������ ����� ������ ������ �������� ������ ������ ������ ������� ������ ������ ������ ������� � ��� ��� ��� ��� ������ ������ ������ ������� ������ ������ ������ ������ ������ ������� ������ ������ ������ ������ ��� ������ ������ ������ ������ �� ��� ������ ���� ������ ������ ��� ��� ������� ������ ��
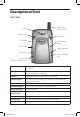
Description of Unit Front View ������� �������������� ���������� �������������� ������������� ������������ ������������� ������� ������������ ��������������� ������������ �������������� ����� ������������ ����������������������� Signal Light LED light information for user (See “Description of Lights” on page 4 for details) SOS Button Reports to the control center by sending a text message when pressed, signaling an emergency.
Description of Unit (continued) Rear View ������������� ����������� ����������������������������������������� Armband Holder For attaching armband to unit, can be attached if desired Battery Cover Removes easily to change the battery Strap Mount For attaching a strap or necklace to the unit Bottom View ������������ ������������������ On/Off Switch To turn power On/Off Battery Cover Lock To lock the battery cover 2 User Manual.
Description of Unit (continued) Left View ���������� ������������ ������������� ����������������� ��������������������������������������� Right View ������������������ ��������������������������������������� Microphone To speak into for voice calls Charger Jack For charging the battery of the main unit Earphone Jack For hands free function Music Ring Output Music ring for incoming call Volume/Test To adjust the volume during phone calls.
Description of Lights ������������ �������������� LIGHT Signal Light LED COLOR AND ACTION DESCRIPTION Blue Light stays on for approximately 2 minutes Unit is looking for a GPS signal Blue Light blinks for approximately 2 minutes Unit has received a valid GPS signal Green light blinks 4 times Unit has received a valid GSM (cellular) signal. Blue and Green Lights blink Normal stand-by mode, ready for use.
Buttons: Signal Light & Sounds ������� ����������� �������������� ������������ ���������� ������������� ������� ������������ ��������������� ������������ �������������� ����� Note ������������ ������������������������ • Geofence and SOS Buttons MUST be held for at least 4 seconds, other buttons press for 2 seconds.
Battery Tips Battery life depends on the network, signal strength, temperature, features, and accessories in use. For maximum performance, please note the following guidelines: • New batteries or batteries stored for a long time may take more time to charge • When charging and storing your battery, keep it near room temperature • Never expose batteries to temperature below –10°C (14°F) or above 45°C (113°F). Warning • It is normal for batteries to gradually require longer charging times.
Getting Started Note Charging the Battery • For the initial charging of the battery, it is recommended that the unit remain in the “Off ” postition. 1. Insert the Home Charger plug into “Charger Jack” on your Gemini unit (See “Description of Unit” on page 3 for location of jack). 2. Plug the other end of the home charger into an electrical outlet. 3. Signal Light is orange while charging. Turn the Gemini On and Off 1. Locate the On/Off switch on the Gemini unit. 2.
Speed Dial Buttons The Speed Dial Buttons Have Three Functions: 1. The person carrying the unit may place a voice call to the numbers assigned to the speed dial buttons. (See Example 1: Placing a Voice Call, page 9). Note 2. Mobile numbers assigned to these buttons are able to request location information from the unit. The Gemini recognizes these numbers and automatically hangs up after one ring. The location of the Gemini will then be sent to the phone that requested the location.
Example 1: Placing a Voice Call By simply pressing the appropriate Speed Dial Button, the person carrying the unit may place a voice call only to the numbers assigned to these Speed Dial Buttons. ���������� ������������ ���������� ������������ ����������������������� In the example above, the unit is able to place a voice call to Mom’s Cell, Dad’s Cell, or Gemini Customer Service. 9 User Manual.
Example 2: How to Request a Position Using the Internet Please visit www.geminitracking.com and log into your account. Once logged in, click on “Locate Unit”, select the unit you would like to request a position for and then click “Get Location”. Using a Telephone Only numbers stored in the Speed Dial Buttons may request a position. Mom’s Cell requests a position of the Gemini by calling the unit.
SOS Button The SOS Button should ONLY be used for an emergency. By pressing and holding down the SOS Button for 4 seconds, a message is sent including the location to the contact you chose to be notified. ���������� ������������ ���������� ������������ Note In the example above, pressing the SOS Button will send a message to Mom’s Cell and Dad’s Cell with a message that indicates an SOS alert with the location of the unit. • SOS Button MUST be held for at least 4 seconds. 11 User Manual.
Geofence (Safety Zone) Button Internet Setup For more information and to program the Geofence (also called Safety Zone), please visit www.geminitracking.com. Once you are logged into your account on the Internet, click on “Set Boundaries” and follow the instructions. If the unit goes outside of this highlighted area a text message is sent to the speed dial numbers that you set to be alerted.
Receiving/Testing Signals Receiving GPS & GSM (cellular) Signals Every time you turn your unit on, it immediately starts searching for a GPS signal, then a GSM (cellular) signal. The following light sequence indicates which signals have been received: 1. Signal light stays solid blue for approximately 2 minutes while searching for a GPS signal. 2. Signal light blinks blue to indicate a valid GPS signal has been received. 3. Signal light blinks green 4 times to indicate a valid GSM (cellular) signal. 4.
Quick Reference Guide FUNCTIONS OPERATIONS Sending an SOS Press and hold the SOS Button for a minimum of 4 seconds. The Signal light will be green while the unit reports the emergency to the control panel and to the speed dial numbers that you set. Location Request— from a phone Mobile phone numbers that have been preset and stored in Speed Dial Buttons 1 and 2 can call and request location information from the unit. The Gemini recognizes these numbers and automatically hangs up after one ring.
Specifications ITEM SPECIFICATION Dimension L:73mm W:45mm H:20mm Weight 170 g ± 5 g Frequencies 900/1800/1900MHz 850/1800/1900MHz Storage temperature Between –10°C and + 55°C Battery capacity 850 mA Power consumption Standby mode: <45mA, GSM Operating: < 250mA 15 User Manual.
Helpful Hints • For faster charging, turn your unit Off while charging or remove the battery and charge it directly using your desktop charger. (Note: Unit will not operate while in Off position or with the battery removed.) • Signal light will always be red when the unit is in the On position while charging, even when the battery is fully charged.
Troubleshooting PROBLEM Buttons not working SOLUTIONS Make sure battery is properly inserted. Make sure the unit is charged. Unable to find GPS signal Make sure unit is in an unobstructed area. For best results turn unit Off, go outside, and turn unit On. Unable to find GSM signal Make sure cellular service is available where you are located. Speed Dial 1 & 2 not working (Speed Dial 3 is reserved for Gemini Customer Service) Make sure you have properly set and stored valid and working phone numbers.
Limited Warranty Gemini warrants to the original purchaser only that the Product will be free from defects in material and workmanship for a period of one (1) year from the date of original purchase.
the unit back to you upon completion of repairs. We may use functionally equivalent reconditioned/refurbished/pre-owned or new products or parts. To take advantage of this Limited Warranty you will be required to either 1) return the below warranty registration card within 30 days of purchase or 2) supply the original packing slip or dated bill of sale (invoice) when you return the product for warranty repairs.
������ ������������ 20 User Manual.indd 20 All rights reserved. Unauthorized duplication of this manual is prohibited.