® Composite To HDMI Scaler GTV-COMPSVID-2-HDMIS User Manual www.gefentv.
ASKING FOR ASSISTANCE Technical Support: Telephone Fax (818) 772-9100 (800) 545-6900 (818) 772-9120 Technical Support Hours: 8:00 AM to 5:00 PM Monday thru Friday PST. Write To: Gefen, LLC c/o Customer Service 20600 Nordhoff St Chatsworth, CA 91311 www.gefentv.com support@gefentv.com Notice Gefen, LLC reserves the right to make changes in the hardware, packaging and any accompanying documentation without prior written notice.
CONTENTS 1 Introduction 2 Operation Notes 3 Features 4 Panel Layout 5 Panel Description 6 Connecting And Operating The Composite & S-Video To Hdmi Scaler 7 Configuring The Composite & S-Video To Hdmi Scaler 12 Specifications 13 Warranty
INTRODUCTION Congratulations on your purchase of the Composite & S-Video To HDMI Scaler. Your complete satisfaction is very important to us. Gefen TV Gefen TV is a unique product line catering to the growing needs for innovative home theater solutions. We specialize in total integration for your home theater, while also focusing on going above and beyond customer expectations to ensure you get the most from your hardware. We invite you to explore our distinct product line and hope you find your solutions.
OPERATION NOTES READ THESE NOTES BEFORE INSTALLING OR OPERATING THE COMPOSITE & S-VIDEO TO HDMI SCALER • The Composite & S-video to HDMI Scaler will cross convert between some digital and audio formats. All audio outputs (HDMI, digital TOSLINK, and analog stereo mini-jack) will be active. The Composite & S-video to HDMI Scaler will not, however, down-mix multi-channel audio formats to 2 channel analog stereo. Please see the chart on page 6 for more information.
FEATURES Features • Inputs S-Video or Composite Video at 480i or 576i resolutions • Outputs HDMI video at resolutions of up to 1080p • Input resolution is automatically detected while the output resolution and refresh rate can be selected via the on-screen display (OSD) menu system and front panel push-buttons • 48MB frame buffer for frame rate conversion • Scales Composite Video and S-Video to HDMI with embedded audio • Supports video output resolutions for computer equipment at up to 1920x1200
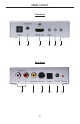
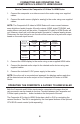
PANEL LAYOUT Front Panel 1 2 3 4 5 6 Back Panel 7 8 9 4 10 11 12
PANEL DESCRIPTION 1 TOSLINK Audio Output Digital TOSLINK audio output. This port is constantly active. It will output 2 channel PCM, Dolby Digital, and DTS formats. Output format is dependant on the chosen input format which can be selected through the on-screen GUI. 2 R/L Analog Audio Stereo analog mini-jack output for analog audio. It will only output a stereo analog signal when the selected input is either from digital or analog stereo source.
CONNECTING AND OPERATING THE COMPOSITE & S-VIDEO TO HDMI SCALER How to Connect the Composite & S-Video To HDMI Scaler 1. Connect the composite or s-video source to the scaler using user supplied cables. 2. Connect the audio source (digital or analog) to the scaler using user supplied cables. NOTE: The Composite & S-video to HDMI Scaler will cross convert between some digital and audio formats. All audio outputs (HDMI, digital TOSLINK, and analog stereo mini-jack) will be active.
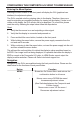
CONFIGURING THE COMPOSITE & S-VIDEO TO HDMI SCALER Entering the Menu System Pressing the Menu button on the front panel will display the GUI (graphical user interface) for adjustment options. The GUI is overlaid onto the outgoing video to the display. Therefore, the source must be outputting a compatible resolution for viewing on the display. If video is not visible on the display, the GUI will also fail to be displayed.
CONFIGURING THE COMPOSITE & S-VIDEO TO HDMI SCALER MAIN MENU The following are the main menu options. Use the - and + buttons to choose your desired subcategory and press Menu to enter it. CONTRAST BRIGHTNESS FINE TUNE COLOR OUTPUT OSD AUDIO INFORMATION CONTRAST Press the - and + buttons to select the CONTRAST option and press the MENU button to select it. Use the - and + buttons to adjust the CONTRAST setting.
CONFIGURING THE COMPOSITE & S-VIDEO TO HDMI SCALER COLOR Press the MENU button to select the COLOR option. There are several subcategories that are available for adjustment. Select the desired option using the - and + buttons and press the MENU button to begin adjustment. Use the - and + buttons to adjust the selected option and press the MENU button when you are finished. The following options are available: RED Use this option to adjust the amount or RED in the video signal.
CONFIGURING THE COMPOSITE & S-VIDEO TO HDMI SCALER OUTPUT Press the - and + buttons to select the OUTPUT option and press the MENU button to select it.. There are several sub-options that are available for selection. Select the desired option using the - and + buttons and press the MENU button to select it and exit.
CONFIGURING THE COMPOSITE & S-VIDEO TO HDMI SCALER FACTORY RESET This option will reset the entire unit to factory settings. Press the MENU button to select the FACTORY RESET option. Press the MENU button once and a confirmation will appear with the word YES. Press the MENU button once more to confirm a FACTORY RESET. INFORMATION Press the MENU button to view information on the current status of the unit. The following categories are displayed: SOURCE This will display the currently selected source.
SPECIFICATIONS Digital Video Amplifier Bandwidth ............................................................ 165 MHz VGA Amplifier Bandwidth ........................................................................... 10 MHz Input DDC Signal ......................................................................... 5 Volts p-p (TTL) S-Video Connector ................................................................................... Mini-DIN Composite Connector ...............................................