
User manual


Page Title
page | 6
Getting Started
Installation
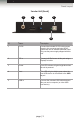
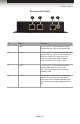
Connecting the DisplayPort KVM Extender over CAT-7
1. Use the included DisplayPort cable to connect the DisplayPort source to the DP In
port on the Sender unit.
2. Connect the Receiver unit to the display using a DisplayPort cable.
3. Use the included USB cable to connect the USB host device to the USB In port
on the Sender unit.
4. Connect up to two USB devices (keyboard, mouse, external drive, etc) to the
USB Out ports on the Receiver unit.
5. Connect two CAT-7 cables between the Sender and Receiver units. Each connector
on the Sender and Receiver unit is identied as Link 1, Link 2, and USB Link.
When connecting the CAT-7 cables, make sure that each CAT-7 cable on the Sender
unit is connected to the corresponding jacks on Receiver unit (e.g. Link 1 → Link 1,
Link 2 → Link 2).
6. Connect a CAT-7 cable between the USB Link jack on the Sender and Receiver unit.
7. Connect the included 5V DC locking power supplies to the Sender and Receiver unit.
Do not overtighten the locking connectors.
8. Connect the AC power cords from each power supply to available electrical outlets.
NOTE: The DisplayPort KVM Extender over CAT-7 will support
resolutions up to 1920 x 1200 (WUXGA) and 1080p Full HD if a
single CAT-7 cable is used. Two CAT-7 cables must be used to
support resolutions up to 2560 x 1600.
If only a single CAT-7 cable will be used, the CAT-7 cable must be
connected between the Link 1 connectors on both the Sender and
Receiver unit.